
NOTE: Parallel tracking changes the way that Web campaigns are tracked with Kochava. If you are using Parallel Tracking, you must be sure to include ko_click_id={msclkid} in your landing page URL/Final URL.
Data Needed Before Beginning Process:
- Valid Bing Paid Search account
Parallel Tracking
Parallel Tracking loads a landing page immediately when a user clicks on an ad without taking the user through the tracking redirect. As the same time, the tracking URL process happens in the background, through the parallel click process, without affecting the user experience.
![]()
![]()
Enabling Parallel Tracking within Bing Paid Search:
- Log in to Microsoft Advertising.
- Navigate to Settings > Account level options.
- Check the Parallel tracking box.
NOTE: Parallel tracking will be enabled for a select set of browsers and ad types to begin with, Microsoft Advertising will resort to sequential tracking for the remaining ad types and browsers.
![]()
![]()
Create a Bing Paid Search Campaign
- Log in to Kochava.
- Select the desired Account and App.
- Select Links > Campaign Manager.
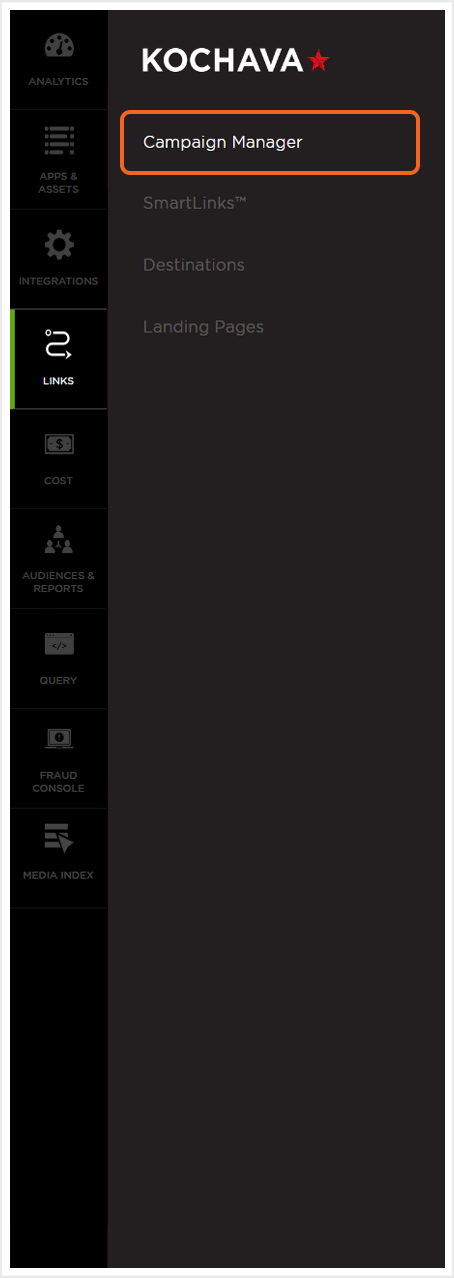
- Click Add a Tracker or Select Segment Tools (⋮) > Add a Tracker.
- Select the Campaign.
- Select the Segment.
- Enter the Tracker Name.
- Select Tracker Type > Acquisition. (default setting)
- Select Media Partner > Bing Paid Search – Web.
- Select an Agency Partner. (optional)
- Insert the website Destination URL.
- Click Save. (if no further trackers need to be created)
- Click Save & Add Another Tracker. (if additional trackers need to be created)
NOTE: In order to streamline the Campaign/Segment/Tracker creation process a feature has been added to allow the creation of campaigns and segments while creating a new tracker. For more information about creating a campaign or segment while adding a new tracker, refer to our Create an Install Campaign support document.
NOTE: When a Tracker is created, Kochava automatically generates a name for the Tracker. We recommend that you replace the Tracker name at this point with a clear name of your choosing.
![]()
![]()
NOTE: After clicking Save or Save & Add Another Tracker, ensure that the Kochava click_url is copied and retained.
Tracking Parameters in Analytics and Reporting
Once the campaign within Kochava and Bing Paid Search has been successfully created, Kochava will begin receiving clicks against the Bing Paid Search Web Traffic Campaigns and will attribute activity from the Web SDK accordingly.
Analytics:
- Log in to Kochava.
- Select the desired Account and App.
- Select Analytics > Event Detail.
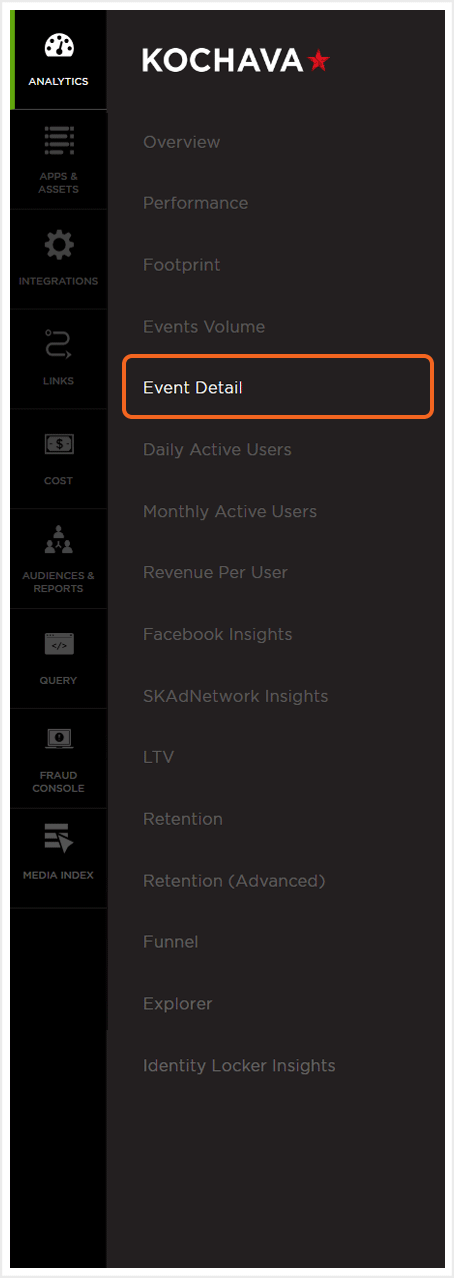
- Click Add a Filter.
- Select Site and/or Creative.
- Select the desired Bing Paid Search site.
NOTE: Within Analytics views, filters can be added for Site and/or Creative or the Split By drop-down menu may also be used to view the Facebook Web Traffic data. For more details about the Analytics, refer to our Analytics Overview support documentation.
![]()
![]()
B. Click “+” to add a site or creative.
Reporting:
- Log in to Kochava.
- Select the desired Account and App.
- Select Audiences & Reports.
- Locate the desired report and Click Customize.
- If Campaign Summary or Network Summary report is selected, Add Grouping Options>site and/or creative. (optional)
NOTE: The site and creative appear in the Click, Install and Event Detail reports by default. For the Campaign Summary and Network Summary reports, adding the parameters may be accomplished under the report Grouping Options.
![]()
![]()
B. For Campaign Summary and Network Summary reports, add parameters to the Grouping Options.
NOTE: Custom Parameters may also be added to a detailed reports. The macro values will be populated in a separate column within the reports. For more information about adding Customer Parameters and additional Reporting functions, refer to our Pulling Reports support documentation.