1. Home
  2. Marketers
  3. Campaign Management
  4. Mixpanel Postback Configuration
  1. Home
  2. Marketers
  3. Mixpanel Postback Configuration

Mixpanel Postback Configuration


The following document defines the process for creating a Mixpanel postback within Kochava. Mixpanel is a mobile analytics company which Kochava can send custom postback data.

Data Needed Before Beginning Process:

  • Mixpanel Token (obtained from the Mixpanel User Interface)

NOTE: The Mixpanel setup process for iOS and Android is similar and therefore this document will cover the setup for both operating systems, with specific differences noted.


Create a Postback Configuration

  1. Log in to Kochava.
  2. Select the desired Account and App.
  3. Select Apps & Assets > Partner Configuration.

Feature Note: To add this menu item to your Favorites Menu, select the “+” sign that appears when you hover over the menu. The Features Menu provides quick access to your most frequently visited areas of the Kochava UI.

  1. Click Add a Configuration.
  2. Select a Network Partner:
    1. Mixpanel – Android
    2. Mixpanel – iOS
  3. Click Save.

NOTE: By default, the Install event is displayed in the configured section of the postback configuration panel. This postback must still have the Mixpanel token entered to postback properly.

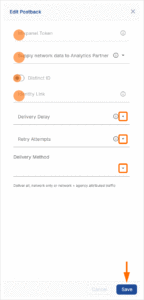
  1. Click Install > 🖉 (Edit).
  2. Enter the Mixpanel Token.
  3. Select Supply Network Data to Analytics Partner.
  4. Select Distinct ID.
  5. Select the Delivery Delay.
  6. Select the Retry Attempts.
  7. Select Deliver Method > All.
  8. Click Save.

NOTE: For more information about custom settings within the postback, refer to Create a Custom Postback.

Updated on January 23, 2025

Was this article helpful?