The Kochava alerting system has been designed to provide an easy way to create and manage data-driven alerts for your app. These alerts are intended to inform you of changes in critical metrics associated with your app. The following document defines the process for creating and editing actions and alerts.
Alerting Interface
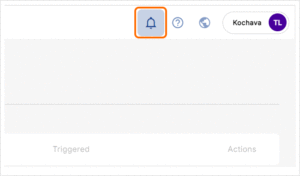
- Log in to Kochava.
- Click on the Alerts Icon.
Adding a New Action
Slack Settings:
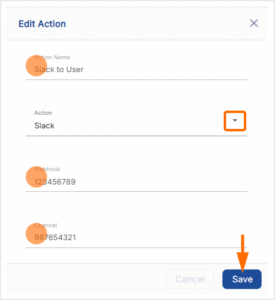
- Enter the Webhook.
Locating/Creating a Slack WebHook —
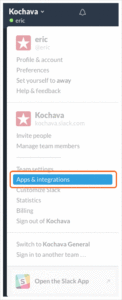
- Log in to Slack.
- Select the Slack drop-down menu > Apps & integrations.
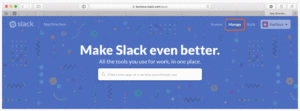
- Click Manage.
- Click Custom Integrations.
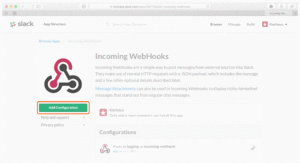
- Click Incoming WebHooks.
- Click Add Configuration.
- If a Channel has not been selected, Select a Channel to send the Slack notification to.
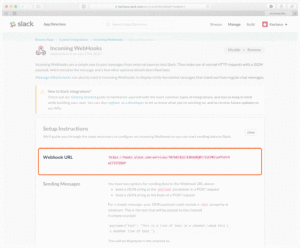
- Copy the WebHook URL and Enter in the Kochava UI.

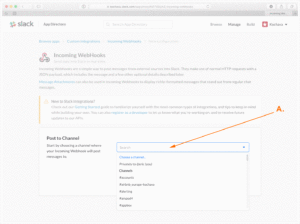
A. Select the group or single user, that the Slack message will be sent to. The @ symbol must be included for the WebHook to be setup properly.
- Enter the Channel.
- Click Save.
Email Settings:
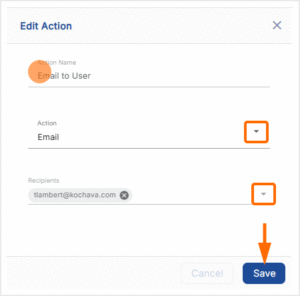
- Enter additional Recipients Email Addresses. (optional)
- Click Save.
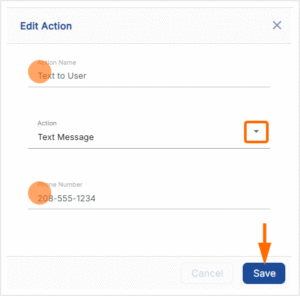
Text Message:
- Enter a Phone Number.
- Click Save.
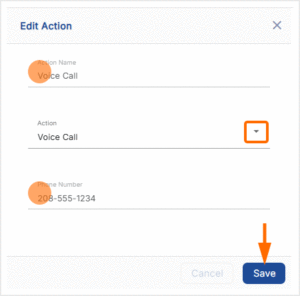
Voice Call:
- Enter a Phone Number.
- Click Save.
Pagerduty Settings:
- Enter the Service Key.
- Click Save.

Editing an Action
- Click the Actions tab.
- Select Action Tools > 🖉 (Edit).
- Adjust any settings as needed.
- Click Save.
Adding a New Alert
Actions provide the means to signal the user that an alert has been triggered.
- Click Add an Alert.
- Enter an unique Alert Name.
- Select an App.
- Select a Severity level:
Options:
- Low
- Medium
- High
- Select an Action Type:
Options:
- Slack to User
- Email to User
- Pagerduty
- Text Message
- Voice Call
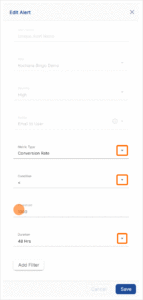
- Select a Metric:
Options:
- Conversion Rate
- Influencers Per Conversion
- MTTI (seconds)
- Revenue Per Device
- Revenue
- Install Volume
- Event Volume
- Click VOlume
- Impression Volume
- Select a Condition:
Options:
- < (less than)
- > (greater than)
- = (equal to)
- <= (less than or equal to)
- >= (greater than or equal to)
- Enter a Threshold value.
- Select a Duration:
Options:
- 1 Hr
- 24 Hrs
- 48 Hrs
- 60 Hrs
- 72 Hrs
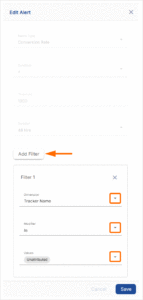
- Click Add a Filter. (optional)
Options:
- Select a Dimension:
- Campaign
- Network
- Tracker
- Select a Modifier:
- In
- Note In
- Select Value(s).
- Click Save.

Organizing Alerts
Alerts can be searched, organized or displayed in multiple ways in order to quickly locate specific alerts.
Sorting Alerts:
Alerts can be sorted in ascending or descending order by any of the available columns including Name, Type, Severity, Last Checked, Triggered and Status.
Filter:
Filters can be added in order to quickly locate a desired Action.
- Click Filter.
- Select the desired filter metric, and the desired option for display.
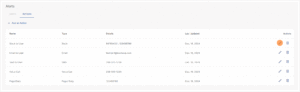
Viewing Alert Details
The My Alerts section displays all of the triggered and non-triggered alerts that have been setup by the user logged-in, and organized by apps. Click on an Action’s expand button to display the Type, Duration, Severity, Action Type, Last Checked and whether the alert has been triggered or not.
- Click on the desired Alert expand button.
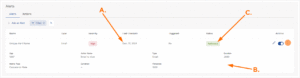
A. The date the alert was checked.
B. The alert settings.
C. Alert Severity.
Editing an Alert
Once alerts have been created, they can be edited to refine or completely change any of the alert settings.
- Locate the desired alert.
- Click Alert Actions > 🖉 (Edit).
- Adjust any settings as needed.
- Click Save.
Deactivating an Alert
At any point after the creation of an alert, the alert may be deactivated.
- Locate the desired alert.
- Click Alert Actions > Deactivate toggle.
Creating a Custom Query Alert
- Write a query that returns a single value under the column alert_metric.
- Save the query in the Kochava Query interface.
- When creating an alert, Select the alert query as the metric.
- Select a threshold and condition that will check against the alert_metric value returned by the query.
Things to Consider when Writing the Query:
- The date range needs to be set dynamically in your query as the duration setting in the alerting UI is ignored.
- Only a single value can be returned or the alert will fail.
- The column name must be alert_metric.
Example:
-- Returns the event revenue from the previous hour.  Set the threshold that will trigger the alert in the UI.
SELECT SUM(event_value) AS alert_metric
FROM events_primary
WHERE date_occurred BETWEEN DATE_ADD(CURRENT_TIMESTAMP(), -1, 'hour') AND CURRENT_TIMESTAMP() -- Set dynamic date range here.
    AND event_name = 'Purchase'; -- Update event name here to reflect your app's revenue event.