The following document defines the process for entering store credentials for the Apple App Store, Google Play Store and Stripe. Additional instructions are provided for locating/creating the needed store credentials which are required to be entered within the Kochava user interface.
Store Credentials User Interface
- Log in to Kochava.
- Select Apps & Assets > All Apps.
- Locate the desired app and click Actions (⋮) > Store Credentials.
Entering App Store Credentials
- Enter the Bundle ID.
- Enter the App Store Connect APP-SPECIFIC SHARED SECRET.
Generating the App Store Connect App-Specific Shared Secret:
- Log in to App Store Connect.
- Select My Apps.
- Click on the desired app.
- Select In-App Purchases > Manage.
- Select App-Specific Shared Secret.
- Generate and Copy the Shared Secret.
- Click Save.
Entering Google Play Credentials
- Enter the Package Name.
- Enter the Service Account Credentials (JSON).
Creating Google Play Store Service Account Credentials:
In order for Kochava to communicate with Google on your behalf, service credentials need to be provided. The following directions provide the steps for creating a Service Account Credential with the Google Developer Project and inserting those credentials within Kochava. The process for creating Google Play Store Credentials is a three part process. First a link needs to be created between a Google Play Developer Account and a Google Developer Project. The second part is creating a Service Account, and the third part grants financial access to Kochava. Each part of the process is described below:
Linking a Google Developer Account:
- Log in to the Google Play Developer Account.
- Click on Settings > Developer account > API access.
- Click Choose a project to link.
- Click I agree for the Terms of Service.
Create a Service Account:
- Click Service accounts > Create new service account.
- Click the link to Go to the Google Cloud Platform.
- Click Service accounts > + CREATE SERVICE ACCOUNT.
- Enter a Service account name.
- Enter a Service account description.
- Click CREATE.
- Under Grant this service account access to project Set the Role to Pub/Sub Admin.
- Click Done.
- Locate the Service Account and Click Actions Tools (⋮) > Create key.
- Select Key Type > JSON.
- Click CREATE.
An Private Key will be downloaded to your computer. This JSON key is what will need to be entered in the Kochava UI.
Grant Financial Access to Kochava:
- Locate the newly created Service account and Click Grant access.
- Check the following permissions:
- View app information and download bulk reports (read-only).
- View financial data, orders, and cancellation survey responses.
- Manage orders and subscriptions.
- Click Invite Userand send the invite.
At this point you will be redirected to the Users and Permissions page where the newly created service account - Click App permissions > Add app and add the desired app.
- Click Apply.
The App Permissions will be displayed, no additional setting need to be selected. - Click Apply.
- Click Save.
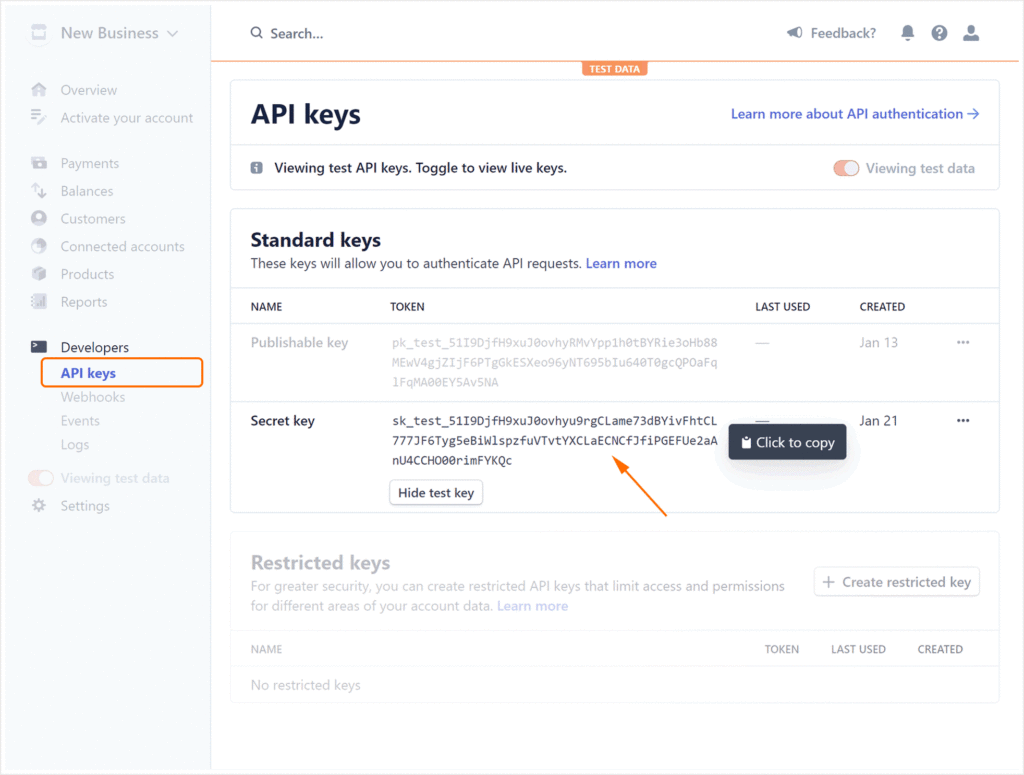
Entering Stripe Credentials
- Enter the Website Domain.
- Enter the Stripe API Key Token.
Locating the Stripe API Key Token:
- Log in to Stripe.
- Click Developers > API keys.
- Click Reveal test key.
- Click on the Secret key.
When the Secret key is clicked, it will be copied.

- Click Save.
