This feature is available only with paid Kochava accounts. Contact us to learn more.
The Fraud Console Account Blocklist page provides visibility to the Site IDs, IP Addresses and Device IDs that have been added to the Local Blocklist. The associated traffic will be added to the Account Blocklist and also will be flagged by Kochava’s Traffic Verifier.
Fraud Console Interface
- Log in to Kochava.
- Select the desired Account.
- Select Fraud Console > Manage Account Blocklist.

Adding Exceptions to the Blocklist
Devices can be added to the Account Blocklist by entering a site ID, device ID or IP address.
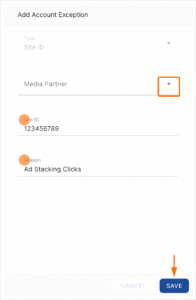
Site ID
- Select Site ID.
- Click + Add.
- Select the Media Partner.
- Enter the Site ID.
- Enter a Reason the site is being added to the Blocklist.
- Click Save.
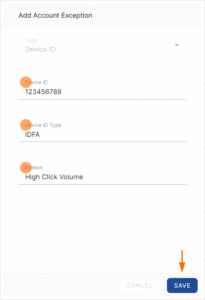
Device ID
- Select Device ID.
- Click + Add.
- Enter the Device ID.
- Enter the Device ID Type.
- Enter a Reason the site is being added to the Blocklist.
- Click Save.
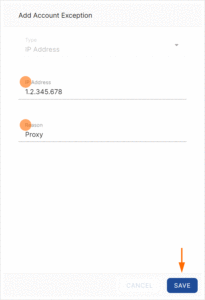
IP Address
- Select IP Address.
- Click + Add.
- Enter the IP Address.
- Enter a Reason the site is being added to the Blocklist.
- Click Save.
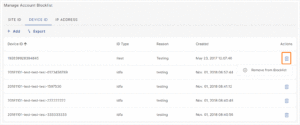
Manage Account Blocklist
Once site IDs, IP addresses or device IDs have been added to the Account Blocklist, blocklisted IDs may be viewed, organized and removed through the Account Blocklist page.
Blocklist Categories:
The sites within the Account Blocklist can be organized by Site ID, Device ID or IP Address, Media Partner, Reason, Created Date and ID Type.
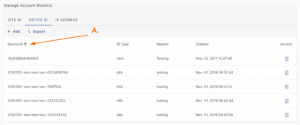
A. Sort Blocklist by category.
Remove from Blocklist
Once a site, device ID or IP address has been added to the Account Blocklist through one of the Fraud Console pages, the site may be removed.
- Locate the desired Site, Device ID or IP Address.
- Click the Trash Can Icon > Remove Site ID from Blocklist.