The following document defines the process for importing data from an external source into Kochava. This allows historical data from other providers to be ingested by Kochava and shown in analytics as well as providing a list of users who have already installed the app in the past for Kochava to deduplicate against.
Data Needed Before Beginning Process:
- A properly formatted CSV File (CSV)
- A valid AWS (Amazon Web Service) account
- S3 Bucket (ARN CSV)
- Role for Cross-Account access (ARN CSV)
Data Preparation
There are two main methods for importing data into Kochava, and each of the methods requires the data to be prepared before the import process can begin. For more information about data preparation, refer to the following methods:
Traffic Import User Interface
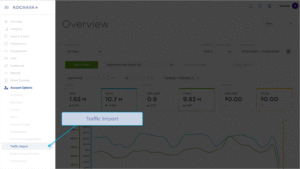
- Log in to Kochava.
- Select the desired Account.
- Select Account Options > Traffic Import.
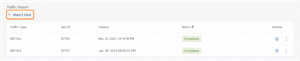
Import New Data
- Click ↑ ↓ Import Data.
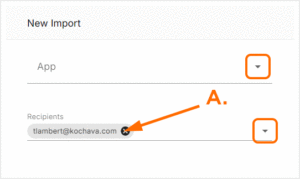
- Select an App.
- Select the desired Recipient(s) Email Address.
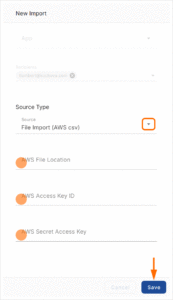
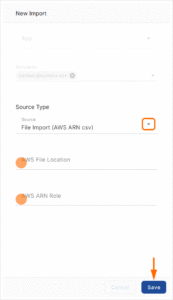
Source Type:
AWS CSV –
- Enter the AWS File Location.
- Navigate to S3 bucket.
- Navigate to file.
- Select file.
- Click Properties.
- Cut and Paste link.
Example: https://s3-us-west-2.amazonaws.com/kochava-traffic-import/Install/Gilt+iOS+iPad.csv”>https://s3-us-west-2.amazonaws.com/kochava-traffic-import/Install/Gilt+iOS+iPad.csv
- Enter the AWS Access Key ID and AWS Secret Access Key :
- Navigate to My Security Credentials.
- Open the Access Keys section.
- Cut and Paste the Access Key ID and Secret Access Key.
Example: AKIBIZG57ZSYADFS2ZHD
AWS ARN CSV –
- Enter the AWS File Location.
- Navigate to S3 bucket.
- Navigate to file.
- Select file.
- Click Properties.
- Cut and Paste link.
Example: https://s3-us-west-2.amazonaws.com/kochava-traffic-import/Install/Gilt+iOS+iPad.csv”>https://s3-us-west-2.amazonaws.com/kochava-traffic-import/Install/Gilt+iOS+iPad.csv
- Enter the AWS ARN Role:
- Navigate to IAM.
- From the left-side menu, Select Roles.
- Cut and Paste the Role ARN.
Example: arn:aws:iam::350235873889:role/KochavaReadS3
Traffic Import Overview
Each time data is imported into Kochava, an overview for each import is created. Imports that are being processed are indicated in blue, successful imports are indicated in green, failed imports are indicated in red, and cancelled imports are indicated in gray.
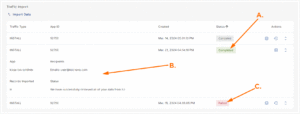
A. Successful Import
B. Data Import Details
C. Failed Import
Traffic Import Actions
Import Details:
Clicking on the up and down carrot icon will reveal the import details.
Recent Import:
Clicking on the stacked database icon will display the imported data.
Restart Import:
Clicking on the circular arrow will start the import process again.
CSV File Format for Data Import
Install CSV File Format:
The following fields are already provided to the Traffic Import UI and do not need to be provided in the CSV file:
- kochava_app_id=selected by user
- action=Install
- import_source_name=File Import
| Field | Example | Description | Req. |
|---|---|---|---|
| usertime | 1456163286 | *Epoch timestamp for record of when the install occurred | Yes |
| imported_attribution | InMobi | **The name of the network or publisher attributed to the install. | Yes |
| ip | 64.237.93.125 | **The IP address of the device on install. | Yes |
| device_type | idfa | The Device ID type associated to the device ID (idfa, idfv, adid, android_id, waid, rida, and custom may be used). | Yes |
| device_id | fdad9921-821a-c6bc-8e87-94e0a3f83a5e | The device id for the device that installed the app. (IDFA, IDFV, ADID, Android_id, WAID, and Custom ids may be used). | Yes |
| device_ua | Mozilla/5.0 (iPhone; U; CPU iPhone OS 5_0 like Mac OS X; en-us) AppleWebKit/528.18 (KHTML, like Gecko) Version/4.0 Mobile/7A341 Safari/528.16 | **A string representation of the device user agent as provided by the client. This string is useful when campaigns require modeled attribution | Yes |
*Defaults to current datetime if left empty
**Must have column but value can be empty
Post-Install CSV File Format:
The following fields are already provided to the Traffic Import UI and do not need to be provided in the CSV file:
- kochava_app_id=selected by user
- action=Event
- import_source_name=File Import
| Field | Example | Description | Req. |
|---|---|---|---|
| event_name | Purchase | *Name of the app event | Yes |
| imported_attribution | InMobi | The name of the network or publisher that was attributed to the event. | Yes |
| event_value | “sku”:123, “price”:”50.00”,”Qty”:1 | The event value pairs for the event from the app. | Yes |
| usertime | 1456163286 | Epoch timestamp for record of when the install occurred. | Yes |
| ip | 182.232.37.203 | The IP address of the device on event. | Yes |
| device_type | idfa | The device ID type associated to the device ID (IDFA, ADID, WAID, and Custom may be used) | Yes |
| device_id | fdad9921-821a-c6bc-8e87-94e0a3f83a5e | The device ID for the device that installed the app (IDFA, ADID, WAID, and Custom ids may be used). | Yes |
*Will default to current datetime if left blank.
AWS Cross-Account Setup
Creating a Web Service Account:
- Navigate to http://aws.amazon.com
- Click Create an AWS Account.
- Follow the on-screen instructions.
Creating an S3 Bucket:
In order to create an S3 bucket, refer to Amazon’s Create the Buckets for Your Website support documentation.
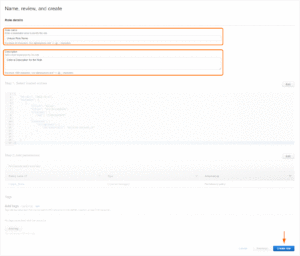
Create an AWS Role for Cross-Account and S3 Bucket Access
- Log in to the AWS Console.
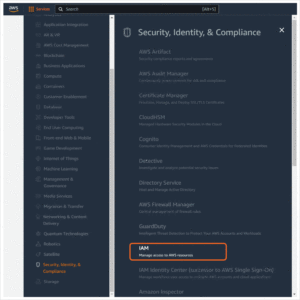
- From the Services drop-down menu, Select Security, Identity, & Compliance > IAM.
- From the left navigation panel, Select Roles.
- Click the Create Role button.
- Select AWS account.
- Select An AWS account > Another AWS account.
- Enter the Kochava AWS account number 719465667078 into Account ID.
- Select Options > Require external ID.
- Enter an External ID.
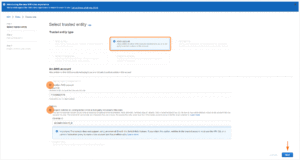
- Click Next.
- Click Create policy (will open a new window).
- Select the JSON tab.
- Enter the desired template code:
Template Example 1:
This template will provide Kochava read access to specific files within one or more buckets, but no access to other files in those buckets.
["arn:aws:s3:::my-bucket-1/my-file-1.csv","arn:aws:s3:::my-bucket-2/some/path/to/my-file-12.csv"].

{
  "Version": "2012-10-17",
  "Statement": [
	{
  	"Effect": "Allow",
      "Action":  "s3:GetObject",
      "Resource": ["arn:aws:s3:::INSERT-BUCKET-NAME-HERE/INSERT-FILE-PATH-HERE"]
	}
  ]
}
Template Example 2:
This template will provide Kochava access to all the files within a bucket.
{
  "Version": "2012-10-17",
  "Statement": [
	{
  	"Effect": "Allow",
  	"Action": "s3:ListBucket",
      "Resource": "arn:aws:s3:::INSERT-BUCKET-NAME-HERE"
	},
	{
  	"Effect": "Allow",
      "Action":  "s3:GetObject",
      "Resource": "arn:aws:s3:::INSERT-BUCKET-NAME-HERE/*"
	}
  ]
}- Update the “Resource”.
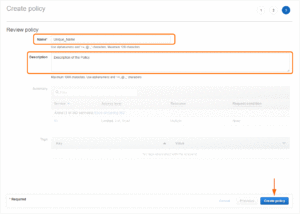
- Click Next: Tags.
- Click Next: Review.
- Enter the Policy Name.
- Enter the Policy Description.
- Click Create policy.
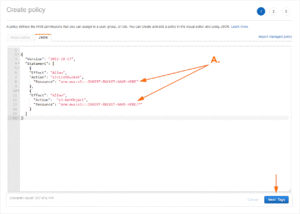
A. Update the Resources field.
- Refresh the Roles Permissions policy screen.
- Select the recent created policy.
- Click Next.
- Enter a Role Name (e.g., KochavaReadS3).
- Enter a Role Description.
- Click Create role.