The following document describes how to set up a campaign for SamsungAds – SAN. Kochava enhances your install and event data with the SamsungAds – SAN ad impression or click metadata directly from Samsung Ads to allow for extremely accurate and complete data.
Data Needed Before Beginning Process:
- SamsungAds Product ID
- SamsungAds Event
Create a Tracker for a SamsungAds – SAN Install Campaign
- Log in to Kochava.
- Select the desired Account and App.
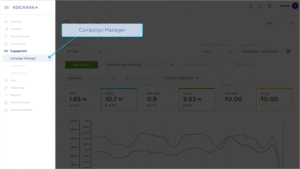
- Select Engagement > Campaign Manager.
- Click + Add (Tracker) or Select Segment Tools (⋮) > Add Tracker.
- Enter the Tracker Name.
- Select Tracker Type > Acquisition. (default setting)
- Select Media Partner > SamsungAds — SAN.
- Select Agency Partner. (optional)
- Select Default Tracker:
- On
- Off (default)
- Select Destination URL Type > Custom.
- Enter a Deep Link. (optional)
- Enter any Custom Parameter(s). (optional)
- Click Save. (If no further trackers need to be created)
- Click Save & Add Another Tracker. (If additional trackers need to be created)
- Click Save & Create Postback (to navigate directly to the Partner Configuration page).
Install Postback Configuration
- Select Apps & Assets > Partner Configuration.

- Click + Add a Configuration.
- Select Media Partner > SamsungAds — SAN.
- Click Go.
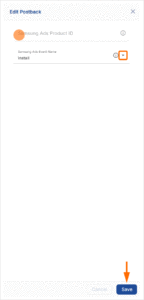
- Select Install > 🖉 (Edit).
- Enter the Samsung Ads Product ID.
- Select the Samsung Ads Event Name > install.
- Click Save.
Reengagement Configuration
The information within this section provides the steps necessary to establish a reengagment campaign. If a reengagment campaign does not need to be created, the information in this section may be disregarded.
Create a Reengagement Segment:
- Locate the desired Campaign.
- Select Campaign Tools (⋮) > Add Segment.
- Enter a Segment Name.
- Enter a Segment Description. (optional)
- Click Add.
Create a Reengagement Tracker:
- Click + Add (Tracker) or Select Segment Tools (⋮) > Add Tracker.
- Enter a Tracker Name.
- Select Tracker Type > Reengagement.
- Select Media Partner > SamsungAds — SAN.
- Select an Agency Partner. (optional)
- Select the Kochava Event that will map to the desired SamsungAds – SAN event.
- Add Reengagement Event.
- Click Save (If no further trackers need to be created).
- Click Save & Add Another Tracker (If additional events need to be created).
- Click Save & Create Postback (to navigate directly to the Partner Configuration page).
Post-Install Event Postback Configuration:
- Select Apps & Assets > Partner Configuration.
- Expand the SamsungAds — SAN > Network Postbacks.
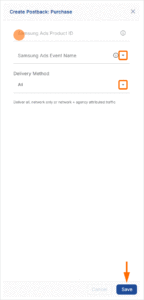
- Locate the desired event and Click + (Create) for a new configuration or 🖉 (Edit) for an existing configuration.
- Enter the SamsungAds – SAN Product ID.
- Select the SamsungAds – SAN Event Name.
- Select the Delivery Method.
- Click Save.
Standard Post-Install Event List:
| Key | Description |
|---|---|
| account_application | Triggered when the user submits an application to open or modify an account. |
| account_cancel | Triggered when the user cancels or closes an existing account. |
| account_open | Triggered when an account is successfully opened or approved. |
| app_open | When a user opens the app. |
| booking_canceled | Triggered when the user cancels a booking or reservation. |
| booking_complete | Triggered when the user successfully completes a booking or reservation. |
| cart_add | Triggered when the user adds an item to the shopping cart. |
| cart_view | Triggered when the user views the shopping cart. |
| content_view | Triggered when the user views a specific piece of content (e.g., page, video, article). |
| credit_application | Triggered when the user submits a credit or loan application. |
| direct_deposit | Triggered when the user sets up, updates, or confirms a direct deposit. |
| first_app_open | When the user opens the app for the first time. |
| first_video_view | When the user completes the first video view. |
| game_currency_purchase | Triggered when the user purchases in-game or virtual currency. |
| invite | Triggered when the user sends an invite or referral to another user. |
| key_event | Triggered for a primary in-app action defined as a key KPI event. |
| level_complete | Triggered when the user completes a game or app level. |
| list_view | Triggered when the user views a list or feed (e.g., category list, search results). |
| login | Triggered when the user successfully logs into an account. |
| other_event | When the user completes a custom event. |
| payment_details | Triggered when the user adds, updates, or confirms payment details. |
| purchase | Triggered when a purchase is recorded as completed (generic purchase event). |
| purchase_canceled | Triggered when the user cancels an order or purchase. |
| purchase_complete | Triggered when a purchase transaction is fully completed and confirmed. |
| purchase_initiated | Triggered when the user initiates a purchase or begins checkout. |
| purchase_one_time | When the user completes a one time purchase. |
| purchase_subscription | When a user pays for a subscription within a 24-hour lookback of exposure (impression or click) to a media campaign. |
| registration | Triggered when the user completes a registration or sign-up form. |
| search | Triggered when the user performs a search within the app or service. |
| share | Triggered when the user shares content or the app via an external channel. |
| sign_up | Triggered when the user signs up for a service, offer, or newsletter. |
| subscription_canceled | Triggered when the user cancels an active subscription. |
| subscription_completed | Triggered when a subscription term ends without renewal. |
| subscription_started | Triggered when a subscription is started or first billed. |
| trial_start | Triggered when the user starts a free or introductory trial. |
| tutorial_complete | Triggered when the user completes the tutorial or onboarding flow. |
| wishlist_add | Triggered when the user adds an item to a wishlist or favorites list. |
| video_view | Video complete. |