The following document defines the process for creating a Pandora campaign within Kochava.
Use Cases for Pandora Campaign:
- An app marketing campaign with Pandora has been created.
Create a Pandora Campaign
- Log in to Kochava.
- Select the desired Account and App.
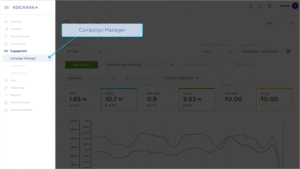
- Select Engagement > Campaign Manager.
- Click + Add (Tracker) or Select Segment Tools (⋮) > Add Tracker.
- Enter a Tracker Name.
- Select Tracker Type > Acquisition. (default setting)
- Select Media Partner:
- Pandora — Android.
- Pandora — iOS.
- Select an Agency Partner. (optional)
- Select the Destination URL Type:
- Custom
- Google Referrer (Android Only)
- Enter or update the Install Destination URL.
- Enter a Deep Link. (optional)
- Enter any Custom Parameters. (optional)
- Click Save. (if no further trackers need to be created)
- Click Save & Add Another Tracker. (if additional trackers need to be created)
- Click Save & Create Postback. (To navigate directly to the Partner Configuration page).
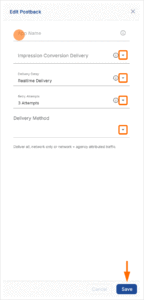
Create a Postback Configuration
- Select Apps & Assets > Partner Configuration.

- Click Add a Configuration.
- Select Network Partner > Pandora:
- Pandora – iOS
- Pandora – Android
- Click Go.
- Select Install > 🖉 (Edit).
- Enter the App Name.
- Select the Impression Conversion Delivery.
- Select the Delivery Delay.
- Select the number of Retry Attempts.
- Select the Delivery Method.
- Click Save.