What’s Happening?
We’re enhancing the Kochava Unified Platform with a modernized navigation and consolidated workflows. All your existing features and data remain exactly the same — we’re just making them easier to access and use.
Why the Changes?
⚠️ MOST IMPORTANT CHANGE
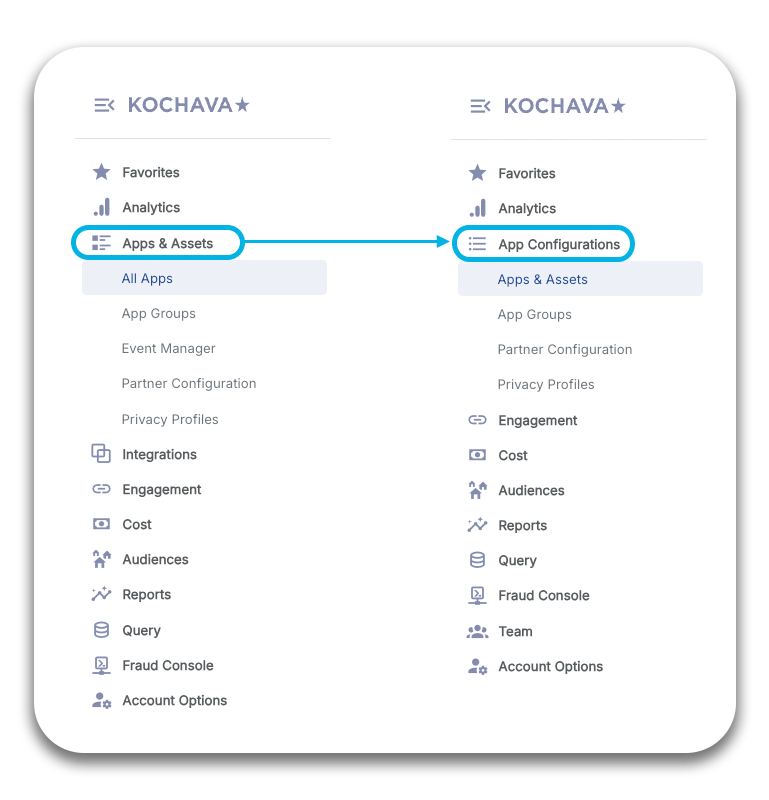
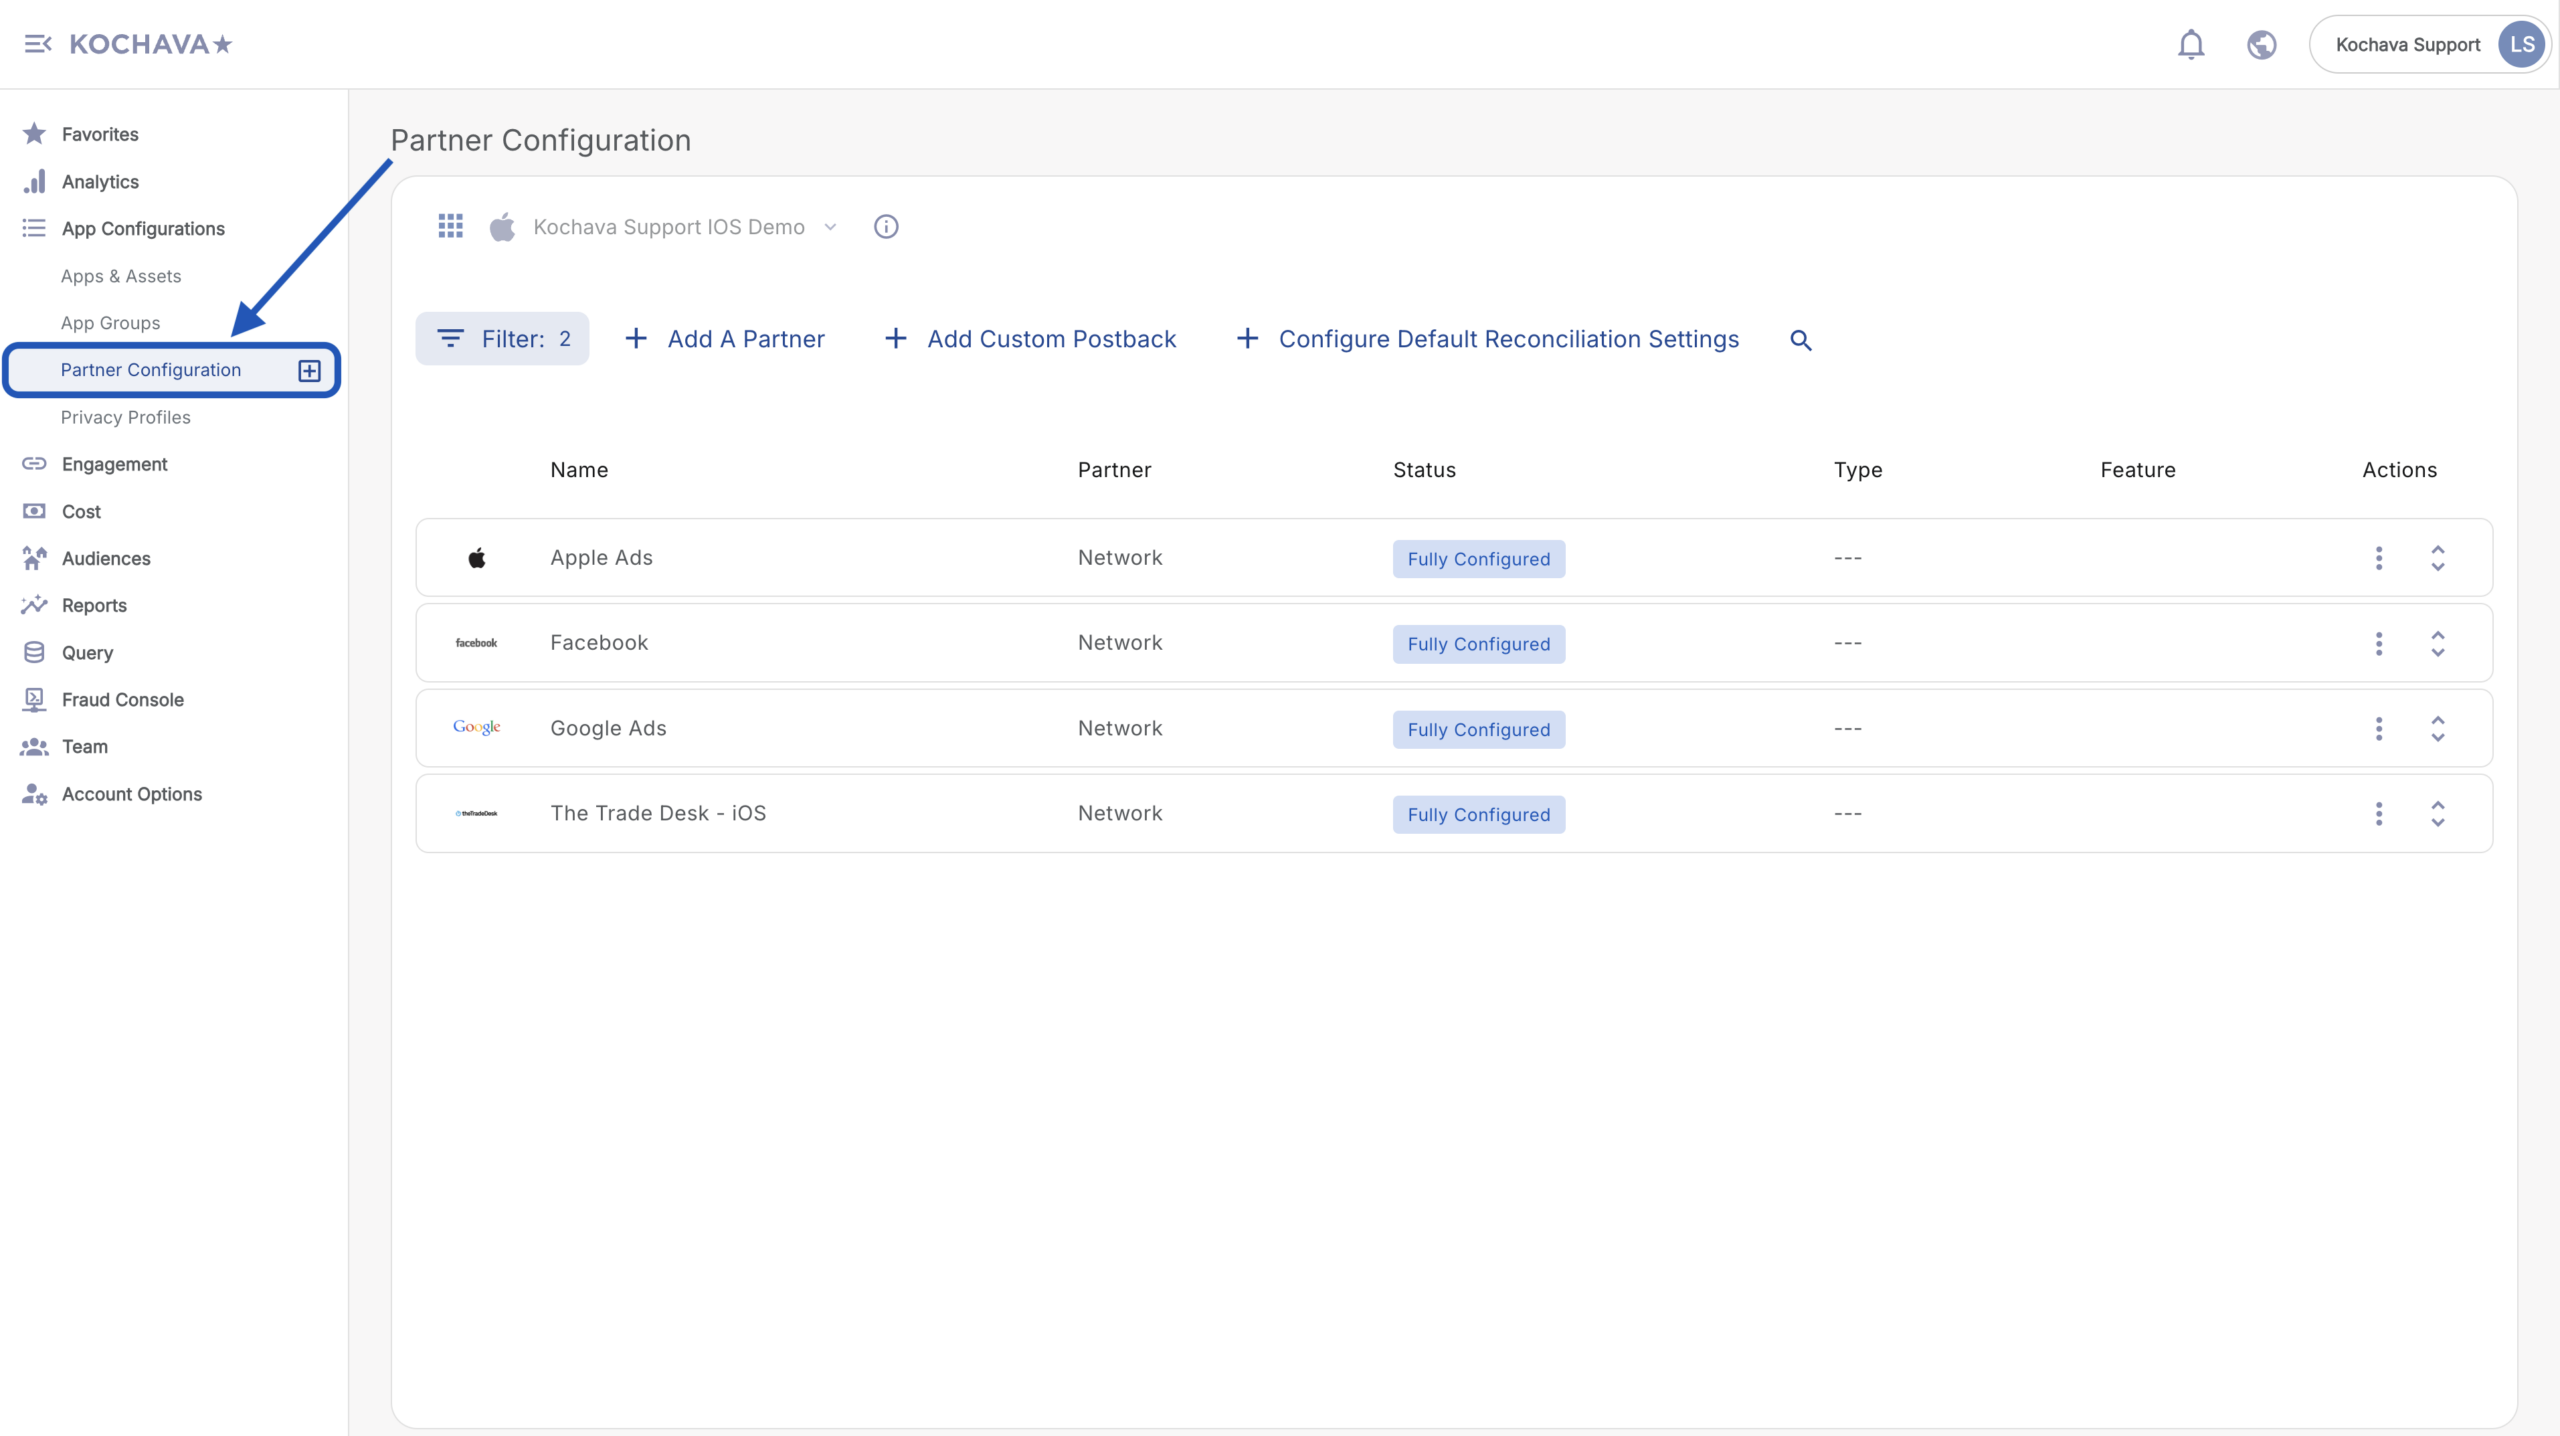
“Apps & Assets” is now “App Configurations”
The biggest navigation change: The left navigation grouping “Apps & Assets” has been renamed to “App Configurations”.
When you log in on April 16, look for App Configurations in the left navigation where you used to see “Apps & Assets”.
What’s Actually Changing?
Four Main Updates
- 1. Navigation Reorganization — “Apps & Assets” grouping renamed to “App Configurations”
- 2. New Apps Page — Tile view (default) with option for list view
- 3. Consolidated App Management — Events, partner config, SKAdNetwork, and more under each app
- 4. Team Consolidation — New Team section with Members, Groups, API Keys, and API Clients in one place
Focus of This Guide
This guide focuses exclusively on Kochava for Advertisers (MMP) features — the Mobile Measurement Partner capabilities that track app installs, events, and attribution.
Quick Reference: Where Things Are Moving
| What You Do Today | Where It Is Now | Where It Will Be (April 15) |
| View all apps | Apps & Assets → All Apps | App Configurations → Apps & Assets → New tile/list view |
| Manage events | Event Manager (separate page) | App Configurations → Apps & Assets → Select app → Events tab |
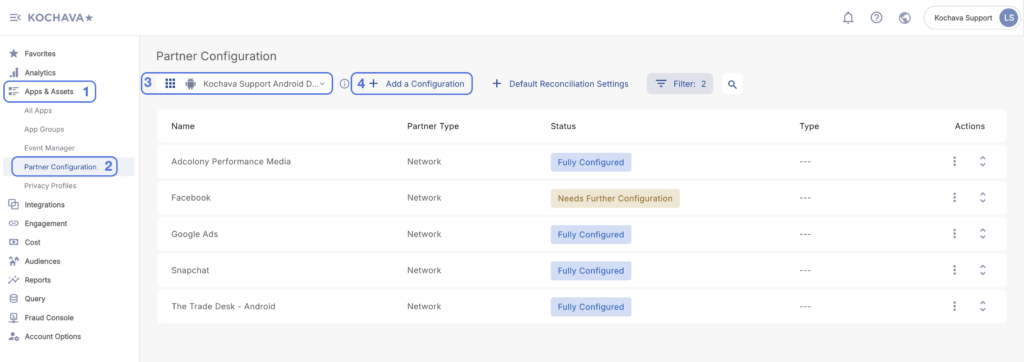
| Configure partners | Partner Configuration (separate page) | App Configurations → Apps & Assets → Select app → MMP Partners tab |
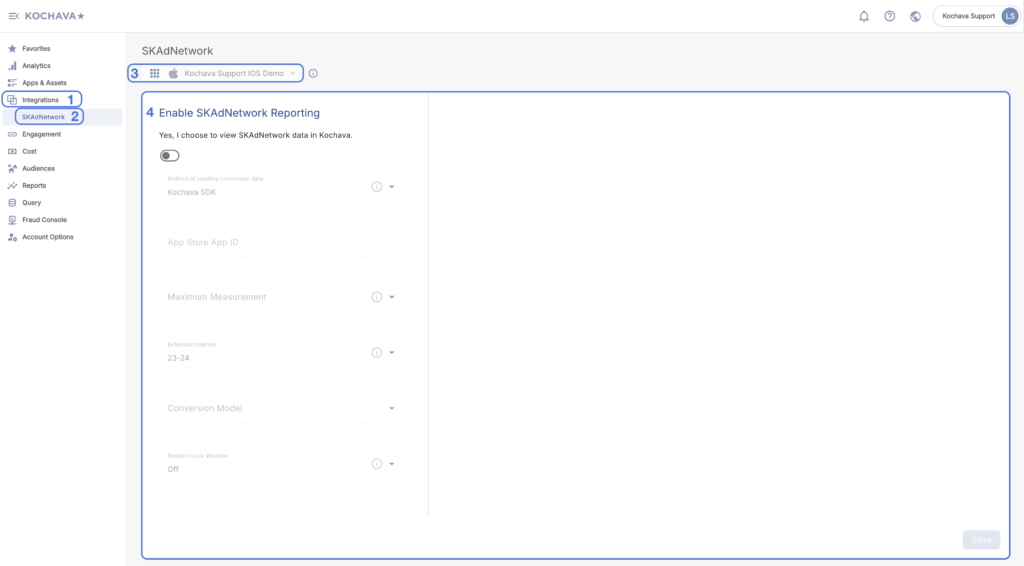
| SKAdNetwork settings | Integrations → SKAdNetwork | App Configurations → Apps & Assets → Select iOS app → SKAdNetwork tab |
| Set up postbacks | Partner Configuration | App Configurations → Apps & Assets → Select app → MMP Partners tab<br>OR App Configurations → Partner Configuration |
| Manage team members | Account Options → Members | Team → Members tab |
| Manage groups | Account Options → Groups | Team → Groups tab |
| Manage API keys | Account Options → API Keys | Team → API Keys tab |
| Manage campaigns | Campaign Manager | Campaign Manager (no change) |
| View analytics | Analytics | Analytics (no change) |
Important Notes:
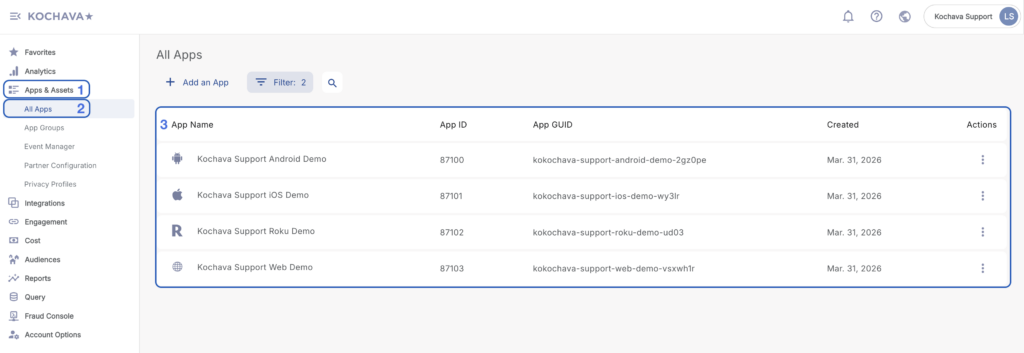
Understanding the Apps & Assets Page Changes
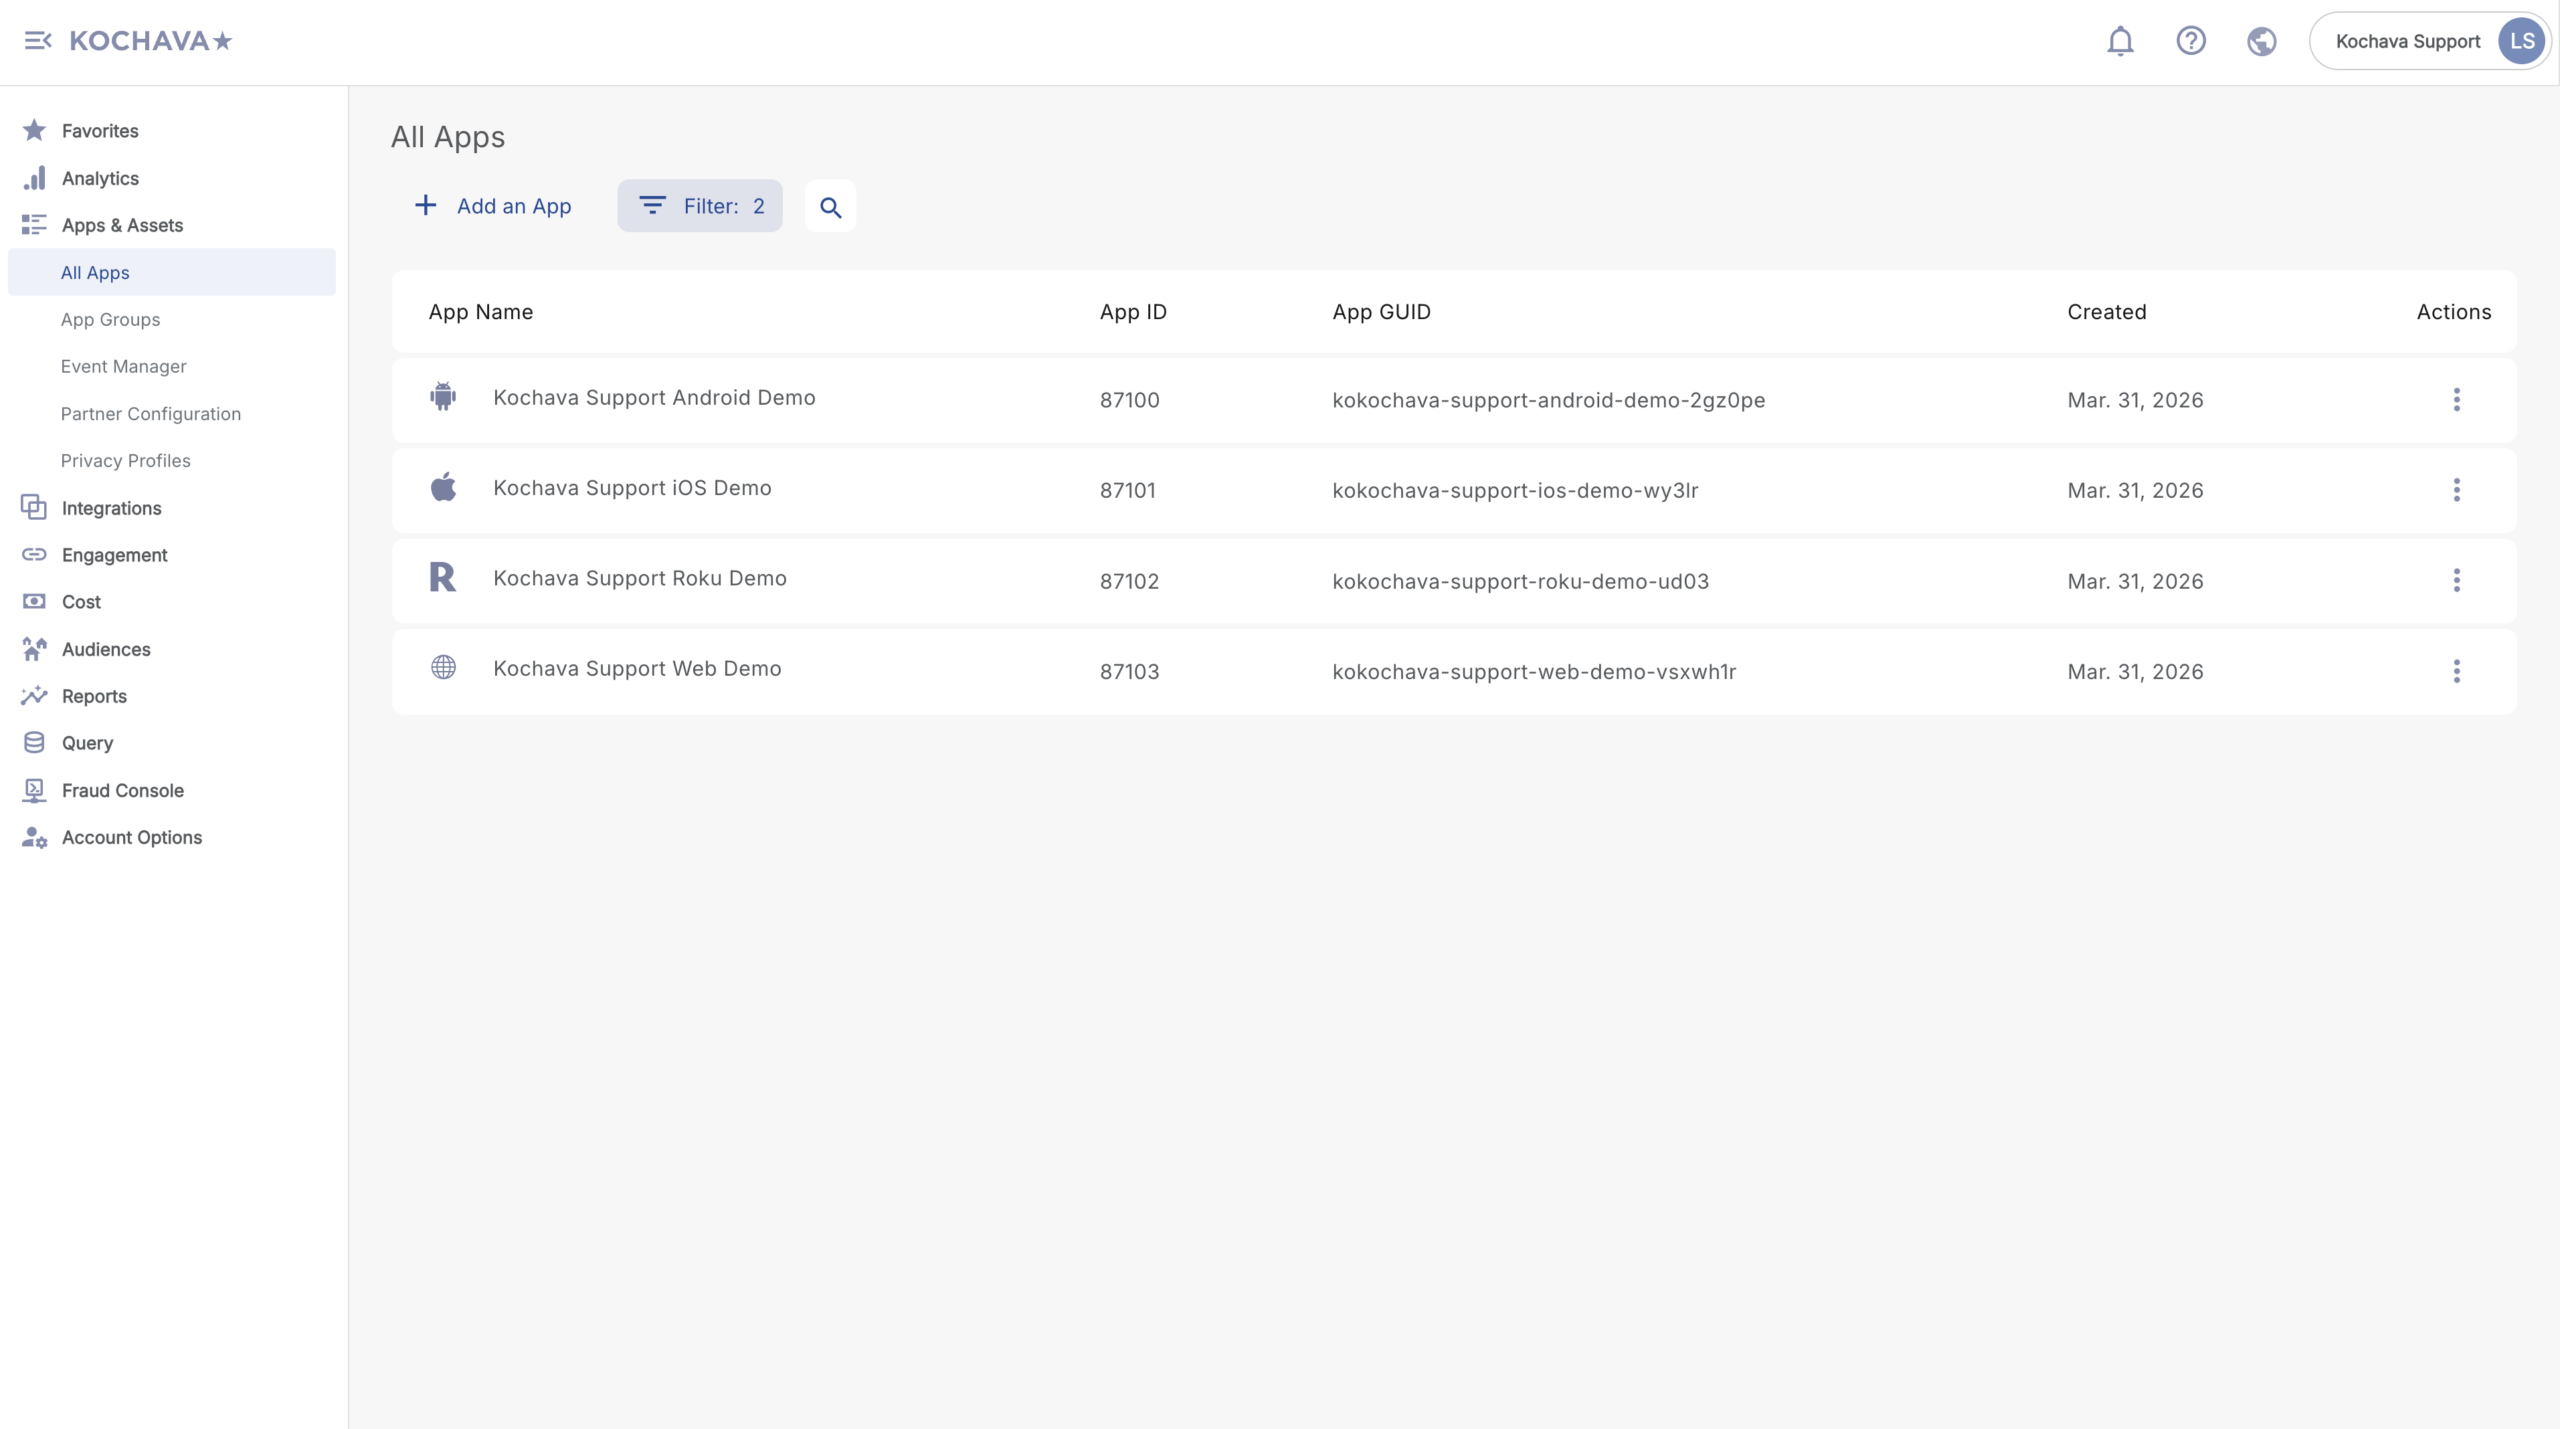
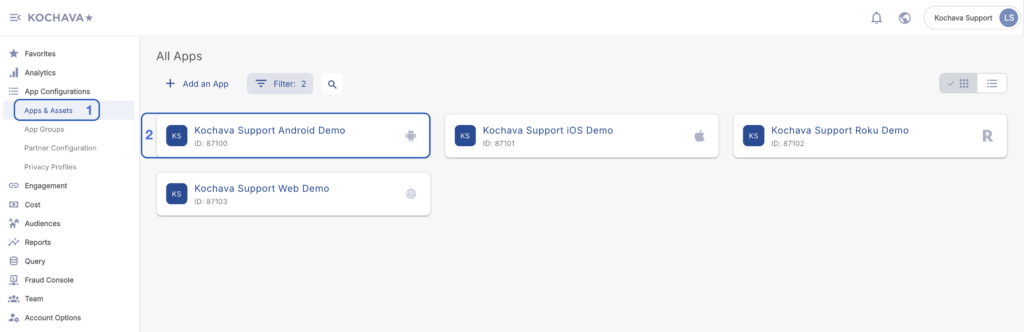
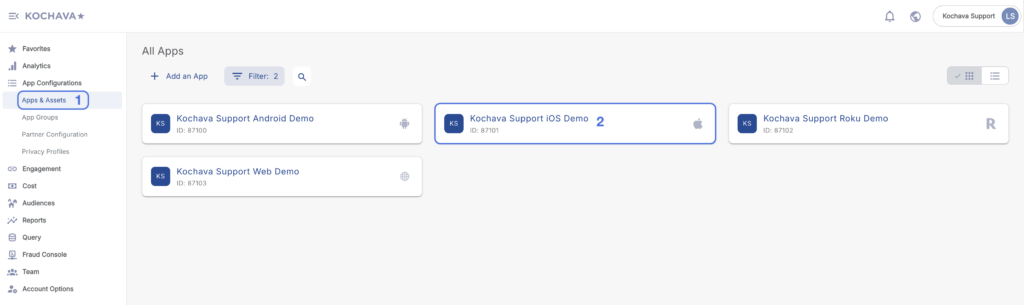
Before: Apps & Assets → All Apps
• Navigate to Apps & Assets (grouping) → All Apps (page)
• Simple list view of all your apps
• Click app → See basic details
• Go to separate pages for events, partners, postbacks
• Go to Integrations for SKAdNetwork (iOS apps)
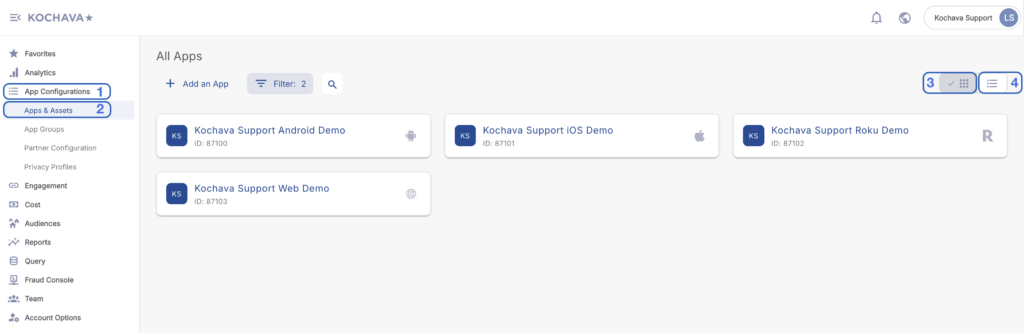
After (April 15): App Configurations → Apps & Assets
• Navigate to App Configurations (grouping) → Apps & Assets (page)
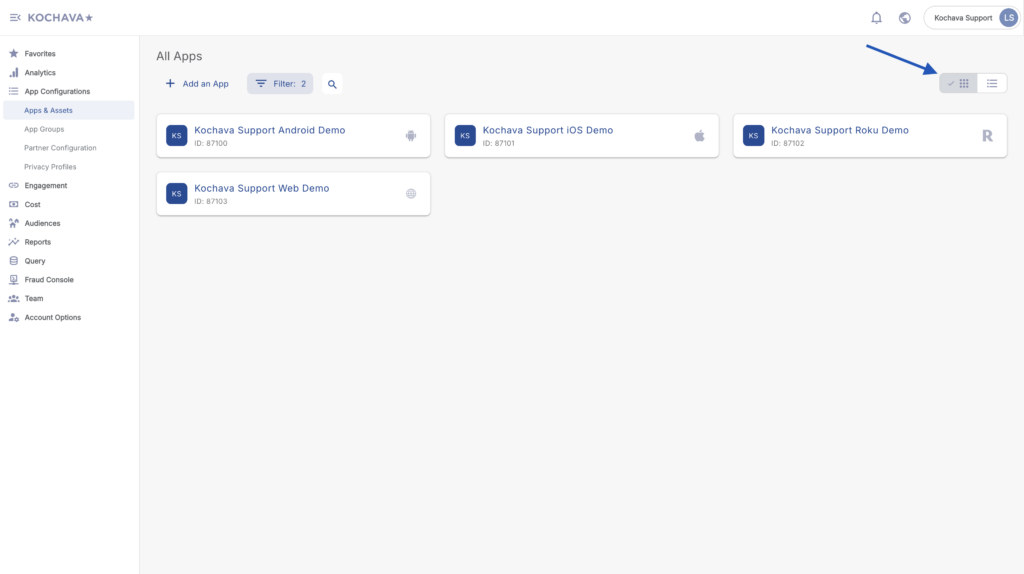
• Tile view by default (can switch to list view)
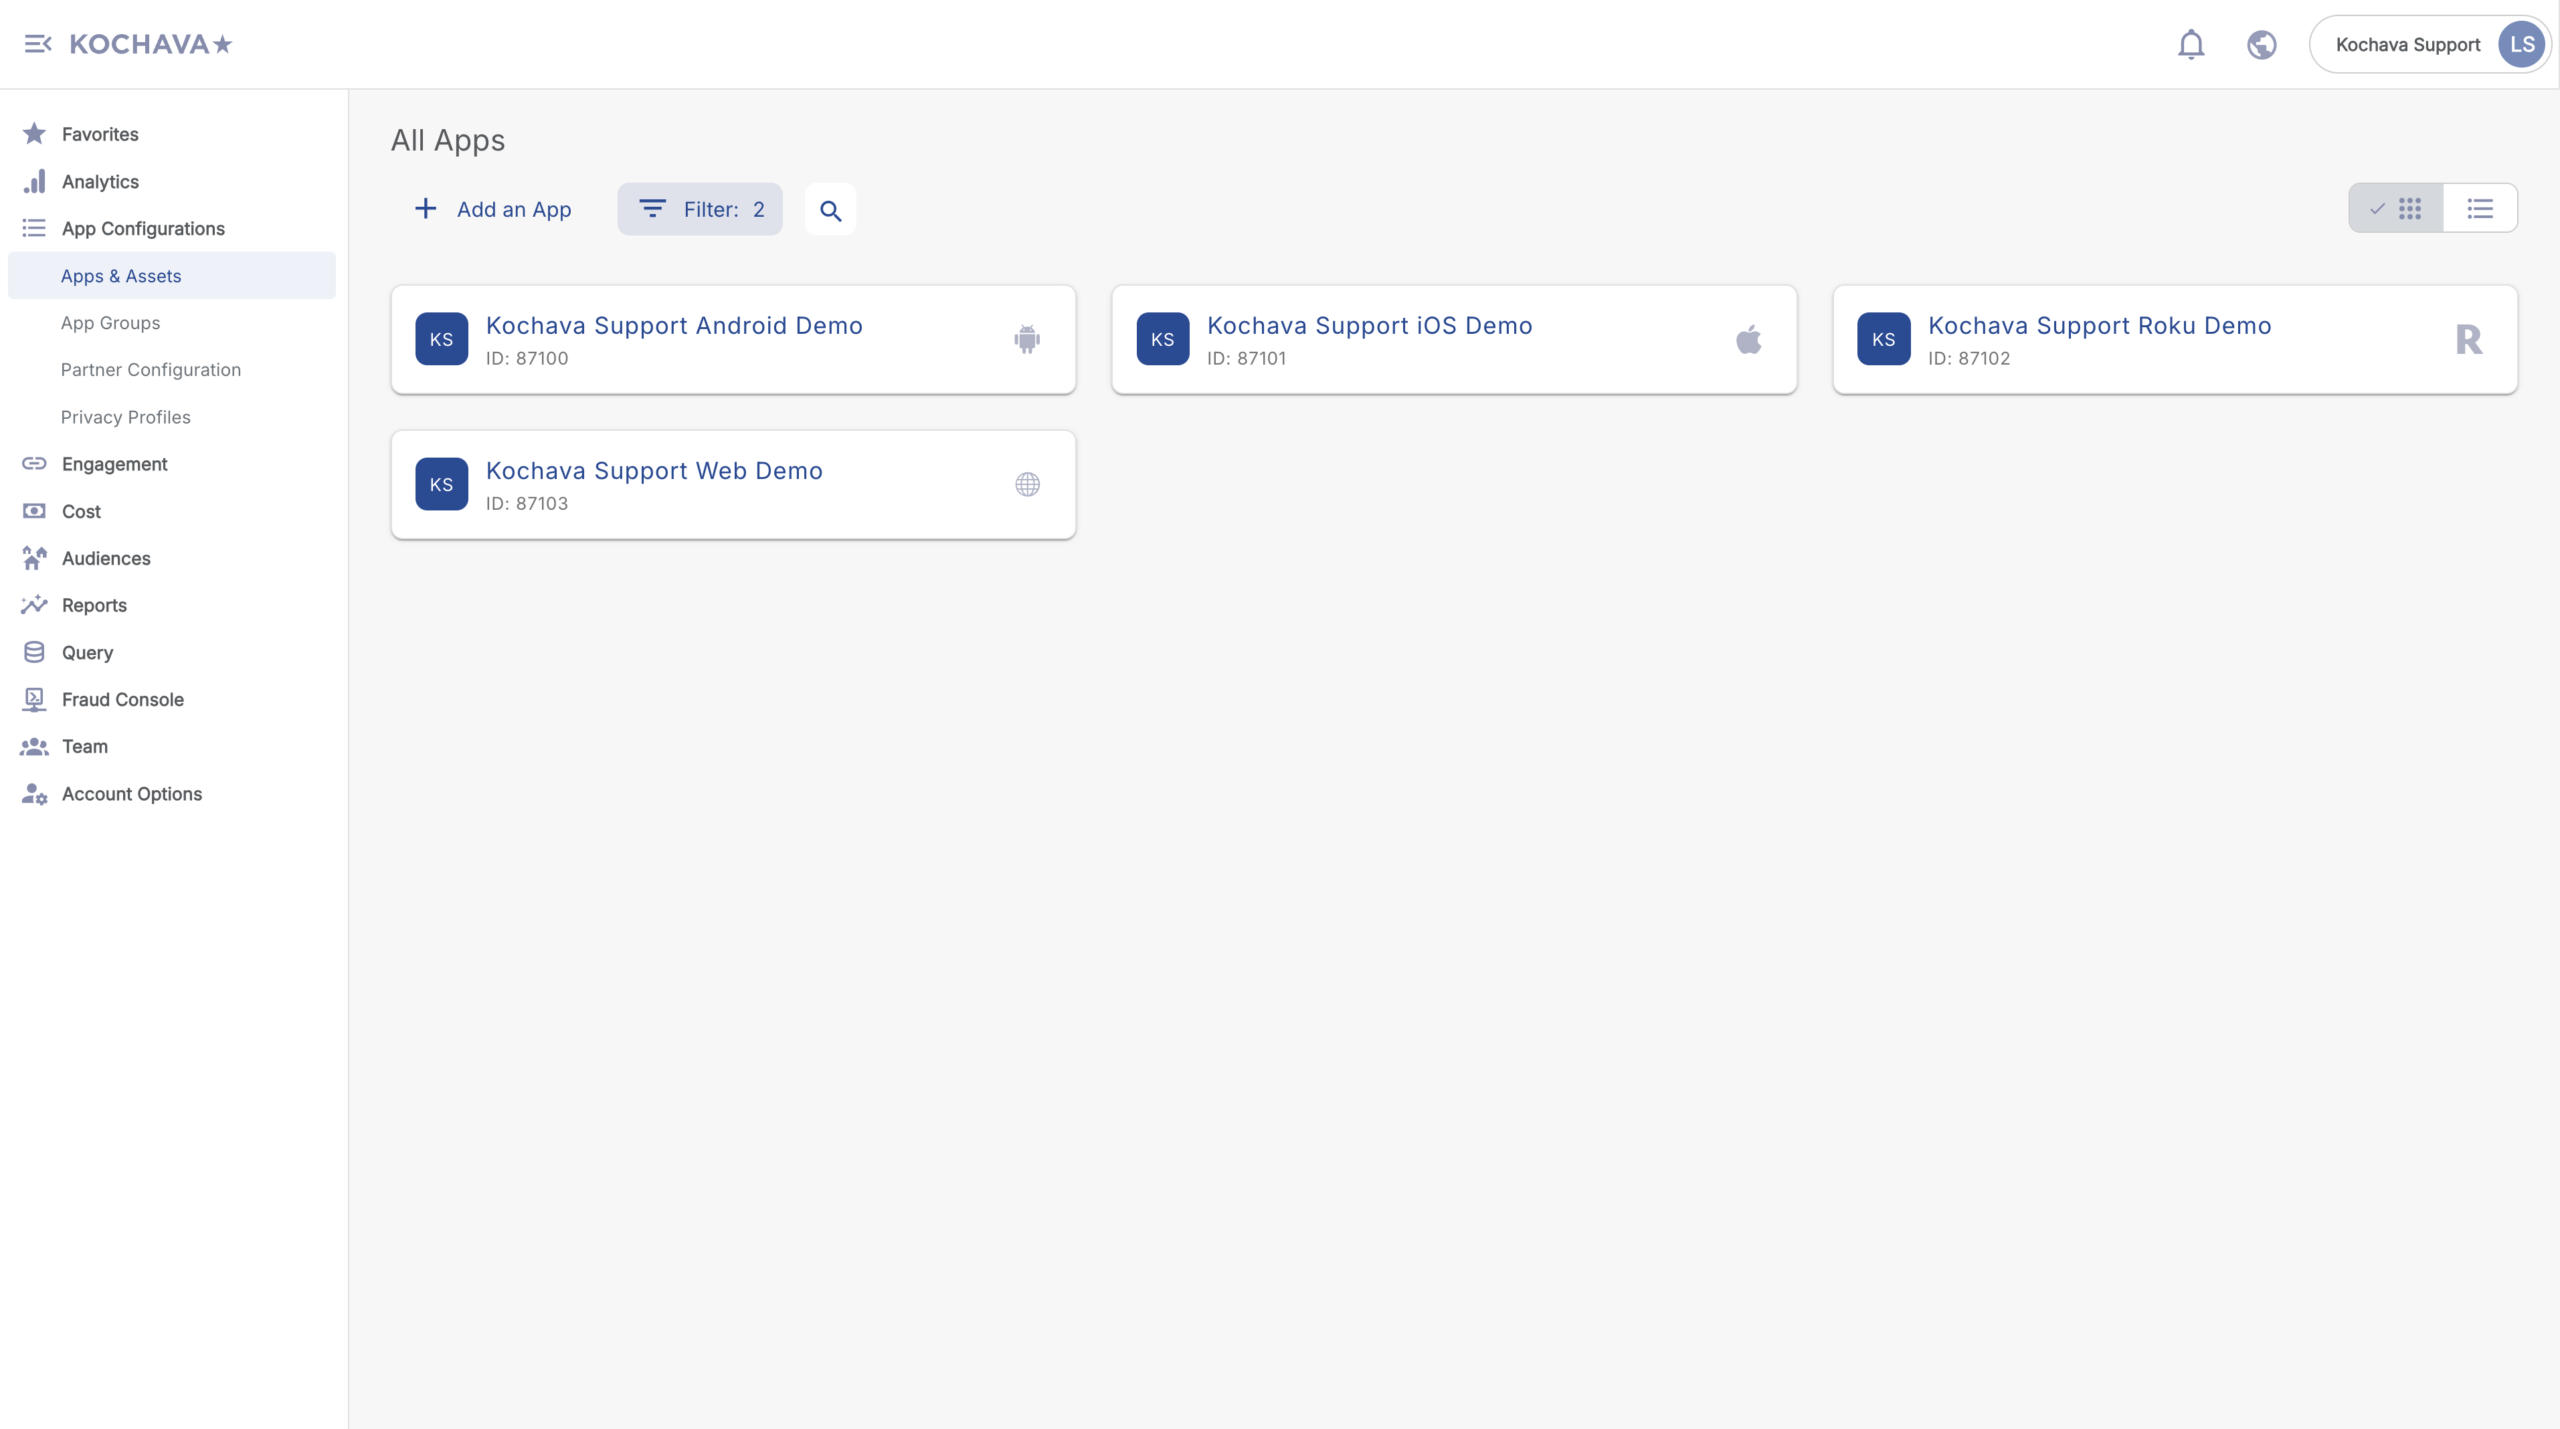
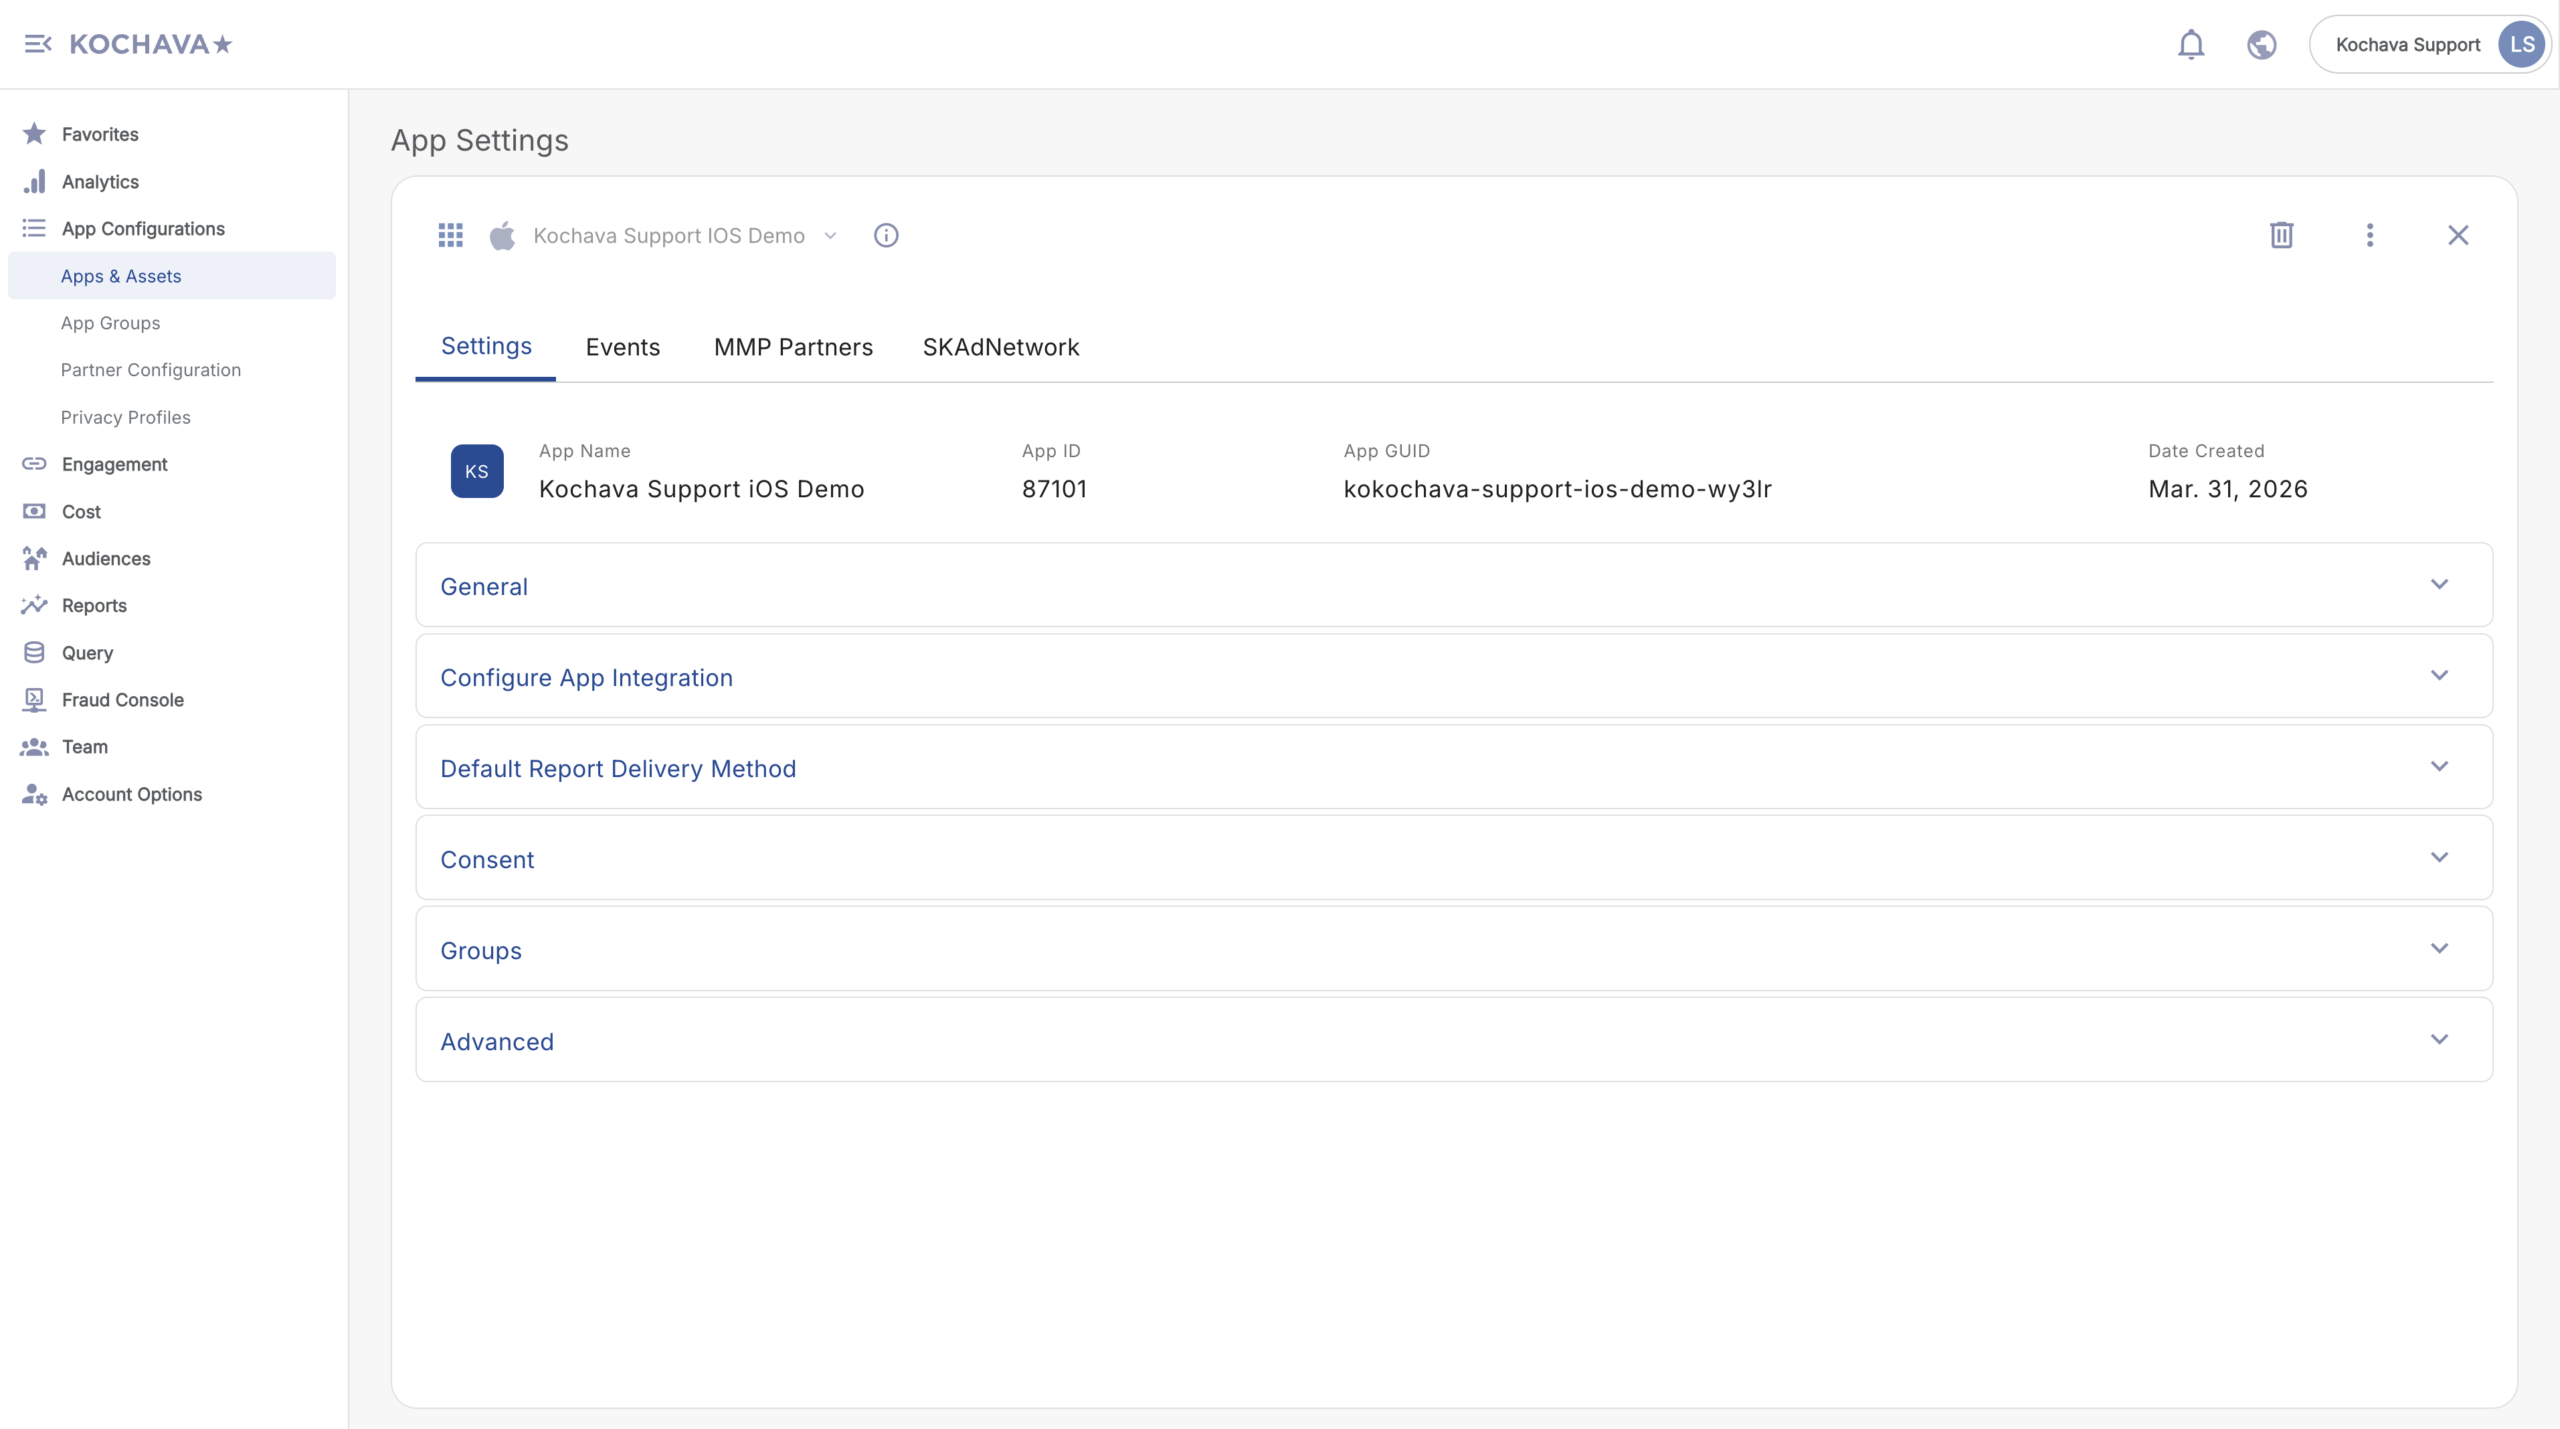
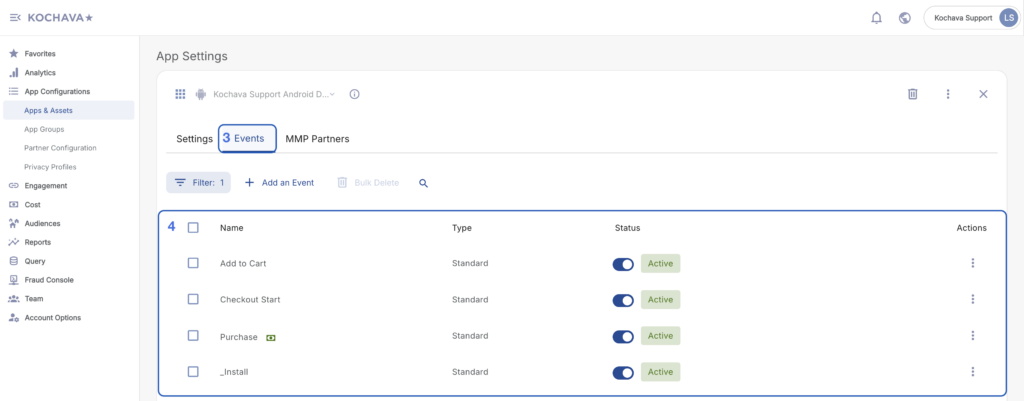
• Click app → See everything about that app in one place:
• Events tab
• MMP Partners tab
• SKAdNetwork tab (iOS apps only)
• App Settings tab
• (Additional tabs based on your configuration)
• Add partners directly from the app page (convenience feature)
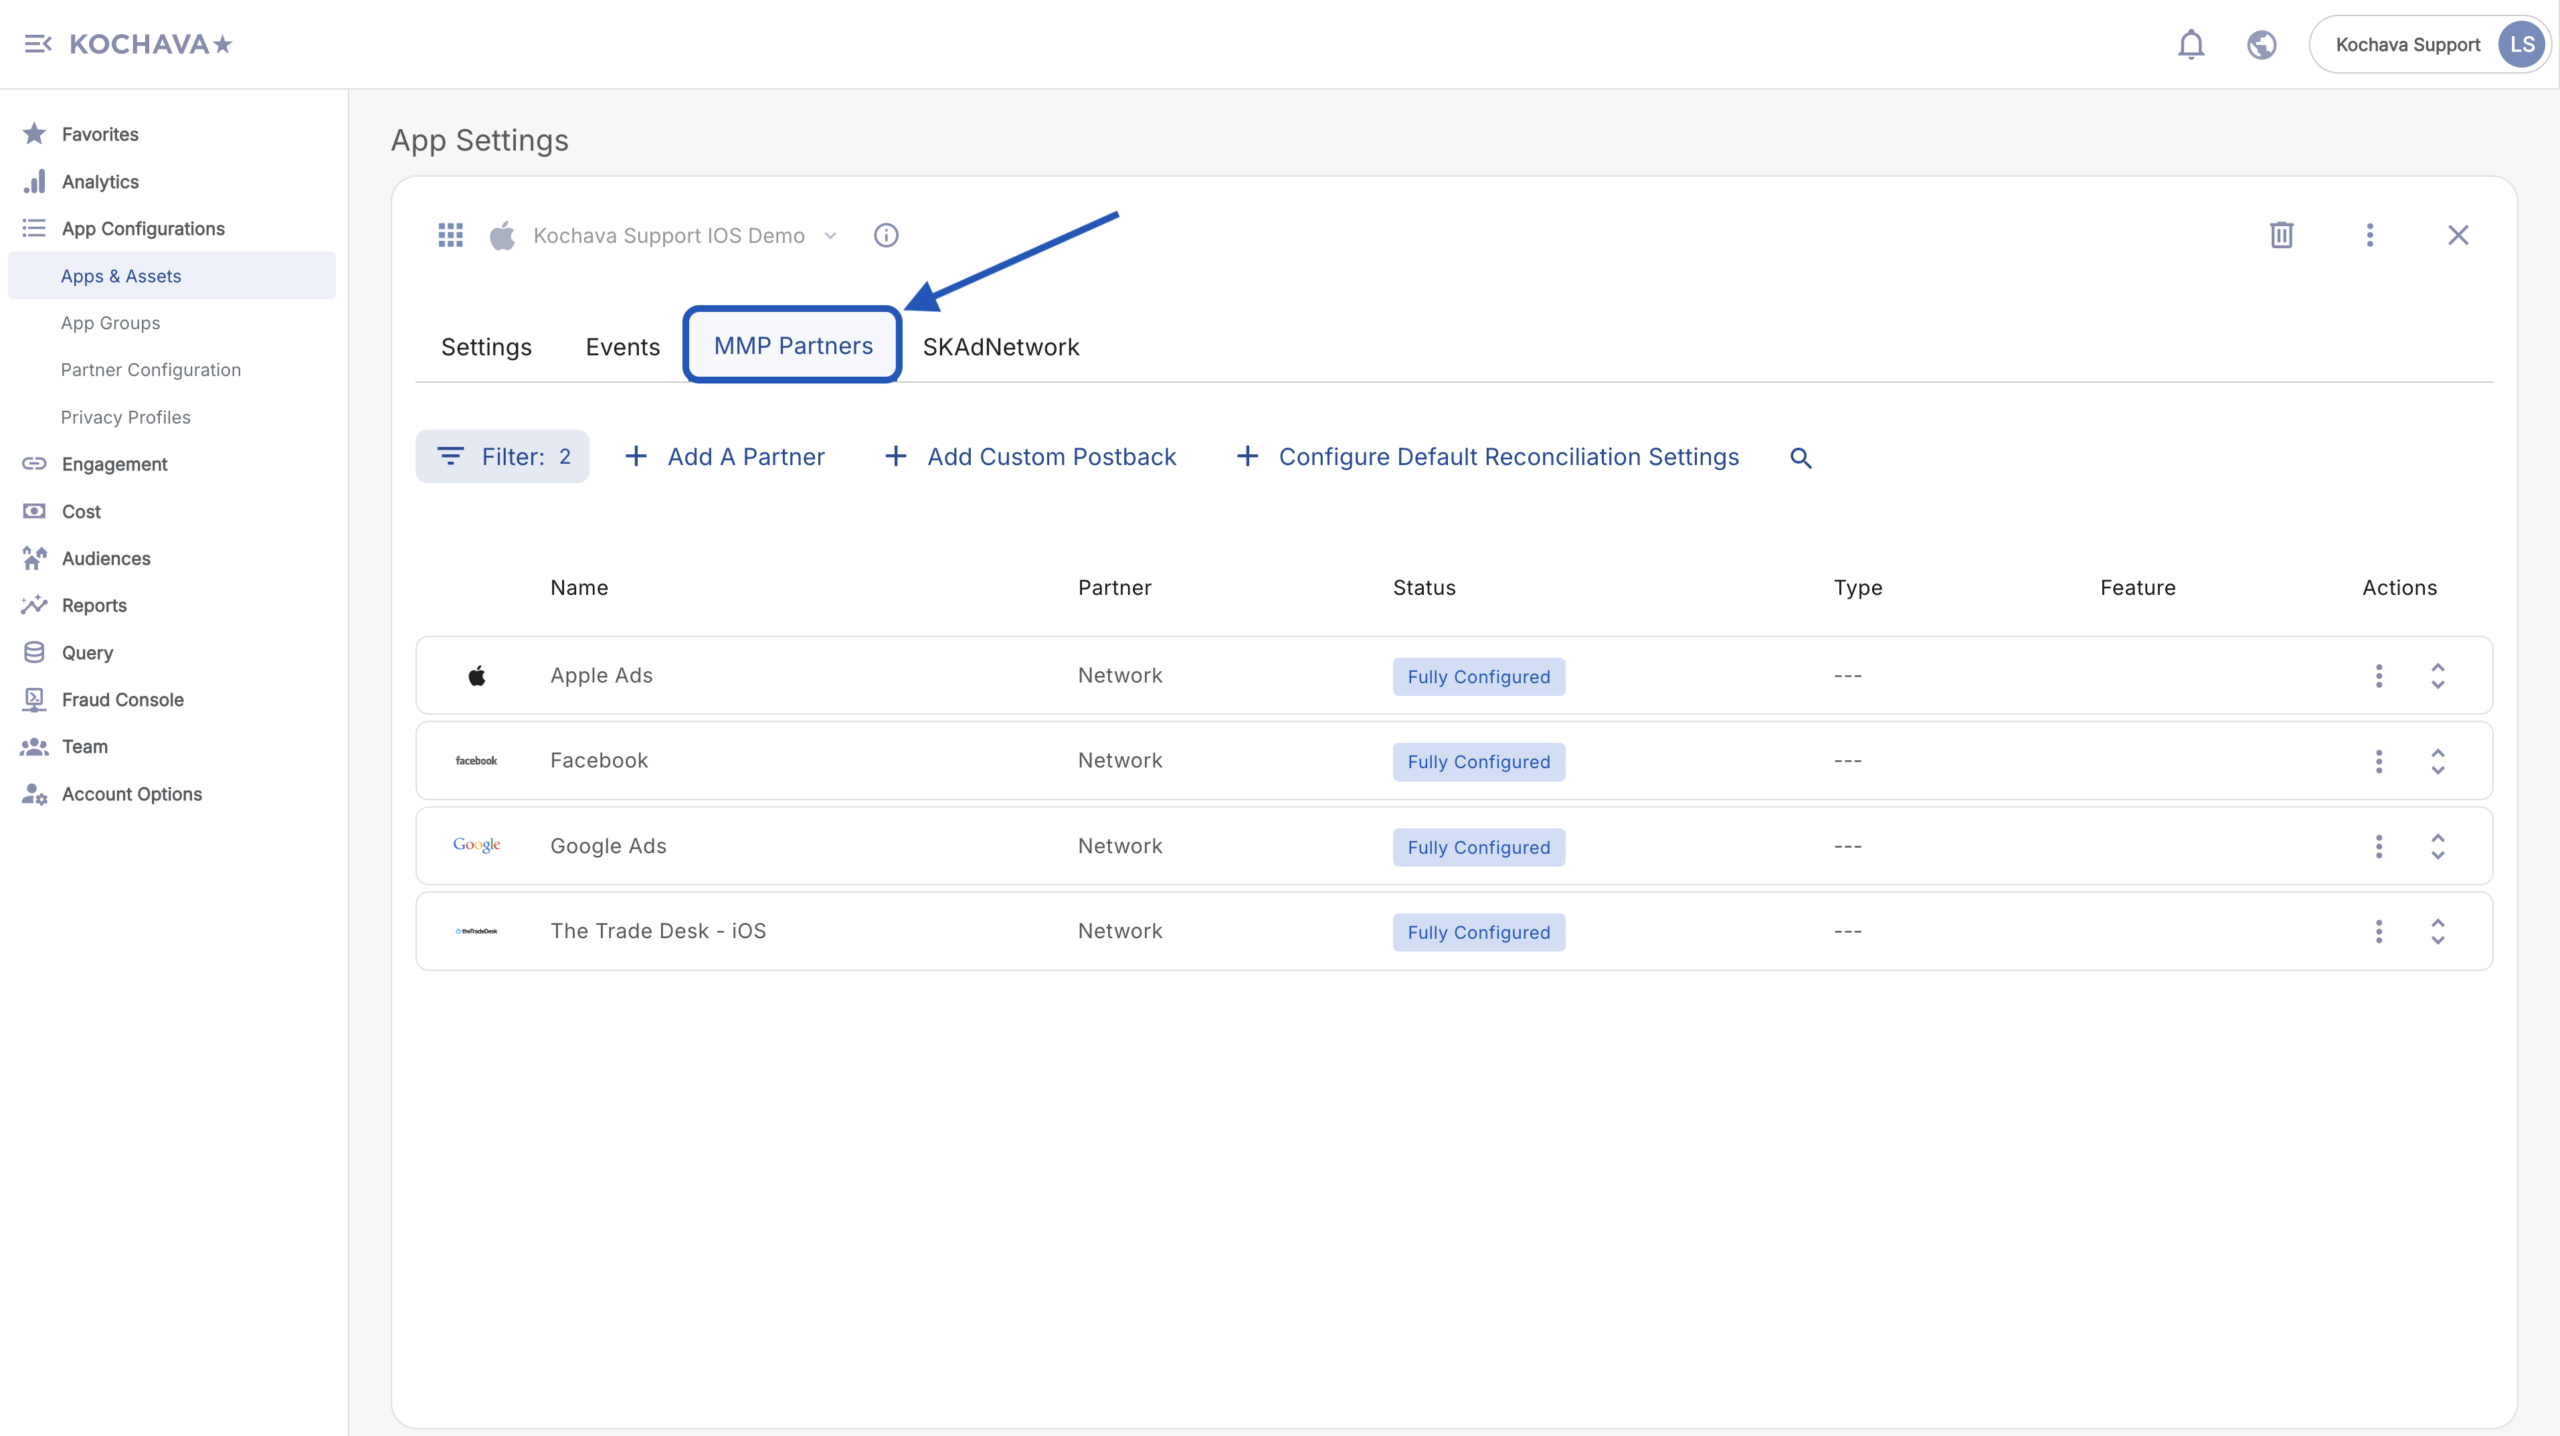
• Partner Configuration page remains available for bulk operations
Understanding Tile View vs. List View
Tile View (Default)
What You’ll See:
• Visual cards for each app
• App icon/logo displayed prominently
• Key information at a glance
• Easy scanning of all your apps
Best For:
• Quick visual identification
• Overview of all apps
• First-time users
• Smaller number of apps
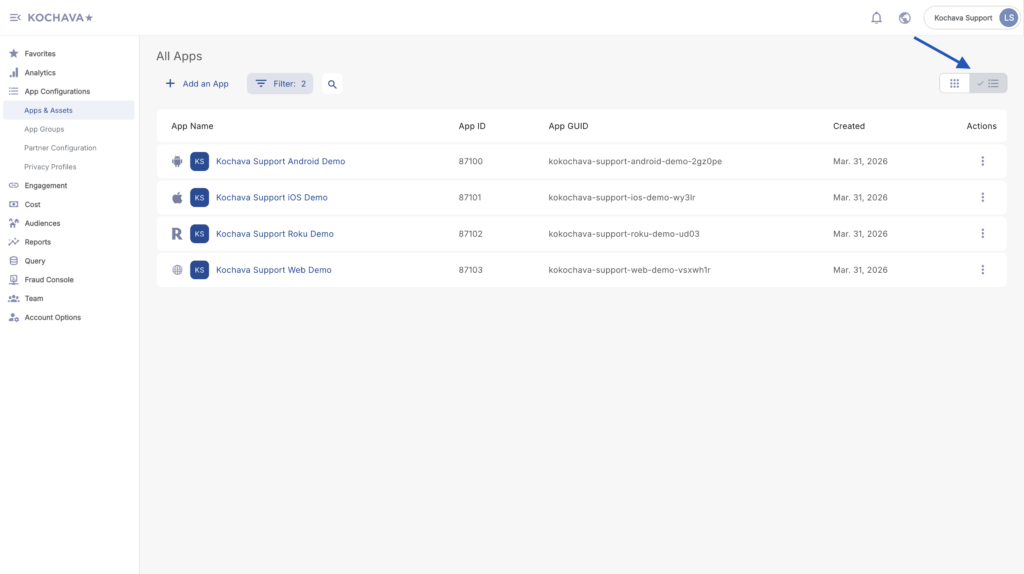
List View (Optional)
What You’ll See:
• Familiar table format
• More apps visible at once
• Sortable columns
• Compact information display
Best For:
• Managing many apps
• Quick sorting and filtering
• Power users who prefer data density
How to Switch: Toggle button in top right of Apps & Assets page
Step-by-Step: Your Updated Workflows
Workflow 1: View All Your Apps
Current Process:
- Click Apps & Assets in navigation
- Click All Apps
- View list of apps
New Process (April 15):
- Click App Configurations in navigation
- Click Apps & Assets
- View apps in tile view (visual cards showing each app)
- Switch to list view if you prefer (toggle in top right)
What’s the Same:
• All your apps appear
• Same app information available
• Same search functionality
What’s New:
• The grouping “Apps & Assets” is now called “App Configurations”
• The page “All Apps” is now called “Apps & Assets”
• Visual tile view makes apps easier to identify
• Choice between tile view and list view
• Cleaner, more modern design
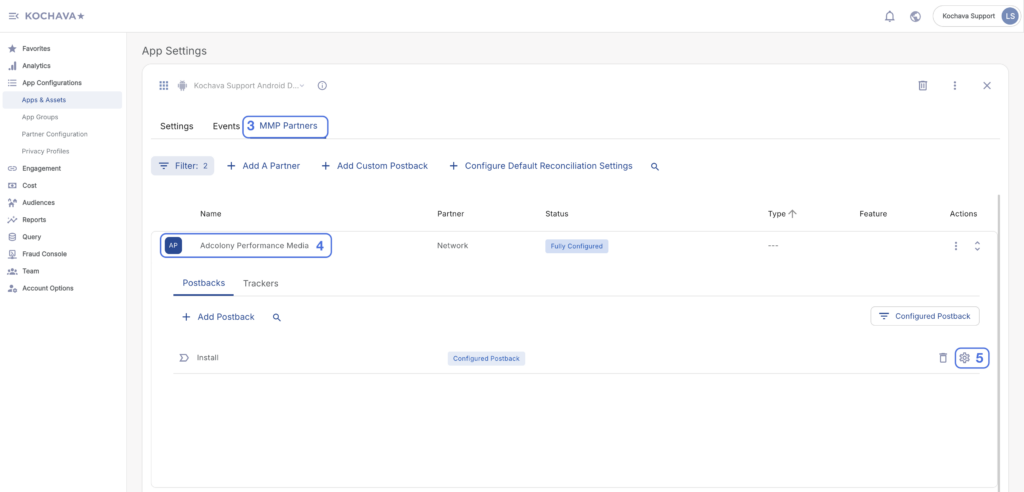
Workflow 2: Manage Events for an App
Current Process:
- Go to Apps & Assets
- Go to Event Manager (separate page)
- Select your app from dropdown
- View/edit events
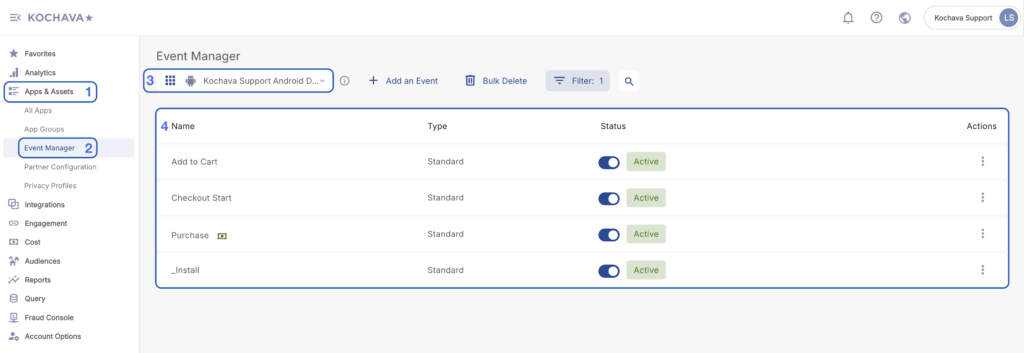
New Process (April 15):
- Go to App Configurations → Apps & Assets
- Click on your app (tile or list item)
- Navigate to Events tab
- View/edit events

What’s the Same:
• All event management capabilities preserved
• Same event creation and editing process
• All your existing events are there
What’s New:
• Events tab integrated into app view
• All app-related information in one location
• No more switching between pages
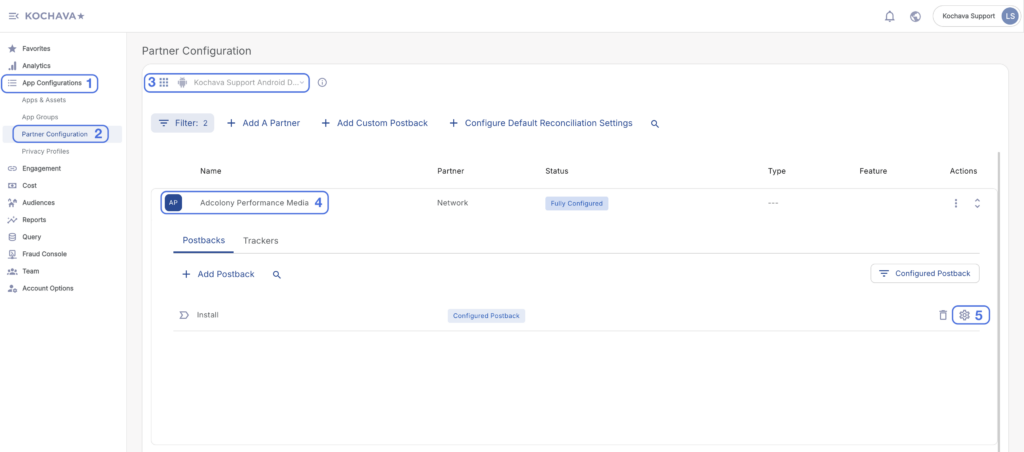
Workflow 3: Configure Partner Configuration
Current Process:
- Go to Apps & Assets
- Go to Partner Configuration (separate page)
- Select your app
- Add or configure partner
New Process (April 15):
- Go to App Configurations → Apps & Assets
- Click on your app
- Navigate to MMP Partners tab
- Add or configure partner

What’s the Same:
• All partner configuration options available
• Same partner list
• Same configuration settings
What’s New:
• Partners tab integrated into app view
• See all partners configured for that app at a glance
• Add partner without leaving app context
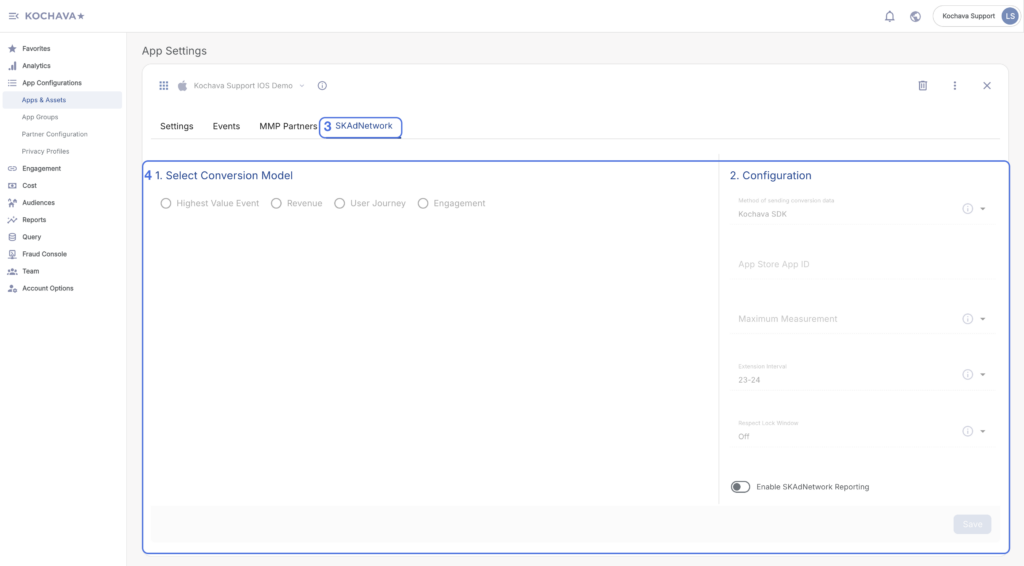
Workflow 4: Manage SKAdNetwork Configuration (iOS Apps)
Current Process:
- Go to Integrations in left navigation
- Click SKAdNetwork
- Select your iOS app
- Configure settings
New Process (April 15):
- Go to App Configurations → Apps & Assets
- Click on your iOS app
- Navigate to SKAdNetwork tab
- Configure settings
What’s the Same:
• All SKAdNetwork configuration options preserved
• Same settings and controls
• All your existing configurations maintained
What’s New:
• SKAdNetwork settings integrated into app view (iOS apps only)
• Better context – you’re already looking at the specific app
• All app-related settings in one place
• No more switching to separate Integrations section
Note: The SKAdNetwork tab only appears for iOS apps. Android apps will not display this tab.
Workflow 5: Set Up Postbacks
Current Process:
- Go to Apps & Assets
- Select Partner Configuration
- Select app
- Select partner
- Set up postback
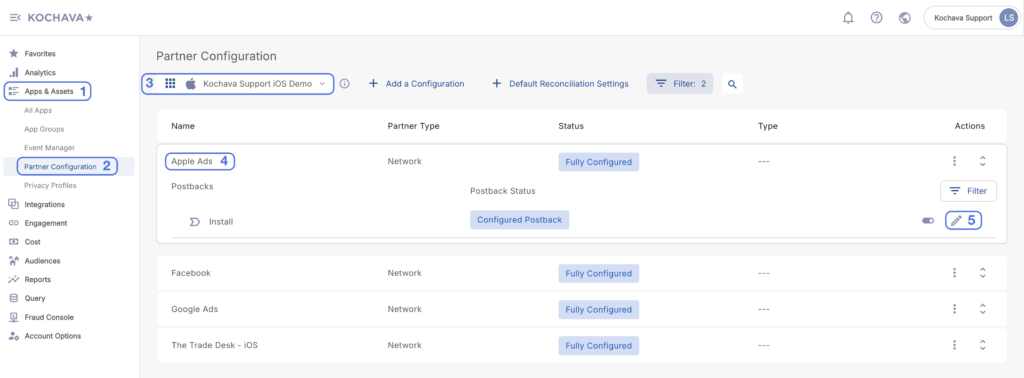
New Process (April 15) — TWO OPTIONS:
Option A (App Context):
- Go to App Configurations → All Apps
- Click on your app
- Navigate to MMP Partners tab
- Select partner
- Set up postback

Option B (App Configurations – Convenience Feature):
- Go to App Configurations menu
- Navigate to Partner Configuration
- Select App
- Select Partner
- Set up Postback
What’s the Same:
• All postback functionality preserved
• Same configuration options
• All existing postbacks maintained
What’s New:
• Postbacks accessible from app context
• Additional convenience location in App Configurations
• More flexible workflow options
• Default postback auto-created when adding new partner configuration
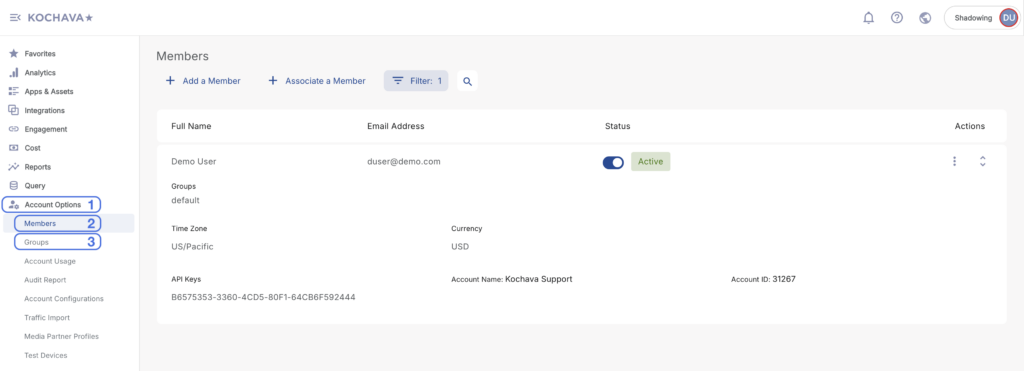
Workflow 6: Manage Team Members & Groups
Current Process:
- Go to Account Options in left navigation
- Click Members for user management
- Click Groups for group management
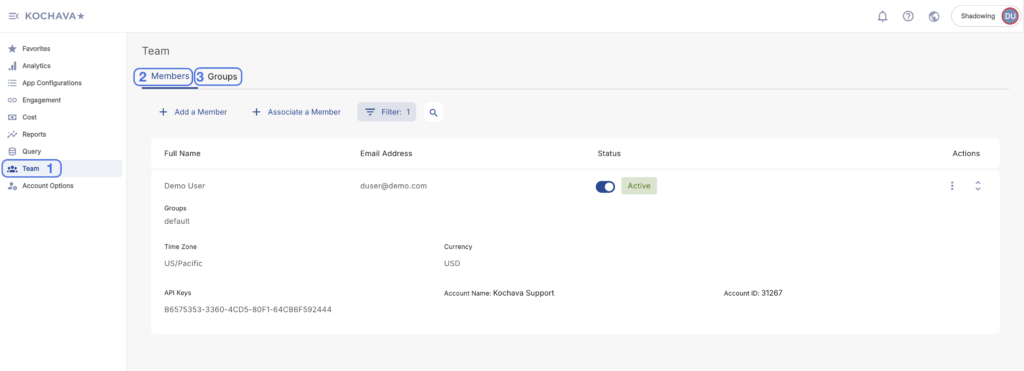
New Process (April 15):
- Click Team in main left navigation (now top-level)
Choose the tab you need: - Members tab – Add/edit team members, assign roles
- Groups tab – Create/manage user groups
What’s the Same:
• All team management capabilities preserved
• Same user roles and permissions
• Same group functionality
• Same API key generation and management
What’s New:
• Everything in one place – No more hunting through Account Options
• Team is top-level in left nav (easier to find)
• Tab-based organization – Clear separation of Members, Groups, API Keys, API Clients
• Better workflow – All team-related tasks accessible from single location
Tab Details:
Members Tab:
• View list of all team members
• Invite new users
• Edit user details and roles
• Manage user status (active/inactive)
• Same capabilities as current Account Options > Members
Groups Tab:
• Create and manage user groups
• Assign members to groups
• Set group-level permissions
• Same capabilities as current Account Options > Groups
What’s NOT Changing
✅ Your Data — All tracking data preserved
✅ Your Campaigns — All campaigns unchanged
✅ Your Analytics — Reporting unchanged
✅ Your Tracking — SDK and tracking links unchanged
✅ Your Integrations — All partner integrations maintained
✅ Your Team — User accounts and permissions preserved
✅ Core Workflows — Campaign Manager, Analytics, Fraud Console unchanged
✅ SKAdNetwork Settings — All configurations maintained (just moved to app tabs)
✅ API Keys — All existing keys continue working (just accessed via Team)
FAQ
Q: Where did "Account Options" go?
A: Team-related functions (Members, Groups, API Keys) have moved to the new Team section in the left nav. Other account settings remain in Account Options.
Q: Where is SKAdNetwork?
A: SKAdNetwork configuration is now in the SKAdNetwork tab when you click into an iOS app under App Configurations → Apps & Assets. The Integrations grouping has been removed.
Q: What if I want to use the old Event Manager page?
A: The standalone Event Manager page is being removed. All event management is now done through the Events tab when you click into an app. This provides better context and workflow efficiency.
Q: How do I manage API keys now?
A: Go to Team in the left navigation, then click the API Keys tab. All your existing API keys are there.
Q: Will my tracking links stop working?
A: No. All tracking links, SDK implementations, and attribution continue working exactly as before. This is a UI update only.
Q: Do I need to reconfigure my partners or SKAdNetwork?
A: No. All configurations are preserved and will appear in the new tabs under each app.
Q: What are the default install postback and tracker that get created?
A: When you add a new partner, the system creates a basic postback configuration and tracker to get you started quickly. You can customize these or add additional ones based on your needs.
Q: Will my campaigns be affected?
A: No. Campaign Manager is unchanged, and all campaigns continue running normally.
Q: Do I need to update my SDK?
A: No. This is a dashboard UI update only. No SDK or implementation changes required.
Q: I see additional sections in my navigation that aren't mentioned in this guide. What are they?
A: If you also use Kochava's AIM (Marketing Mix Modeling) product, you may see additional sections like "MMM Insights" or additional tabs in Team. Please refer to the separate AIM Migration Guide for those features.