The following document describes how to set up a campaign for InMobi Glance — SAN. Kochava enhances your install and event data with the InMobi Glance — SAN ad impression or click metadata directly from InMobi Glance — SAN to allow for extremely accurate and complete data.
Data Needed Before Beginning Process:
- InMobi Glance – SAN Product ID
- InMobi Glance – SAN Event Name
Create a Tracker for an InMobi Glance — SAN Install Campaign
- Log in to Kochava.
- Select the desired Account and App.
- Select Engagement > Campaign Manager.
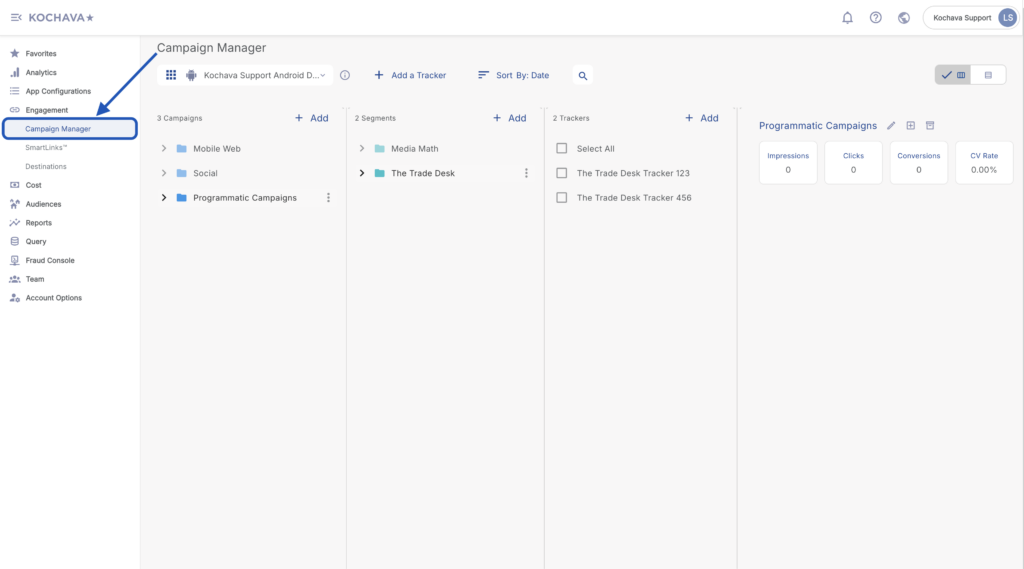
- Click + Add (Tracker) or Select Segment Tools (⋮) > Add Tracker.
- Enter the Tracker Name.
- Select Tracker Type > Acquisition. (default setting)
- Select Media Partner > InMobi Glance — SAN.
- Select Agency Partner. (optional)
- Enter the Destination URL.
- Enter a Deep Link. (optional)
- Enter any Custom Parameter(s). (optional)
- Click Save. (If no further trackers need to be created)
- Click Save & Add Another Tracker. (If additional trackers need to be created)
- Click Save & Create Postback (to navigate directly to the Partner Configuration page).
Install Postback Configuration
- Select App Configurations > Partner Configuration.
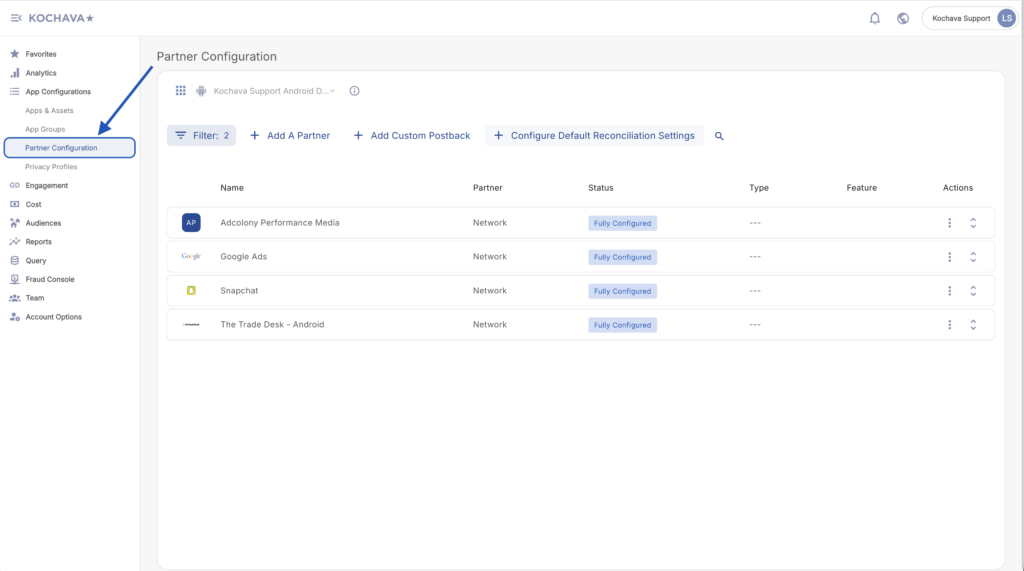
- Click Add a Configuration.
- Select Media Partner > InMobi Glance — SAN.
- Click Save.
- Select Install > 🖉 (Edit).
- Enter the InMobi Glance – SAN Product ID.
- Select the InMobi Glance – SAN Event Name > first_open.
- Click Save.
Reengagement Configuration
The information within this section provides the steps necessary to establish a reengagment campaign. If a reengagment campaign does not need to be created, the information in this section may be disregarded.
Create a Reengagement Segment:
- Locate the desired Campaign.
- Select Campaign Tools (⋮) > Add a Segment.
- Enter a Segment Name.
- Enter a Segment Description. (optional)
- Click Submit.
Create a Reengagement Tracker:
- Click Add a Tracker or Select Segment Tools (⋮) > Add a Tracker.
- Select the Campaign.
- Select the Segment.
- Enter a Tracker Name.
- Select Tracker Type > Reengagement.
- Select Media Partner > InMobi Glance — SAN.
- Select an Agency Partner. (optional)
- Select the InMobi Glance — SAN Event that will map to the selected Kochava event.
- Add Reengagement Event.
- Click Save (If no further trackers need to be created).
- Click Save & Add Another Tracker (If additional events need to be created).
- Click Save & Create Postback (to navigate directly to the Partner Configuration page).
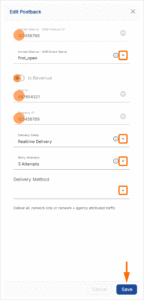
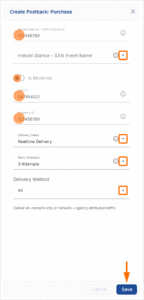
Post-Install Event Postback Configuration:
- Select App Configurations > Partner Configuration.
- Select InMobi Glance — SAN > Network Tools (⋮) > Postbacks.
- Locate the desired event and Click + for a new configuration or 🖉 (Edit) for an existing configuration.
- Enter the InMobi Glance – SAN Product ID.
- Select the InMobi Glance – SAN Event Name.
- Toggle Is Revenue. (optional)
- Enter the App ID.
- Enter the Property ID.
- Select the Delivery Delay.
- Select the Retry Attempts.
- Select the Delivery Method.
- Click Save.
Standard Post-Install Event List:
| Key | Description |
|---|---|
| first_open | When a user successfully launches an instant of the app for the first time. |
| session_start | When a user successfully launches an instant of the app. |
| trial | When a user successfully signs up for a given trial product. |
| sign_up | When a user completes an app sign up. |
| subscription | When a user pays for a subscription within a 14 day lookback of exposure (impression or click) to a media campaign. |
| checkout_start | User has completed checkout of items in cart. |
| level_complete | When the user completes a level within the app. |
| purchase | Item has been purchased. |
| share_with_friend | Link shared with contact. |
| ad_initiate | Ad has been started. |
| first_video_view | When the user makes the initial video view. |
| video_view | Video complete. |
| event_login | Signifies successful user authentication. |
| creditmatch_lead | Represents acquisition of credit-related leads. |
| new_registration | Marks completion of user account creation. |
| de_accountopen_start | Marks initiation of account opening process. |
| de_accountopen_success | Indicates successful account opening. |
| registration_complete | When a user completes a user registration. |
| return_reg | Denotes return to registration process. |
| de_directdeposit_success | Signifies successful direct deposit setup. |
| invite | Indicates sending or receiving invitations. |
| update | Represents completion of account or profile updates. |
| share | Link shared with contact. |
| add_to_wishlist | Item has been added to wishlist. |
| content_view | The user has viewed the ad content. |
Click and Impression Attribution Macros:
Click-through attribution, also known as click tracking, is the term used when a click leads to a user action within a certain attribution window. View-through attribution, also known as impression tracking, is the term used when an impression leads to a user action within a certain attribution window. The attribution window is supported for 30 day click lookback and 14 day impression lookback to meet your business needs.
| URL Parameters | Description | Type |
|---|---|---|
| click_id | ID of the click. | string |
| creative_id | ID of the creative. | string |
| device_id_type | The type of the device ID sent. | string |
| site_id | ID of the site. | string |
Example Attribution Response
Match:
{
"success": true,
            “attributionMode”: “BMA”,
"type": "impression",
"metadata": {
"click_id": "click_id",
"creative_id":"creative_id",
"site_id":"site_id",
"device_id_type":"device_id_type",
"unix_date":"unix_date"
"device_id":"device_id"
},
"match": {
" "IP": "IP""
}
}
No Match:
{
    "success": false,
    "attribution_mode": "BMA",
    "type": null,
    "matched_by": null,
    "matched_by_keys": null,
    "metadata": null,
    "match": null
}