The following document defines the process for creating The Trade Desk (TTD) campaign within Kochava.
Data Needed Before Beginning Process:
Create a Trade Desk Campaign
- Log in to Kochava.
- Select the desired Account and App.
- Select Engagement > Campaign Manager.
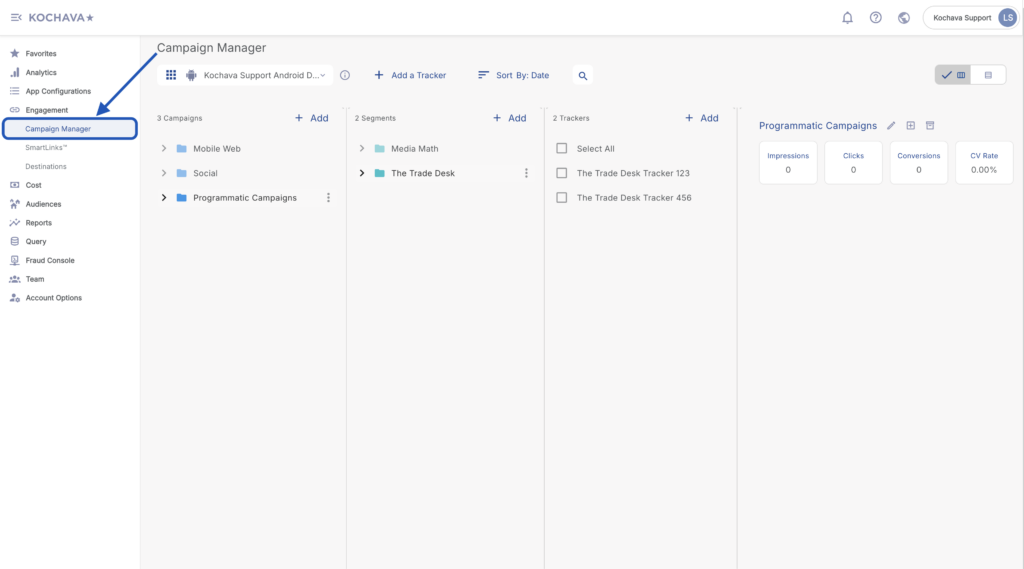
- Select the desired Campaign & Segment, or create new ones.
- Click + Add (Tracker)
- Enter the Tracker Name.
- Select Tracker Type > Acquisition. (default setting)
- Select Media Partner:
- The Trade Desk – iOS
- The Trade Desk – Android
- Select Agency Partner. (optional)
- Select the Destination URL Type:
- Custom
- Google Referrer (Android Only)
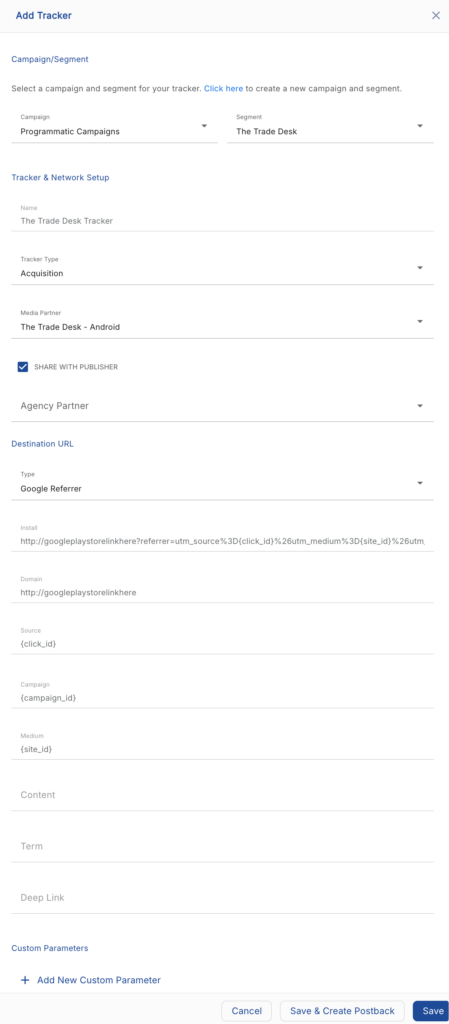
- Enter the Install Destination URL.
- Enter a Deep Link. (optional)
- Add a Custom Parameter. (optional)
- Click Add New Parameter.
- Enter the Custom Parameter.
- Add additional Custom Parameters. (optional)
- Click Save. (If no further trackers need to be created)
- Click[ Save & Add Another Tracker. (If additional trackers need to be created)
- Click Save & Create Postback (to navigate directly to the Partner Configuration page).
Data The Trade Desk Sends to Kochava:
Below is a list of the data that is sent to Kochava from The Trade Desk.
| adv={adv} | The TTD ID used to identify each advertiser. |
| ad_platform=TTD | Information used by Kochava. |
| click_id=%%TTD_IMPRESSIONID%% | The Trade Desk click ID |
| creative_id=%%TTD_CREATIVEID%% | The TTD ID used to identify each creative. |
| creative_size=%%TTD_ADFORMAT%% | Creative size (width x height). |
| site_category=default_site_category | Information used by Kochava. |
| site_id=%%TTD_SITE%% | The domain URL of the site that served the ad. |
| upid={upid} | The TTD ID used to identify each conversion tracker. |
| impression_id=%%TTD_IMPRESSIONID%% | The Trade Desk impression ID. |
| device_id=%%TTD_DEVICEID%% | The IDFA or ADID. |
| device_id_type=%%TTD_DEVICETYPE%% | The type of device ID sent. |
| event=served | The type of impression sent. |
Reengagement Configuration
The information within this section provides the steps necessary to establish a reengagment campaign. If a reengagment campaign does not need to be created, the information in this section may be disregarded.
Create a Reengagement Tracker:
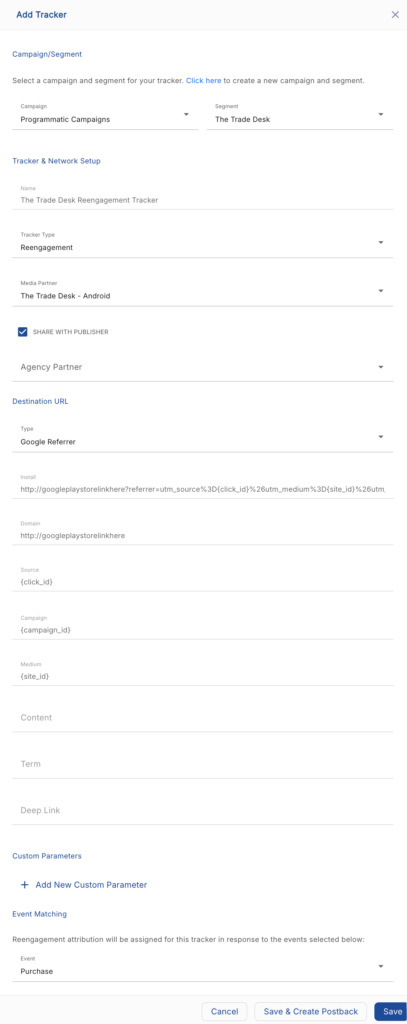
- Navigate to Engagement > Campaign Manager.
- Select the desired Campaign & Segment, or create new ones.
- Click + Add (Tracker).
- Enter a Tracker Name.
- Select Tracker Type > Reengagement.
- Select Media Partner:
- The Trade Desk – iOS
- The Trade Desk – Android
- Select an Agency Partner. (optional)
- Select the Destination URL Type:
- Custom
- Google Referrer (Android Only)
- Enter the Install Destination URL.
- Enter a Deep Link. (optional)
- Add a Custom Parameter. (optional)
- Enter Pricing Type and Target Pricing. (optional)
- Select The Trade Desk Event.
- Click Save (If no further trackers need to be created).
- Click Save & Add Another Tracker If additional events need to be created).
- Click Save & Create Postback. (To navigate directly to the Partner Configuration page).
Postback Configuration
- Select App Configurations > Partner Configuration.
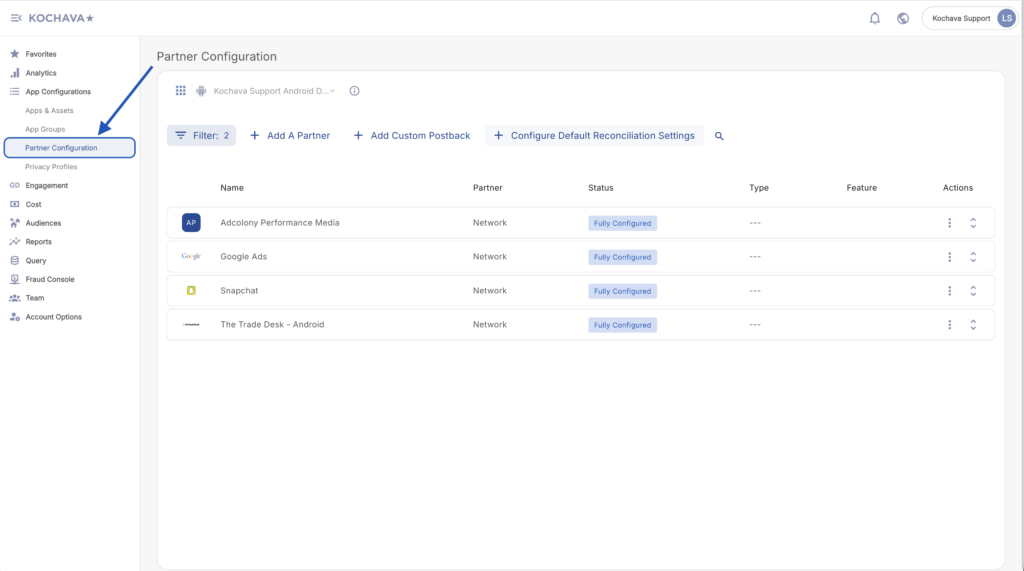
- Click + Add a Partner.
- Select Network Partner:
- The Trade Desk – iOS
- The Trade Desk – Android
- Click Next.
- Verify Status: Active.
- Click Save.
- Expand The Trade Desk Parter Configuration.
- Select + Add a Postback.
- Select the desired Event.
- Enter the App Name
- Select the Impression Conversion Delivery:
- Deliver All
- Deliver Only Completed View
- Deliver None
- Enter the Advertiser ID.
- Enter the App Tracker ID.
- Enter the Event Name.
- Select the Delivery Delay.
- Select the number of Retry Attempts.
- Select the Delivery Method.
- Click Save.
