Kochava for Agencies provides an effective means to manage the workflow between marketers, ad networks & publishers, and agencies. Marketers can easily work with a single agency or multiple agencies to run across campaigns for a marketer’s app(s). When a marketer utilizes a multiple-agency solution, each agency will only have access to campaigns they have created or those that the marketer created and assigned to them. Various levels of agency integration are available for marketers to select, providing robust permissions to allow agencies to create campaigns with any integrated media partner or have view-only access to specific campaigns created by the marketer.
Below are the three levels of agency integration available:
Limited Agency Profile
Access to:
- Campaign/Segment Creation
- Tracker Creation
- Analytics
- Reporting
- Partner Configuration
Full Agency Profile
Access to:
- App Tools
- Campaign Management
- Tracker/Segment Creation and Management
- Analytics
- Reporting
- Partner Configuration
Agency Account Approval/Creation Process
In order for a marketer to select an agency to work with, the agency must have a valid account within Kochava with the Agency setting turned ON. In order to turn on the Agency setting, contact your Client Success Managers. After this is done, follow the steps below to create your Media Partner Profile.
In order for a marketer to select an agency to work with, it is necessary for the agency to have a valid agency account within the UI (User Interface). To request a new Kochava account for your agency, please ensure that the request comes from an advertiser who is already integrated and utilizing Kochava as their Mobile Measurement Partner (MMP). The advertiser should reach out to Support@Kochava.com to confirm the request, including your agency contacts in the CC field. Our Support Team will then begin the agency account creation process and follow up with the necessary access credentials.
Media Partner Profile Configuration (Steps for Agency):
- Log in to Kochava.
- Select the desired Account.
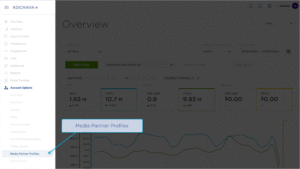
- Select Account Options > Media Partner Profiles.
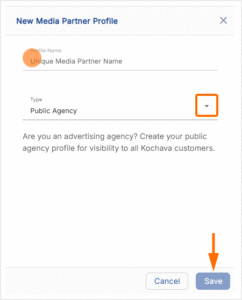
- Click + Add a Media Partner.
- Enter a Media Partner Title.
- Select Profile Type > Public Agency.
- Click Save.
Creating a Controlled Agency Configuration
When a marketer chooses ‘Controlled Agency Access”, the marketer will need to create Kochava Trackers and select the Agency Partner they’re for. Once the tracker is created, the marketer will need to provide the impression and/or click URL to the agency for trafficking. Any activity on such trackers will be tagged as belonging to the agency.
Create a Tracker (Steps for Marketer Admin):
- Log in to Kochava.
- Select the desired Account and App.
- Click + Add (Tracker) or Select Segment Tools (⋮) > Add Tracker.
- Enter a Unique Tracker Name.
- Select the Agency Partner.
- Select additional tracker options.
- Click Save.
Accessing Campaign Manager (Steps for Agency):
- Log in to Kochava.
- Select the desired Account and App.
- Select Engagement > Campaign Manager.
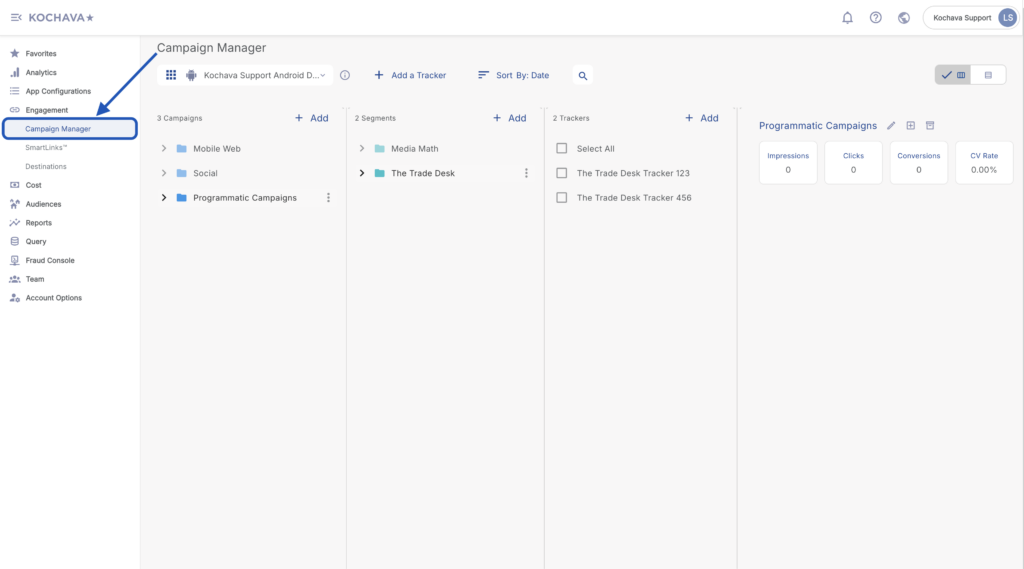
- Locate the desired Campaign and Tracker. Expand to view data.
Setting up a Postback Configuration (Steps for Marketer Admin):
- Log in to Kochava.
- Select the desired Account and App.
- Select App Configurations > Partner Configuration.
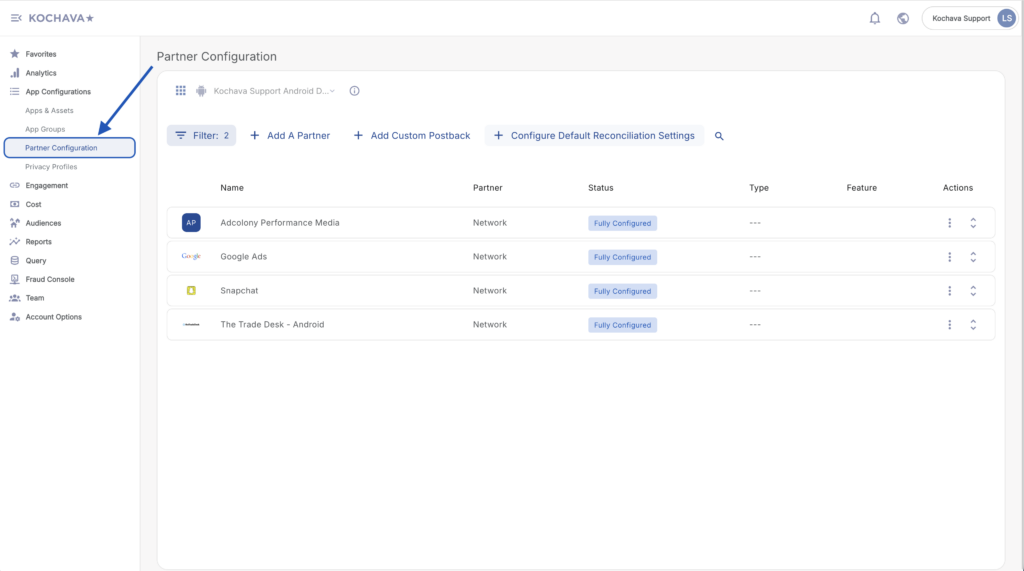
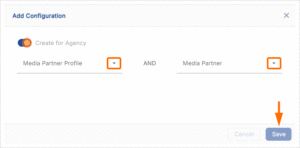
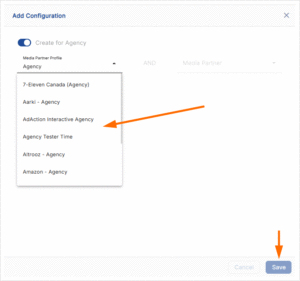
- Click + Add a Configuration.
- Check the Create For Agency toggle.
- Select the Media Partner Profile.
- Select the Media Partner.
- Click Save.
In order to send a real-time feed of installs and in-app events to an endpoint or to a Kochava-Certified partner, a partner configuration will need to be setup by the marketer in this case.
For more information on how to create a Custom Postback or a Kochava-Certified Postback, refer to our support documentation.
Creating a Limited Agency Configuration
Partner Configuration (Steps for Marketer Admin)
- Log in to Kochava.
- Select the desired Account and App.
- Select App Configurations > Partner Configuration.
- Click Add a Configuration.
- Select Media Partner > Select the Agency.
- Click Save.
Create New Trackers (Steps for Agency):
- Log in to Kochava.
- Select the desired Account and App
- Select Apps & Assets > Campaign Manager.
- Click Add a Tracker.
- Enter a Tracker Name.
- Select a Media Partner.
- Select your Agency under Agency Partner.
- Enter a Deep Link. (optional)
- Click Save.
Setting up a Postback Configuration (Steps for Marketer Admin or Agency):
In order to send a real-time feed of installs and in-app events to an endpoint or to a Kochava-Certified partner, the marketer must setup a postback configuration. For more information about a Custom Postback or a Kochava-Certified Postback, refer to our support documentation.
Configuring SAN Campaigns with Kochava for Agencies:
In order for Kochava to properly associate installs to their respective campaigns/segments/trackers in the Kochava dashboard, the Tracker ID must be appended to the campaign name within the associated SAN (e.g., Facebook, Google). To setup Twitter campaigns, refer to the steps outlined in the Create Kochava Twitter Campaign support document(attribution windows will not be available to agencies).
- Log in to Kochava.
- Select the desired Account and App.
- Select Engagement > Campaign Manager.
- Locate the desired Campaign, and Tracker. Expand to locate the Tracker ID.
- Copy and add the Tracker ID to the campaign name within the SAN UI.
SAN Nuances for Agencies
Event Postbacks:
For Event Postback configuration, please refer to our Kochava for Agencies SAN Campaign Postback Setup support documentation.
FMPs:
- Agencies will need to include the tracker IDs from Kochava in the FMP campaigns to track to the proper campaigns.
- Agencies need to setup FMP specific postbacks within their agency account if they are running with an FMP.
Full Agency Profile
The Full Agency configuration provides unlimited access for agencies to create apps, campaigns, trackers, as well as have access to the advanced tool set within Kochava. For further information contact your Client Success Managers.
Technical Support for Agencies
If you require technical support in using the platform, please contact Support@Kochava.com or send an email to the dedicated client account alias (e.g., ClientName@kochava.com) if your client has provided you with one.
Be sure to include the client’s account name and the name of the app(s) you are working with, along with the specifics of your inquiry.