The Scenarios tab within the AIM MMM Dashboard enables you to independently configure optimization settings and run “what-if” analyses for your app’s media spend — without requiring manual intervention from Kochava’s Customer Service or Data Science teams.
Using Scenarios, you can:
- Create up to 3 non-archived scenarios per app at any time
- Configure optimization strategy, budget type, and media source settings
- Generate a 2-week preview of projected outcomes automatically upon scenario creation
- Compare multiple scenarios side-by-side to identify the best-performing configuration
- Activate your chosen scenario to trigger a full 12-week optimization cycle and push live spend recommendations
Navigating to the Scenarios Tab
- From the left navigation, expand AIM MMM and click Dashboard.
- Select your app using the app selector in the top-left of the dashboard.
- Click the Scenarios tab in the tab bar (alongside Performance Overview, Recommendations, and Media Partners).
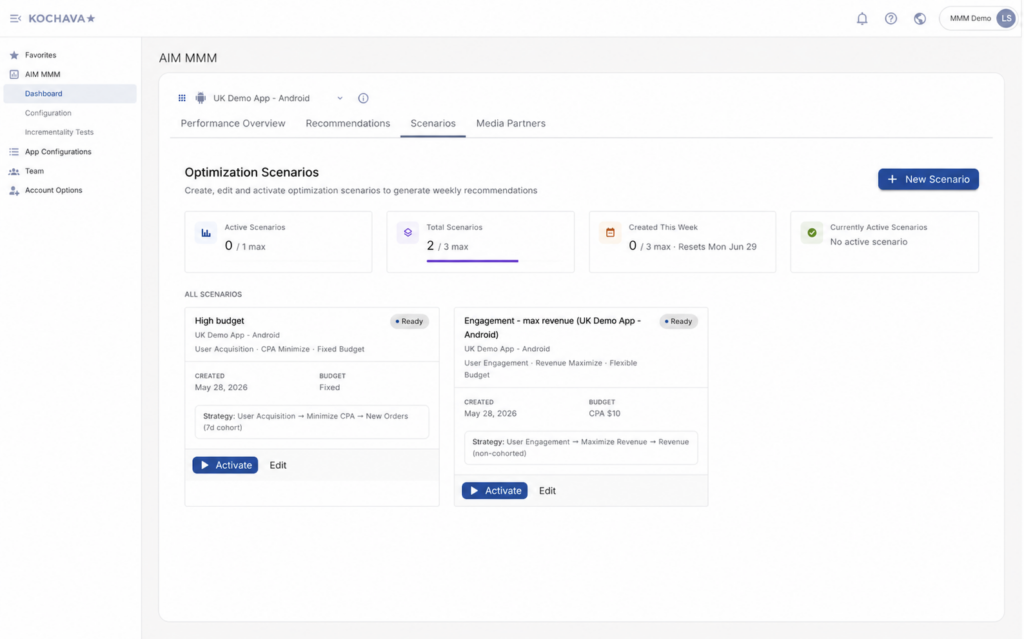
Scenarios Tab Overview
The Scenarios tab is organized into two primary areas: the Summary Metrics Bar at the top and the All Scenarios list below it.
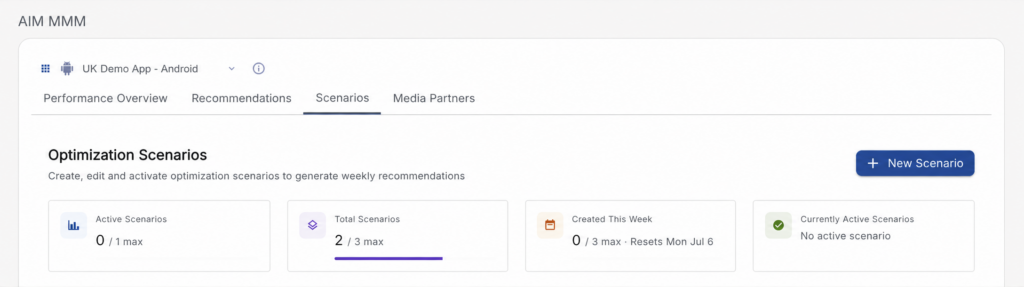
Summary Metrics Bar
At the top of the Scenarios tab, four summary cards provide an at-a-glance view of your current scenario usage and limits.
| Card | Description |
|---|---|
| Active Scenarios | Displays the number of currently active scenarios vs. the maximum allowed (1 max), with a blue progress bar. |
| Total Scenarios | Displays the total number of non-archived scenarios vs. the 3-scenario maximum, with a purple progress bar. |
| Created This Week | Displays how many scenarios have been created during the current week vs. the weekly limit (3 max). Resets each Monday. |
| Currently Active Scenarios | Displays the name of the scenario currently in Active state, or “No active scenario” if none is activated. |
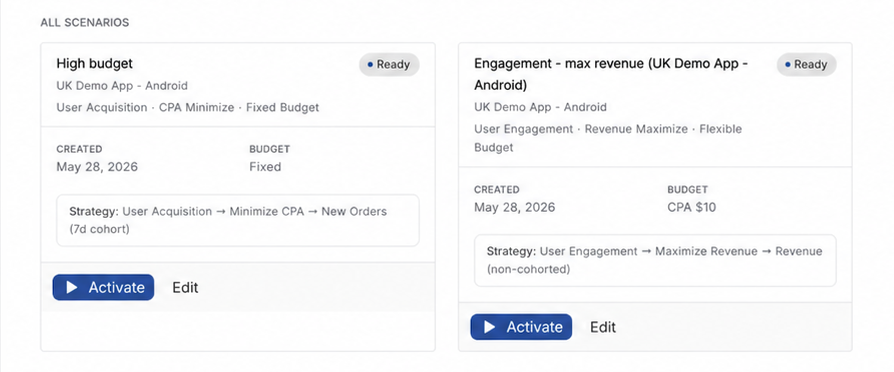
All Scenarios List
Below the summary bar, the All Scenarios section displays all of your non-archived scenarios as individual cards. Each scenario card surfaces key configuration details, its current status, and available actions.
Scenario Card Anatomy
Each scenario card includes the following information:
| Element | Description |
|---|---|
| Scenario Name | The user-defined name for the scenario (e.g., “High budget”). |
| App | The app the scenario is associated with (e.g., UK FreePrints Android). |
| Strategy Summary | A one-line description of the configured optimization strategy (e.g., User Acquisition · CPA Minimize · Fixed Budget). |
| Status Badge | A colored chip indicating the scenario’s current state (e.g., Ready, Generating Preview, Active). |
| Created Date | The date the scenario was originally created. |
| Budget | The budget type configured for the scenario (e.g., Fixed, or a Flexible CPA target such as CPA $10). |
| Full Strategy | A detailed strategy description line (e.g., User Acquisition → Minimize CPA → New Orders (7d cohort)). |
Scenario Card Actions
Depending on the scenario’s current status, one or more action buttons appear in the card footer:
| Button | Available When | Description |
|---|---|---|
| Activate | Status = Preview Ready | Commits the scenario to production and triggers the full 12-week optimization run. |
| Edit | Status = Preview Ready, Preview Failed, Activation Failed, or Cancelled | Opens the scenario configuration form pre-filled with existing settings. |
| Retry | Status = Preview Failed | Re-queues the preview run using the existing configuration. |
| Retry Activation | Status = Activation Failed | Re-attempts the full activation run. |
| Cancel Preview | Status = Queued or Generating Preview | Cancels the in-progress preview. The scenario remains in your scenario count; archive it to free up a slot. |
| Re-run Preview | Status = Cancelled | Re-queues the scenario for a new 2-week preview run. |
| Deactivate | Status = Active | Stops the weekly recommendation refresh. The scenario returns to Preview Ready state. |
| Archive | Status = Preview Ready, Preview Failed, Cancelled, or Activation Failed | Permanently marks the scenario as read-only and removes it from the scenario count. |
Scenario States
Scenarios move through a defined lifecycle of states. The table below describes each state, its corresponding UI label, and whether it counts toward the 3-scenario limit.
| State (System) | UI Label | Description | Counts Toward Limit? |
|---|---|---|---|
pending_preview | Queued | Scenario created; waiting for preview to start | Yes |
preview_running | Generating Preview | 2-week preview run in progress | Yes |
preview_generated | Preview Ready | Preview complete; results available for review | Yes |
preview_failed | Preview Failed | Preview job failed; click Retry to re-run | Yes |
activating | Activating | Full 12-week optimization run in progress | Yes |
activating_failed | Activation Failed | Activation job failed; click Retry Activation | Yes |
activated | Active | Optimization run complete; recommendations are live | Yes |
cancelled | Cancelled | Preview was cancelled; can be re-previewed | Yes |
archived | Archived | Scenario is permanently read-only; excluded from limit | No |
Creating a New Scenario
To create a new scenario, click the + New Scenario button in the upper-right of the Scenarios tab.
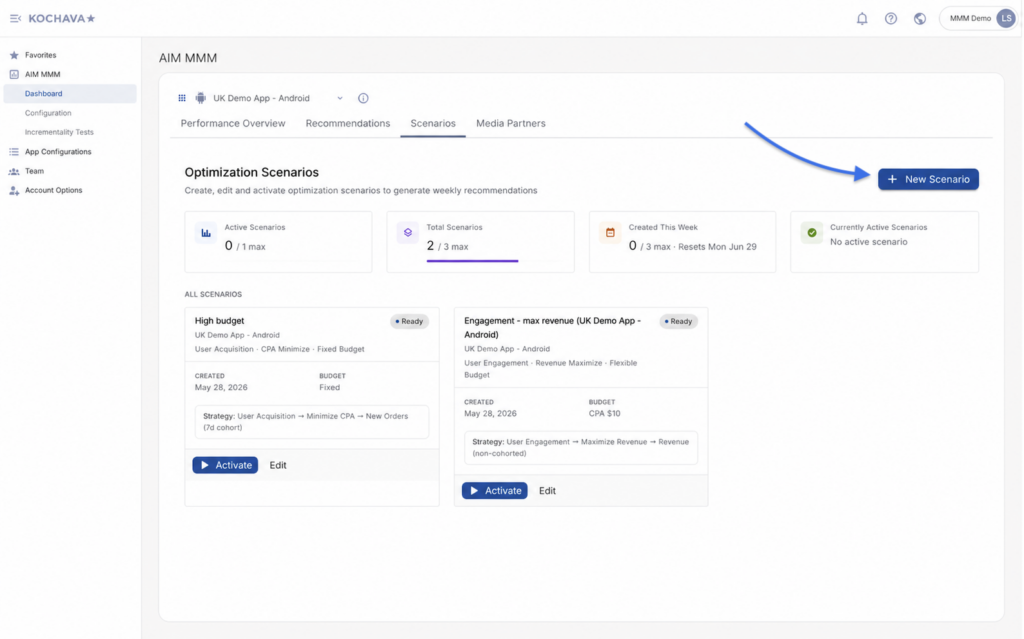
The scenario creation wizard walks you through four configuration steps.
Step 1: General Settings
Enter a name and optional description for your scenario.
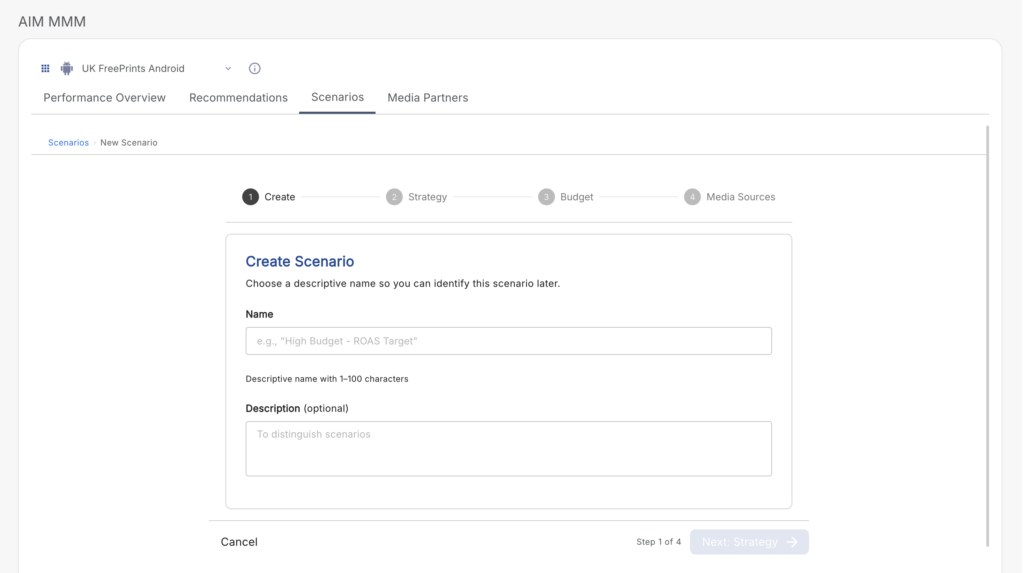
- Scenario Name (required): 1–100 characters.
- Description (optional): Up to 500 characters.
Step 2: Strategy Selection
Choose the optimization strategy for your scenario in three steps.
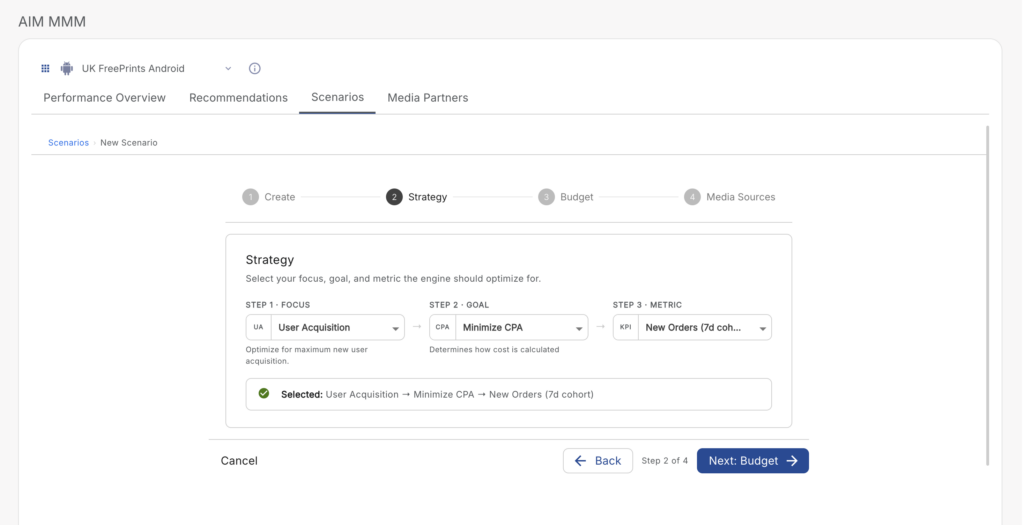
Step 2a — Focus: Choose the primary optimization focus.
| Option | Description |
|---|---|
| User Acquisition | Optimize toward acquiring new users. |
| User Engagement | Optimize toward engaging and retaining existing users. |
| Hybrid | Balance acquisition and engagement goals. |
Step 2b — Type: Choose the optimization type.
| Option | Description |
|---|---|
| Minimize CPA | Reduce the cost per acquisition. |
| Maximize Revenue | Maximize revenue generated from ad spend. |
Step 2c — Metric: Choose the specific performance metric to optimize against. Available options depend on your Focus and Type selections.
| Focus | Type | Available Metrics |
|---|---|---|
| User Acquisition | Minimize CPA | New Orders (7d cohort), Total Orders (7d cohort) |
| User Acquisition | Maximize Revenue | Revenue (7d) |
| User Engagement | Minimize CPA | Total Orders (non-cohorted) |
| User Engagement | Maximize Revenue | Revenue (non-cohorted) |
| Hybrid | Minimize CPA | Total Orders (365d + non-cohorted) |
| Hybrid | Maximize Revenue | Revenue (365d + non-cohorted) |
Step 3: Budget Configuration
Configure how the optimizer should manage your budget.
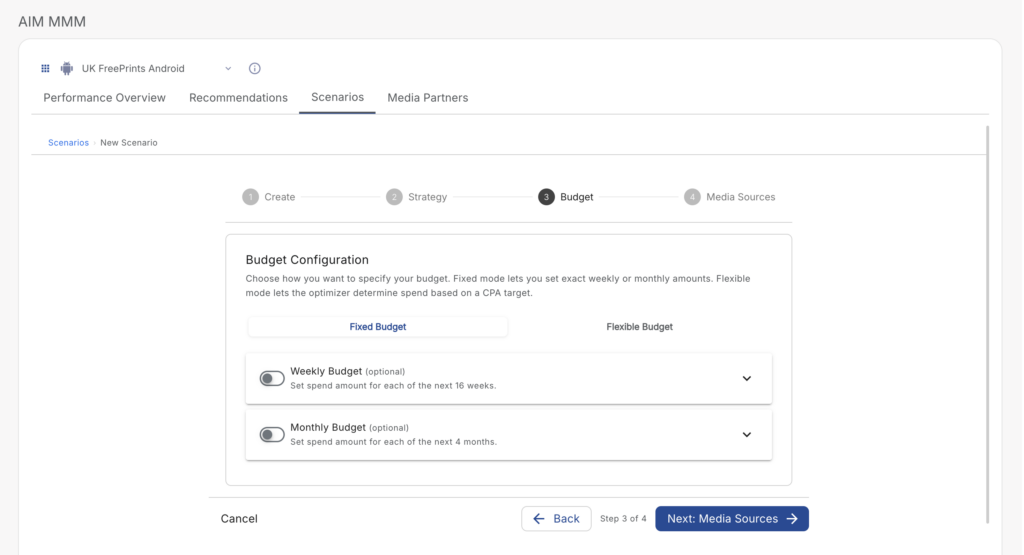
Choose between two budget modes:
Fixed Budget
Specify a budget per week or per month. The optimizer will work within your defined spend limits.
- Provide weekly or monthly budget amounts (mutually exclusive).
- Budget fields are optional — if left blank, the optimizer determines the recommended budget.
- If some months are left blank, the optimizer falls back to the target CPA (or a historically calculated EMA-based CPA) for those periods.
Flexible Budget
Specify a target CPA or ROAS and let the optimizer determine the appropriate budget.
- Optionally set a Target CPA or Target ROAS — if no target CPA is provided, the system calculates one from your historical Exponential Moving Average (EMA).
- Optionally define min/max budget guardrails.
Step 4: Media Source Customization
Select and configure the media sources to include in this scenario’s optimization.
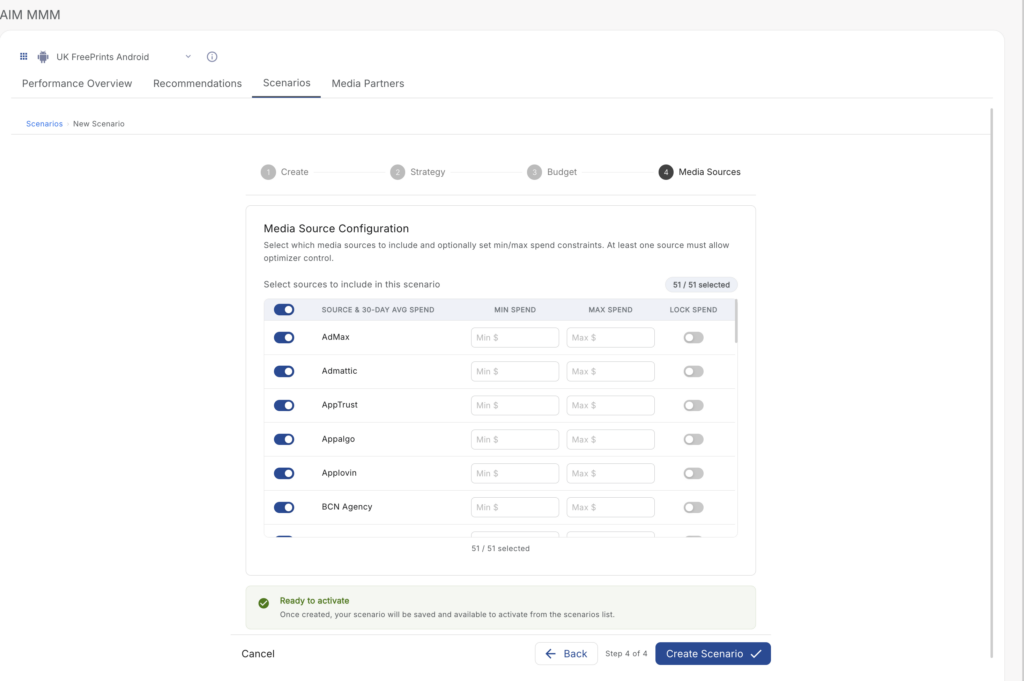
- Enable/Disable Sources: Toggle individual media sources on or off.
- Min/Max Spend: Set floor and ceiling spend constraints per source.
- Maintain Spend: Lock a source at its current spend level, preventing the optimizer from adjusting it.
A counter displays your current selection count (e.g., “Media Sources: 12/50 selected”). Up to 50 media sources may be included per scenario.
Scenario Preview
When a new scenario is created, a 2-week preview run is automatically triggered. No manual action is required.
The preview:
- Generates projected 2-week results based on your configured strategy, budget, and media sources.
- Is stored separately from your live recommendations and does not affect production output.
- Returns results incrementally — partial results may display before the run is fully complete.
- Is typically available within 5–15 minutes of scenario creation.
You will receive both an in-app notification (bell icon) and an email notification when your preview is ready.
Viewing Preview Results
Once a scenario reaches Preview Ready status, you can click into the scenario to view the 2-week preview results.
Preview results include:
KPI Summary Cards
Displays projected values for Total CPA, Total ROAS, Total Revenue, and Total Spend — each with a delta vs. the Business As Usual (BAU) baseline.
Performance Chart
A time-series chart combining 4 weeks of historical data with the 2-week preview forecast. A clear boundary separates historical data from projected data. Confidence interval shading is displayed around forecast values.
Channel Breakdown Table
A sortable, paginated table (20 rows per page) showing per-media-source projections, including:
- Current spend
- Recommended spend
- Delta
- CPA, ROAS, and Revenue
Comparing Scenarios
Up to 3 scenarios can be compared side-by-side, alongside a BAU baseline, using the Resync for Comparison feature.
To ensure results are directly comparable, scenarios must be run against the same data snapshot. The Resync for Comparison action re-runs your selected scenarios simultaneously via the optimizer, producing results from an identical data baseline.
To compare scenarios:
- From the Scenarios tab, select the scenarios you want to compare (up to 3).
- Click Resync for Comparison.
- Once the resync completes, results from all selected scenarios — plus the BAU baseline — are displayed side-by-side.
The comparison view displays:
- The date of the last resync
- Side-by-side KPI cards per scenario
- A combined chart with distinct color coding per scenario
- A channel breakdown table showing all scenarios
Data can be exported in CSV or JSON format using the Export button.
Activating a Scenario
Activating a scenario commits it to production and triggers the full 12-week optimization cycle. After activation, live spend recommendations on the Recommendations tab will reflect the activated scenario’s configuration.
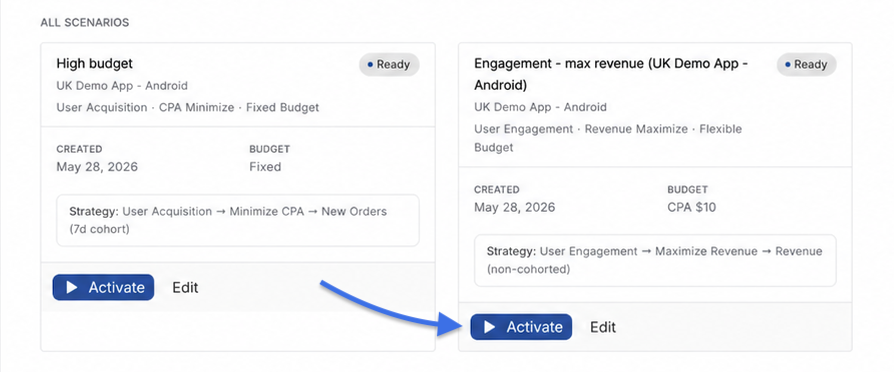
To activate a scenario:
- Locate the scenario in the All Scenarios list with a status of Preview Ready.
- Click Activate on the scenario card.
- If another scenario is currently Active, a confirmation dialog will appear warning that existing recommendations will be replaced. Confirm to proceed.
- The scenario transitions to Activating status while the 12-week optimization run is processed.
- Once complete, the scenario status changes to Active and recommendations are updated on the Recommendations tab.
Activation timing:
- Target completion: ~6 hours
- Warning notification sent at: 7 hours
- Hard timeout / Activation Failed state: 8 hours (a Retry Activation button will appear)
Managing Scenarios
Editing a Scenario
Scenarios in Preview Ready, Preview Failed, Activation Failed, or Cancelled status can be edited. Click Edit on the scenario card to re-open the configuration wizard pre-filled with current settings. Saving edits automatically triggers a new preview run.
Archiving a Scenario
Archiving a scenario removes it from your scenario count, freeing up a slot for a new scenario. Archived scenarios are read-only — they cannot be edited, activated, or re-previewed.
To archive: click the Archive option available in the scenario card actions for any eligible scenario.
Archived scenarios are retained for 90 days before permanent deletion.
Retrying Failed Scenarios
If a preview or activation run fails due to a transient error, a Retry or Retry Activation button will appear on the scenario card. Clicking retry re-queues the run using the existing configuration. The scenario ID, name, and full audit history are preserved across retry attempts.
Cancelling a Preview
While a scenario is in Queued or Generating Preview status, a Cancel Preview button is available. Cancelling transitions the scenario to Cancelled status.
Scenario Limits Reference
| Limit | Value |
|---|---|
| Max non-archived scenarios per app | 3 |
| Max Active or Activating scenarios per app | 1 |
| Weekly preview run limit (resets each Monday) | 3 |
| Max media sources per scenario | 50 |
| Scenario name length | 1–100 characters |
| Description length | 0–500 characters (optional) |
| Preview results retention | 3 months |
| Archived scenario retention | 90 days before permanent deletion |
| Minimum historical data required | 90 days |
Notifications
You will be notified when your scenario preview is ready through two channels:
- In-app notification — appears in the bell icon (notification center) within the Kochava platform.
- Email notification — sent to the account email address associated with the user who created the scenario.
Notification message: “Your scenario ‘[Scenario Name]’ preview is ready. [View Results →]”
Frequently Asked Questions
Q: Why does my scenario count toward the limit even though I cancelled it?
Cancelled scenarios still occupy a configuration slot and can be re-previewed at any time. To free up a slot, archive the cancelled scenario.
Q: Can I activate a scenario without viewing the preview results first?
Yes. You can activate any scenario in Preview Ready status without reviewing the preview results. After activation, the Recommendations tab will reflect the newly activated scenario’s recommendations.
Q: What happens to my existing recommendations when I activate a new scenario?
The previously Active scenario’s recommendations are replaced by the newly Activated scenario’s recommendations. The previous scenario is returned to Preview Ready status — it is not deleted or archived automatically. You can keep it, reactivate it later, or archive it manually.
Q: How long does a preview take?
Preview results are typically delivered within 5–15 minutes (90th percentile). The scenario status updates automatically and you will receive both an in-app and email notification when results are ready.
Q: Can I compare scenarios across different apps?
No. Cross-app scenario comparison is not supported. All scenarios included in a comparison must belong to the same app.
Q: What is BAU?
BAU (Business As Usual) represents the predicted outcome if your current spend allocation is maintained without any adjustments. It serves as the baseline against which scenario projections are compared.
Related Articles