The following document defines the process for creating an Line campaign within Kochava.
Data Needed Before Beginning Process:
- Line Mobile App ID
- Line Advertiser ID
Create a Line Campaign
- Log in to Kochava.
- Select the desired Account and App.
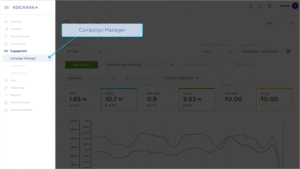
- Select Engagement > Campaign Manager.
- Click + Add (Tracker) or Select Segment Tools (⋮) > Add Tracker.
- Enter a unique Tracker Name.
- Select the Tracker Type > Acquisition
- Select Media Partner:
- Line Ads Platform – iOS
- Line Ads Platform – Android
- Select a Agency Partner. (optional)
- Select the Destination URL Type:
- Custom
- Google Referrer (Android Only)
- Enter the Install Destination URL.
- Enter a Deep Link. (optional)
- Add a Custom Parameter. (optional)
- Custom
- Google Referrer (Android Only)
- Click Save. (If no further trackers need to be created)
- Click Save & Add Another Tracker. (If additional trackers need to be created)
- Click Save & Create Postback. (To navigate directly to the Partner Configuration page).
Reengagement Configuration
The information within this section provides the steps necessary to establish a reengagment campaign. If a reengagment campaign does not need to be created, the information in this section may be disregarded.
Create a Reengagement Segment:
- Locate the desired Campaign.
- Select Campaign Tools (⋮) > Add a Segment.
- Enter a Segment Name.
- Enter a Segment Description. (optional)
- Click Submit.
Create a Reengagement Tracker:
- Click Add a Tracker or Select Segment Tools (⋮) > Add a Tracker.
- Select the Campaign.
- Select the Segment.
- Enter a Tracker Name.
- Select Tracker Type > Reengagement.
- Select Media Partner:
- Line Ads Platform – iOS
- Line Ads Platform – Android
- Select an Agency Partner. (optional)
- Select the Destination URL Type:
- Enter the Install Destination URL.
- Enter a Deep Link. (optional)
- Add a Custom Parameter. (optional)
- Select the Line Event.
- Click Save (If no further trackers need to be created).
- Click Save & Add Another Tracker If additional events need to be created).
- Click Save & Create Postback. (To navigate directly to the Partner Configuration page).
Postback Configuration
To comply with Line’s audience building tech, specific data points are required to be sent. If a reengagement campaign is going to be run without sending the specific data points, a custom postback configuration should be created.
- Select Apps & Assets > Partner Configuration.

- Click + Add a Configuration.
- Select Network Partner:
- Line Ads – iOS
- Line Ads – Android
- Click Save.
- Locate the desired post-install event.
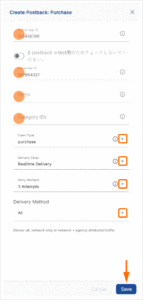
- Click Postback Tools (⋮) > Edit.
- Enter the Line Mobile App ID.
- Enter the Line Advertiser ID.
- Enter the Items path.
- Enter the Line Category IDs.
- Select the Event Type.
- Select the Delivery Delay.
- Select the number of Retry Attempts.
- Select the Delivery Method.
- Click Save.
Line Event Detail
Open Event:
| Name | Required | Optional | Description | Schema |
|---|---|---|---|---|
| timestamp | ✔ | Timestamp when server received event (milliseconds). | integer (int64) | |
| mobile_app_id | ✔ | Mobile App ID. | string | |
| advertiser_id | ✔ | Advertiser ID. | string | |
| audience_id | ✔ | IDFA or Advertising ID. | string | |
| user_agent | ✔ | Client user agent. | string | |
| ip_address | ✔ | Client up address. | string |
View Home Event:
| Name | Required | Optional | Description | Schema |
|---|---|---|---|---|
| timestamp | ✔ | Timestamp when server received event (milliseconds). | integer (int64) | |
| mobile_app_id | ✔ | Mobile App ID. | string | |
| advertiser_id | ✔ | IDFA or Advertising ID. | string | |
| user_agent | ✔ | Client user agent. | string | |
| ip_address | ✔ | Client up address. | string |
View Category Event:
| Name | Required | Optional | Description | Schema |
|---|---|---|---|---|
| timestamp | ✔ | Timestamp when server received event (milliseconds). | integer (int64) | |
| mobile_app_id | ✔ | Mobile App ID. | string | |
| advertiser_id | ✔ | IDFA or Advertising ID. | string | |
| user_agent | ✔ | Client user agent. | string | |
| ip_address | ✔ | Client up address. | string | |
| category_ids | ✔ | Category IDs. | < string > array |
View Item Event:
| Name | Required | Optional | Description | Schema |
|---|---|---|---|---|
| timestamp | ✔ | Timestamp when server received event (milliseconds). | integer (int64) | |
| mobile_app_id | ✔ | Mobile App ID. | string | |
| advertiser_id | ✔ | IDFA or Advertising ID. | string | |
| audience_id | ✔ | IDFA or Advertising ID. | string | |
| user_agent | ✔ | Client user agent. | string | |
| ip_address | ✔ | Client up address. | string | |
| items | ✔ | View items. | < Item > array | |
| category_ids | ✔ | Category IDs. | < string > array |
Search Event:
| Name | Required | Optional | Description | Schema |
|---|---|---|---|---|
| timestamp | ✔ | Timestamp when server received event (milliseconds). | integer (int64) | |
| mobile_app_id | ✔ | Mobile App ID. | string | |
| advertiser_id | ✔ | IDFA or Advertising ID. | string | |
| audience_id | ✔ | IDFA or Advertising ID. | string | |
| user_agent | ✔ | Client user agent. | string | |
| ip_address | ✔ | Client up address. | string | |
| keyword | ✔ | Search keyword. | string |
Add to Cart Event:
| Name | Required | Optional | Description | Schema |
|---|---|---|---|---|
| timestamp | ✔ | Timestamp when server received event (milliseconds). | integer (int64) | |
| mobile_app_id | ✔ | Mobile App ID. | string | |
| advertiser_id | ✔ | IDFA or Advertising ID. | string | |
| audience_id | ✔ | IDFA or Advertising ID. | string | |
| user_agent | ✔ | Client user agent. | string | |
| ip_address | ✔ | Client up address. | string | |
| items | ✔ | Added items. | < Item > array | |
| category_ids | ✔ | Category IDs. | < string > array |
Purchase Event:
| Name | Required | Optional | Description | Schema |
|---|---|---|---|---|
| timestamp | ✔ | Timestamp when server received event (milliseconds). | integer (int64) | |
| mobile_app_id | ✔ | Mobile App ID. | string | |
| advertiser_id | ✔ | IDFA or Advertising ID. | string | |
| audience_id | ✔ | IDFA or Advertising ID. | string | |
| user_agent | ✔ | Client user agent. | string | |
| ip_address | ✔ | Client up address. | string | |
| items | ✔ | Added items. | < Item > array | |
| category_ids | ✔ | Category IDs. | < string > array |
Level Achieved Event:
| Name | Required | Optional | Description | Schema |
|---|---|---|---|---|
| timestamp | ✔ | Timestamp when server received event (milliseconds). | integer (int64) | |
| mobile_app_id | ✔ | Mobile App ID. | string | |
| advertiser_id | ✔ | IDFA or Advertising ID. | string | |
| audience_id | ✔ | IDFA or Advertising ID. | string | |
| user_agent | ✔ | Client user agent. | string | |
| ip_address | ✔ | Client up address. | string | |
| *level_id | ✔ | Achieved level ID. | string |
Tutorial Complete Event:
| Name | Required | Optional | Description | Schema |
|---|---|---|---|---|
| timestamp | ✔ | Timestamp when server received event (milliseconds). | integer (int64) | |
| mobile_app_id | ✔ | Mobile App ID. | string | |
| advertiser_id | ✔ | IDFA or Advertising ID. | string | |
| audience_id | ✔ | IDFA or Advertising ID. | string | |
| user_agent | ✔ | Client user agent. | string | |
| ip_address | ✔ | Client up address. | string | |
| *level_id | ✔ | Achieved level ID. | string |
Custom Event:
| Name | Required | Optional | Description | Schema |
|---|---|---|---|---|
| timestamp | ✔ | Timestamp when server received event (milliseconds). | integer (int64) | |
| mobile_app_id | ✔ | Mobile App ID. | string | |
| advertiser_id | ✔ | IDFA or Advertising ID. | string | |
| audience_id | ✔ | IDFA or Advertising ID. | string | |
| user_agent | ✔ | Client user agent. | string | |
| ip_address | ✔ | Client up address. | string | |
| name | ✔ | Custom event name. Maximum Length: 100 | string | |
| data | ✔ | Any string can be specified. Maximum Length: 100 | string |