Support Home > Campaign Management > Tracker Override Settings

Tracker Override Settings

Feature Summary: The following document defines the process for setting tracker specific overrides for impression and/or click attribution as well as the duration of time post-install events will be associated to the original attribution source.


NOTE: The tracker override settings will take precedence over the network-specific impression and click attribution settings.


Data Needed Before Beginning Process:

  • A valid campaign with tracker setup within Kochava.


Use Cases for Updating Tracker Override Settings:

  • If you are running both User Acquisition as well as reengagement campaigns with the same network, you may want different lookback windows based on the specifics of the I/O in place for each campaign type.
  • This functionality allows you to customize your reconciliation options at a more granular level. For example if you are running both incentivized and non-incentivized campaigns on the same network, an advertiser would likely want a shorter lookback window for their incentivized campaign because those campaigns have a much shorter MTTI.


WARNING: Tracker-level overrides do not function for SANs. If specific settings need to be adjusted for a SAN, refer to our Partner Reconciliation Settings support documentation.


Tracker Override User Interface

  1. Log in to Kochava.
  2. Select the desired Account and App.
  3. Select Links > Campaign Manager.
  4.  


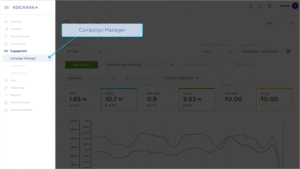
  1. Locate the desired Campaign.
  2. Click the Campaign expand button.
  3. Select Tracker Tools () > Overrides.

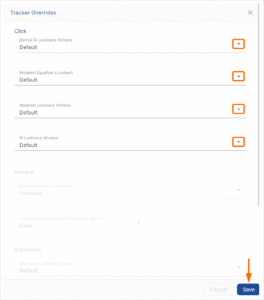
Click Override Settings

NOTE: For more information on the Kochava Attribution Engine, refer to our Attribution Overview support documentation.

(see iOS 14+ restrictions)

  1. Select the Click Device Lookback window.
  2. NOTE: The Click Device Lookback determines the time frame that Kochava will lookback for click based device attribution. The Click Device Lookback can be set from Disabled up to 30 days.

  3. Select the Click Fingerprint Equalizer window.
  4. NOTE: The Click Fingerprint Equalizer window determines the length of time that Kochava will consider a fingerprint match at the same level of attribution as a device-based match. The Click Fingerprint Equalizer window can be set from Disabled up to 30 days.

  5. Select the Click Fingerprint Lookback window.
  6. NOTE: The Click Fingerprint Lookback window determines the time frame that Kochava will lookback for click based full-fingerprinting attribution. The Click Fingerprinting Lookback window can be set from Disabled up to 30 days.

  7. Select the Click IP Lookback window.
  8. NOTE: The Click IP Lookback window determines the time frame that Kochava will lookback for click based IP-only fingerprinting and IP-range fingerprinting attribution. The Click IP Lookback window can be set from Disabled up to 30 days.

  9. If Event Association lookback settings need to be modified, proceed to the General Override Settings sections; if not, Click Save.


General Override Settings

  1. Select the Event Association Lookback window.
  2. NOTE: The Event Association Lookback determines the time frame that Kochava will associate a post-install event within the window of conversion. The Event Association Lookback window can be set from one minute up to 365 days, or an unlimited amount of time.

    NOTE: After the event association lookback period has elapsed, the events that occur after the elapse will be labeled as unattributed.

    NOTE: When the event association lookback setting is modified, only the events that occur after the setting modification will apply the logic that was changed.


    USE CASE: An advertiser has a specific time frame in which they require a network to have an attributed install and post-install event in order to obtain payment. The Event Association Lookback window provides the tool to specifically track the installs and post-install events that fall within the desired time frame.


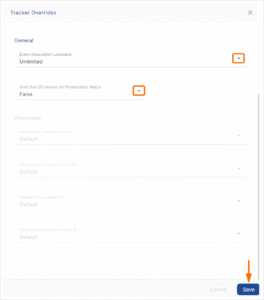
  3. Select if Omit Sub OS Version for Probabilistic Match.
  4. NOTE: By default this setting is set to False.

    NOTE: When this setting is set to True, Kochava’s system will ignore the patch level of the OS version when either the click or install does not have the patch level/patch level=0 and award probabilistic attribution based on the first two sections of the OS version. If both the click and install have a patch level, Kochava will not disregard the patch level (example click = iOS 15.2.5 install = iOS 15.2.1 will not match).

  5. If Impression Association lookback settings need to be modified, proceed to the Impression Override Settings sections; if not, Click Save.


Impression Override Settings

  1. Select the Impression Device Lookback window.
  2. NOTE: The Impression Device Lookback determines the time frame that Kochava will lookback for impression based device attribution. The Impression Device Lookback can be set from Disabled up to 24 hours.

  3. Select the Impression Fingerprint Lookback window.
  4. NOTE: The Impression Fingerprint Lookback window determines the time frame that Kochava will lookback for impression based full-fingerprinting attribution. The Impression Fingerprint Lookback can be set from Disabled up to 24 hours.

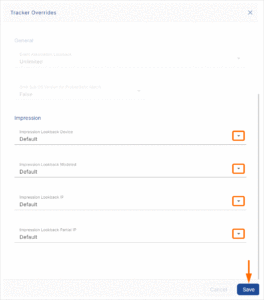
  5. Select the Impression IP Lookback window.
  6. NOTE: The Impression IP Lookback window determines the time frame that Kochava will lookback for impression based IP only fingerprinting attribution. The Impression IP Lookback can be set from Disabled up to 24 Hours.

  7. Select the Impression Partial IP Lookback window.
  8. NOTE: The Impression Partial IP Lookback window determines the time frame that Kochava will lookback for impression based IP-range fingerprinting attribution. The Impression Partial IP Lookback can be set from Disabled up to 24 Hours.

  9. Click Save.


Last Modified: Jan 11, 2024 at 4:09 pm