
Overview
The Kochava SDK is lightweight and can easily be integrated into your project in only a few minutes. To get started check out the Minimum Requirements and then follow the steps in the Integrating the SDK topic. If you have already integrated, explore the remaining topics for additional functionality.
The Kochava SDK is lightweight and can easily be integrated into your project in only a few minutes. To get started check out the Minimum Requirements and then follow the steps in the Integrating the SDK topic. If you have already integrated, explore the remaining topics for additional functionality.

Platforms:
- Roku
- Roku TV
Devices:
- Roku Express
- Roku Streaming Stick
- Roku Streambar
- Roku Ultra
- Roku TV
Minimum Requirements:
- Roku OS 8
- Roku SceneGraph Channel
Data Privacy:

Platforms:
- Roku
- Roku TV
Devices:
- Roku Express
- Roku Streaming Stick
- Roku Streambar
- Roku Ultra
- Roku TV
Minimum Requirements:
- Roku OS 8
- Roku SceneGraph Channel
Data Privacy:
Upgrading the SDK
Upgrade to a new major version of the Kochava SDK:
Estimated Time to Complete
30 Minutes
Upgrade to a new major version of the Kochava SDK by following the instructions provided. When upgrading multiple major versions you should review the documentation for each version along the way, making the necessary changes as you go until you reach the most recent version. This will ensure smaller and more manageable steps.
After completing all upgrade steps to the current version you should follow the Confirming the SDK Integration instructions before deploying the changes. You may also wish to review the release notes or additional topics to see if there are any new features you wish to integrate.
Estimated Time to Complete
30 Minutes
Upgrade to a new major version of the Kochava SDK by following the instructions provided. When upgrading multiple major versions you should review the documentation for each version along the way, making the necessary changes as you go until you reach the most recent version. This will ensure smaller and more manageable steps.
After completing all upgrade steps to the current version you should follow the Confirming the SDK Integration instructions before deploying the changes. You may also wish to review the release notes or additional topics to see if there are any new features you wish to integrate.
Overview
The upgrade from version 1 to version 2 rebrands the SDK from Tracker to Measurement and replaces two synchronous accessors with asynchronous callback-based equivalents. Thoroughly review the Integrating the SDK topic for more details after performing the migration steps.
Refactors
Measurement Object
The SDK entry point was renamed from kochava.tracker to kochava.measurement. Replace all instances of kochava.tracker with kochava.measurement in your codebase.
Retrieve Install ID
The getDeviceId() function has been removed and replaced with the asynchronous retrieveInstallId(callbackFunction) function, which may be called before the SDK is started and invokes the callback once the install id is available. See the Retrieving the Kochava Install ID topic for more information.
Get Install Attribution
The attribution object and its getRetrieved(), getRaw(), getAttributed(), getFirstInstall(), and retrieve(callback) methods have been removed. Use the asynchronous retrieveInstallAttribution(callbackFunction) function instead. See the Retrieving Attribution topic for more information.
Additional Notes
Regional networking connectivity has been improved, and on dual-stack networks the SDK can now capture additional IP information to help improve attribution matching for conversions originating on IPv6 connections. Actual impact may vary depending on network conditions and publisher configuration.
Overview
This is the initial version of the Roku SDK.
Integrating the SDK
Integrate the Kochava SDK into your app:
Estimated Time to Complete
5 Minutes
Estimated Time to Complete
5 Minutes
In order to integrate the Kochava SDK you must first add the SDK to your project and then start the SDK in code. To ensure proper measurement and attribution thoroughly review all integration steps.
1. Add the SDK
Adding the SDK to your project involves downloading and placing it into your project directory.
- Download and unzip the Kochava Roku SDK to a known location.
- Copy the “components/kochava” directory into the “components” directory of your project.
- Copy the “source/kochava” directory into the “source” directory of your project.
- Import the KochavaSdk.brs script in your primary scene xml file.
<script type="text/brightscript" uri="pkg:/source/kochava/KochavaSdk.brs"/>2. Start the SDK
Once you have added the Kochava SDK to your project, the next step is to configure and start the SDK. We recommend starting the SDK as soon as the application starts in the primary scene init function, although this can be done later if needed. Starting the SDK as early as possible will ensure it’s started before use and provide more accurate session reporting.
Only your App GUID is required to start the SDK with the default settings, which is the case for typical integrations. You may optionally use an alternate testing App GUID so that your testing activities do not have an impact on your live app analytics. However, when doing this you should always ensure that you do not accidentally release a production build with a development configuration. Below are examples showing both configuration options.
Example (Basic Configuration)
kochava = GetKochavaInstance()
kochava.measurement.startWithAppGuid("_YOUR_APP_GUID_")
Example (Separate Dev and Prod Configurations)
kochava = GetKochavaInstance()
if (CreateObject("roAppInfo").isDev()) {
    kochava.setLogLevel(kochava.LogLevel.Trace)
    kochava.measurement.startWithAppGuid("YOUR_DEV_APP_GUID")
} else {
    kochava.setLogLevel(kochava.LogLevel.Info)
    kochava.measurement.startWithAppGuid("YOUR_PRODUCTION_APP_GUID")
}In order to integrate the Kochava SDK you must first add the SDK to your project and then start the SDK in code. To ensure proper measurement and attribution thoroughly review all integration steps.
1. Add the SDK
Adding the SDK to your project involves downloading and placing it into your project directory.
- Download and unzip the Kochava Roku SDK to a known location.
- Copy the “components/kochava” directory into the “components” directory of your project.
- Copy the “source/kochava” directory into the “source” directory of your project.
- Import the KochavaSdk.brs script in your primary scene xml file.
<script type="text/brightscript" uri="pkg:/source/kochava/KochavaSdk.brs"/>2. Start the SDK
Once you have added the Kochava SDK to your project, the next step is to configure and start the SDK. We recommend starting the SDK as soon as the application starts in the primary scene init function, although this can be done later if needed. Starting the SDK as early as possible will ensure it’s started before use and provide more accurate session reporting.
Only your App GUID is required to start the SDK with the default settings, which is the case for typical integrations. You may optionally use an alternate testing App GUID so that your testing activities do not have an impact on your live app analytics. However, when doing this you should always ensure that you do not accidentally release a production build with a development configuration. Below are examples showing both configuration options.
Example (Basic Configuration)
kochava = GetKochavaInstance()
kochava.tracker.startWithAppGuid("_YOUR_APP_GUID_")
Example (Separate Dev and Prod Configurations)
kochava = GetKochavaInstance()
if (CreateObject("roAppInfo").isDev()) {
    kochava.setLogLevel(kochava.LogLevel.Trace)
    kochava.tracker.startWithAppGuid("YOUR_DEV_APP_GUID")
} else {
    kochava.setLogLevel(kochava.LogLevel.Info)
    kochava.tracker.startWithAppGuid("YOUR_PRODUCTION_APP_GUID")
}Confirming the SDK Integration
Ensure the SDK has been properly integrated:
Estimated Time to Complete
5 Minutes
After integrating the SDK or creating a new App GUID, we suggest performing these tests to ensure the SDK has been integrated successfully and is functioning as expected within your app.
View the Testing an Integration with Kochava documentation for additional details on how to view the integration results on the Kochava dashboard.
Validate the Install
The SDK will send an install for the app once, after a fresh install. Before performing this test ensure you have cleared the app data, typically by re-installing the app. This test ensures the SDK was configured properly and successfully sent the install to Kochava.
- Double check the SDK configuration in code, ensuring the correct App GUID.
- Run the app for approximately 30 seconds, which will allow more than enough time for the SDK to start and send an install to Kochava under typical conditions.
- Wait a minute or two and visit the Install Feed Validation page for your app within the Kochava dashboard, under Apps & Assets > Install Feed Validation. Within that page, look for the Integration Success! message which indicates integration was successful and that Kochava did receive an install from the SDK. At this point you have confirmed a successful SDK integration and can move ahead to Validate Post Install Events below.
- If instead you see an Integration Not Complete! message, wait a few more minutes and refresh the page. After refreshing, if the Integration Not Complete! message persists, double check the following, then repeat this test:
- Correct App GUID is used within SDK code configuration.
- Ensure the SDK configuration and startup code is being reached.
- Ensure the network connection from the test device is not limited behind a firewall or otherwise.
Validate Event Measurement
If you are measuring user events, you can use this test to ensure the SDK was configured properly and is successfully sending these events to Kochava.
- Double check the SDK configuration in code, ensuring the correct App GUID.
- Double check your event measurement code and ensure it is reachable.
- Launch the app and perform necessary actions within the app to trigger the event(s) you wish to test. After performing these actions, wait 60 seconds to allow more than enough time for the SDK to send these events.
- Wait a minute or two and visit the Event Manager page for your app within the Kochava dashboard, under Apps & Assets > Event Manager. Within that page, ensure the tested event names are displayed here, in which case you have confirmed the SDK is successfully measuring these events.
- If your event names are not displayed here after waiting a few minutes, double check the following, then repeat this test:
- Correct App GUID is used within SDK code configuration.
- Ensure the SDK configuration and startup code is being reached prior to any event code.
- Ensure the SDK event code is being reached.
- Ensure the network connection from the test device is not limited behind a firewall or otherwise.
Analyzing SDK Behavior
While confirming your integration, it may be useful to understand the SDK’s basic flow of operations. When the SDK is started the following sequence of events occur:
- A handshake with Kochava may be made to determine dynamic settings for this app.
- If this is the first launch, the install data is sent to Kochava (this only happens once).
- At this point the SDK is idle and awaits requests from the app.
- If a request is made to the SDK by the app it will be processed along with any necessary network calls, after which the SDK will return to an idle state.
- When the app is terminated or suspended, a session-end payload may be sent to Kochava.
- When the app is resumed or relaunched, a session-begin payload may be sent to Kochava.
To view these in your log as they occur, see the Enabling Logging topic for details on how to enable and read the Kochava SDK logs.
Enabling Logging
Enable logging output from the SDK:
Estimated Time to Complete
5 Minutes
Logging provides a text-based log of the SDK’s behavior at runtime, for purposes of debugging. For example, while testing it may be useful to see the contents of certain payloads being sent to Kochava servers, in which case the log level should be set to debug (or higher).
Six different log levels are available, each of which include all log levels beneath them. Info log level is set by default, although trace log level should be used when debugging so that all possible log messages are generated.
Log Level: None/Never
No logging messages are generated.
Log Level: Error
Errors which are to some extent fatal.
Log Level: Warn
Warnings which are not fatal.
Log Level: Info
General information, such as basic initialization and API calls.
Log Level: Debug
Low level messages intended for verifying (or debugging) an integration. Includes transaction payloads.
Log Level: Trace/Verbose
Very low level messages intended for tracing the origin of an issue.
To enable logging, set the desired log level early during initialization. As the SDK executes, log messages will be printed to your console log. Kochava SDK log messages are denoted with a log tag of “KVA”, however log messages may span multiple lines so filtering just to lines containing KVA may truncate messages. When capturing a log for a support request, it is critical that the entire un-truncated log is provided. For checking basic integration, log messages with the additional tag of “Kochava Diagnostic” provide the most commonly used information.
Estimated Time to Complete
5 Minutes
Logging provides a text-based log of the SDK’s behavior at runtime, for purposes of debugging. For example, while testing it may be useful to see the contents of certain payloads being sent to Kochava servers, in which case the log level should be set to debug (or higher).
Six different log levels are available, each of which include all log levels beneath them. Info log level is set by default, although trace log level should be used when debugging so that all possible log messages are generated.
Log Level: None/Never
No logging messages are generated.
Log Level: Error
Errors which are to some extent fatal.
Log Level: Warn
Warnings which are not fatal.
Log Level: Info
General information, such as basic initialization and API calls.
Log Level: Debug
Low level messages intended for verifying (or debugging) an integration. Includes transaction payloads.
Log Level: Trace/Verbose
Very low level messages intended for tracing the origin of an issue.
To enable logging, set the desired log level early during initialization. As the SDK executes, log messages will be printed to your console log. Kochava SDK log messages are denoted with a log tag of “KVA”, however log messages may span multiple lines so filtering just to lines containing KVA may truncate messages. When capturing a log for a support request, it is critical that the entire un-truncated log is provided. For checking basic integration, log messages with the additional tag of “Kochava Diagnostic” provide the most commonly used information.
Example (Enable Trace Logging in a Dev Build)
kochava = GetKochavaInstance()
if (CreateObject("roAppInfo").isDev()) {
    kochava.setLogLevel(kochava.LogLevel.Trace)
} else {
    kochava.setLogLevel(kochava.LogLevel.Info)
}

' Start the SDK
' ...
Example (Enable Trace Logging in a Dev Build)
kochava = GetKochavaInstance()
if (CreateObject("roAppInfo").isDev()) {
    kochava.setLogLevel(kochava.LogLevel.Trace)
} else {
    kochava.setLogLevel(kochava.LogLevel.Info)
}

' Start the SDK
' ...Measuring Events
Measure user behavior and actions beyond the install:
Estimated Time to Complete
15 Minutes
Measure noteworthy actions or user behavior within your app such as in-app purchases, page views, or level completions. Events can be instrumented either by using the standard format provided by the SDK or using your own custom event name.
Events are built by first selecting an event type and then setting any applicable parameters you wish to include with the event. For example, you might choose a Registration Complete event type and set values for the User ID and User Name parameters. There are a variety of standard event types and dozens of standard parameters available. When creating an event, you only need to set values for the parameters you wish to measure with a maximum of 16 per event.
For a detailed list of standard event types and parameters, see: Post Install Event Examples.
It is recommended to use one of the standard event types whenever possible, however for scenarios where standard event types do not meet your needs custom event types can be used. Custom event types can be implemented by using a String in place of the Standard Event Type when instrumenting the event.
Estimated Time to Complete
15 Minutes
Measure noteworthy actions or user behavior within your app such as in-app purchases, page views, or level completions. Events can be instrumented either by using the standard format provided by the SDK or using your own custom event name.
Events are built by first selecting an event type and then setting any applicable parameters you wish to include with the event. For example, you might choose a Registration Complete event type and set values for the User ID and User Name parameters. There are a variety of standard event types and dozens of standard parameters available. When creating an event, you only need to set values for the parameters you wish to measure with a maximum of 16 per event.
For a detailed list of standard event types and parameters, see: Post Install Event Examples.
It is recommended to use one of the standard event types whenever possible, however for scenarios where standard event types do not meet your needs custom event types can be used. Custom event types can be implemented by using a String in place of the Standard Event Type when instrumenting the event.
Example (Basic)
event = kochava.events.buildWithEventType(kochava.EventType.RegistrationComplete)
event.setUserId("abcdefg")
event.setUserName("user_123")
event.send()
Example (Basic)
event = kochava.events.buildWithEventType(kochava.EventType.RegistrationComplete)
event.setUserId("abcdefg")
event.setUserName("user_123")
event.send()
Example (Custom Parameter Types)
event = kochava.events.buildWithEventType(kochava.EventType.LevelComplete)
event.setName("The Deep Dark Forest")
event.setCustomValue("attempts", 3.0)
event.setCustomValue("score", 12000.0)
event.send()
Example (Custom Parameter Types)
event = kochava.events.buildWithEventType(kochava.EventType.LevelComplete)
event.setName("The Deep Dark Forest")
event.setCustomValue("attempts", 3.0)
event.setCustomValue("score", 12000.0)
event.send()
Custom Event Types
It is recommended to use one of the standard event types whenever possible, however for scenarios where standard event types do not meet your needs custom event types can be used. Custom event types can be implemented by using a String in place of the Standard Event Type when instrumenting the event.
Custom Event Types
It is recommended to use one of the standard event types whenever possible, however for scenarios where standard event types do not meet your needs custom event types can be used. Custom event types can be implemented by using a String in place of the Standard Event Type when instrumenting the event.
Example (Custom Event Type)
event = kochava.events.buildWithEventName("Enemy Defeated")
event.setName("The Angry Ogre")
event.setCustomValue("reward", "Gold Token")
event.send()
Example (Custom Event Type)
event = kochava.events.buildWithEventName("Enemy Defeated")
event.setName("The Angry Ogre")
event.setCustomValue("reward", "Gold Token")
event.send()Measuring Purchases
Measure in-app purchases and revenue:
Estimated Time to Complete
10 Minutes
In-app purchases can be easily measured and attributed by sending a purchase event with the total amount of revenue. To accomplish this instrument an event of type Purchase and include the following values.
- Price (revenue)
- Currency
- Product Name
- Receipt (if available)
Estimated Time to Complete
10 Minutes
In-app purchases can be easily measured and attributed by sending a purchase event with the total amount of revenue. To accomplish this instrument an event of type Purchase and include the following values.
- Price (revenue)
- Currency
- Product Name
- Receipt (if available)
Example (Purchase Event)
event = kochava.events.buildWithEventType(kochava.EventType.Purchase)
event.setPrice(4.99)
event.setName("Coins")
event.setCurrency("usd")
event.send()
Example (Purchase Event)
event = kochava.events.buildWithEventType(kochava.EventType.Purchase)
event.setPrice(4.99)
event.setName("Coins")
event.setCurrency("usd")
event.send()
Measuring Subscriptions and Trials
Measure user subscriptions and free trials:
Estimated Time to Complete
10 Minutes
User subscriptions and free trials can be easily measured and attributed by sending a subscription or trial event along with an accompanying identity link. To accomplish this instrument a Subscription or Trial event and include the following values.
- Price (revenue)
- Currency
- Product Name
- Receipt (if available)
- User or Subscriber ID (hash suggested)
Estimated Time to Complete
10 Minutes
User subscriptions and free trials can be easily measured and attributed by sending a subscription or trial event along with an accompanying identity link. To accomplish this instrument a Subscription or Trial event and include the following values.
- Price (revenue)
- Currency
- Product Name
- Receipt (if available)
- User or Subscriber ID (hash suggested)
Example (Subscription Event)
' first register an identity link for this user
kochava.measurement.registerIdentityLink("user_id", "ABCDEF123456789")

' next, instrument the subscription event
event = kochava.events.buildWithEventType(kochava.EventType.Subscribe)
event.setPrice(9.99)
event.setCurrency("usd")
event.setName("Monthly Subscription")
event.setUserId("ABCDEF123456789")
event.send()
Example (Subscription Event)
' first register an identity link for this user
kochava.tracker.registerIdentityLink("user_id", "ABCDEF123456789")

' next, instrument the subscription event
event = kochava.events.buildWithEventType(kochava.EventType.Subscribe)
event.setPrice(9.99)
event.setCurrency("usd")
event.setName("Monthly Subscription")
event.setUserId("ABCDEF123456789")
event.send()
A free trial is handled in a similar way, although the price should be set to 0 and the event type should indicate Trial rather than Subscription. The product name should remain the same, as the event type indicates whether this was free trial or subscription.
A free trial is handled in a similar way, although the price should be set to 0 and the event type should indicate Trial rather than Subscription. The product name should remain the same, as the event type indicates whether this was free trial or subscription.
Example (Free Trial Event)
' first set an identity link for this user
kochava.measurement.registerIdentityLink("user_id", "ABCDEF123456789")

' next, instrument the trial event
event = kochava.events.buildWithEventType(kochava.EventType.StartTrial)
event.setPrice(0.0)
event.setCurrency("usd")
event.setName("Monthly Subscription")
event.setUserId("ABCDEF123456789")
event.send()
Example (Free Trial Event)
' first set an identity link for this user
kochava.tracker.registerIdentityLink("user_id", "ABCDEF123456789")

' next, instrument the trial event
event = kochava.events.buildWithEventType(kochava.EventType.StartTrial)
event.setPrice(0.0)
event.setCurrency("usd")
event.setName("Monthly Subscription")
event.setUserId("ABCDEF123456789")
event.send()
Measuring Deeplinks
Measure deeplink related actions and user activity:
Estimated Time to Complete
5 Minutes
Measuring deeplinks is accomplished similar to any other type of event. In order to measure a deeplink event, create an event of type Deeplink and set the URI parameter along with any other relevant parameters to the values provided when the deeplink occurred.
Estimated Time to Complete
5 Minutes
Measuring deeplinks is accomplished similar to any other type of event. In order to measure a deeplink event, create an event of type Deeplink and set the URI parameter along with any other relevant parameters to the values provided when the deeplink occurred.
Example (Deeplink Event)
event = kochava.events.buildWithEventType(kochava.EventType.Deeplink)
event.setUri("https://deeplinkuri.example/path")
event.send()
Example (Deeplink Event)
event = kochava.events.buildWithEventType(kochava.EventType.Deeplink)
event.setUri("https://deeplinkuri.example/path")
event.send()
Identity Linking
Link existing user identities with installs:
Estimated Time to Complete
10 Minutes
Setting an Identity Link provides the opportunity to link different identities together in the form of key and value pairs. For example, you may have assigned each user of your app an internal ID which you want to connect to a user’s service identifier. Using this feature, you can send both your internal ID and their service identifier to connect them in the Kochava database.
In order to link identities, you will need to register this identity link information in the form of unique key and value pair(s) as early as possible. This can be done during the initial configuration of the SDK if the identity link information is already known, or it can be done after starting the SDK. When linking to an event, such as for purchases and subscriptions, ensure that the Identity Link is registered prior to instrumenting the event.
Estimated Time to Complete
10 Minutes
Setting an Identity Link provides the opportunity to link different identities together in the form of key and value pairs. For example, you may have assigned each user of your app an internal ID which you want to connect to a user’s service identifier. Using this feature, you can send both your internal ID and their service identifier to connect them in the Kochava database.
In order to link identities, you will need to register this identity link information in the form of unique key and value pair(s) as early as possible. This can be done during the initial configuration of the SDK if the identity link information is already known, or it can be done after starting the SDK. When linking to an event, such as for purchases and subscriptions, ensure that the Identity Link is registered prior to instrumenting the event.
Example (Register an Identity Link)
kochava.measurement.registerIdentityLink("user_id", "123456789")
kochava.measurement.registerIdentityLink("service_id", "abcdefg")
Example (Register an Identity Link)
kochava.tracker.registerIdentityLink("user_id", "123456789")
kochava.tracker.registerIdentityLink("service_id", "abcdefg")
Retrieving the Kochava Install ID
Obtain the unique install identifier assigned by Kochava:
Estimated Time to Complete
1 Minute
The unique identifier assigned to an install can be obtained any time after the SDK has been started by calling this method. The Kochava Install ID is used to identify a specific app install and is scoped to that particular install. Different apps or installs on the same device will have different Install IDs.
Estimated Time to Complete
1 Minute
The unique identifier assigned to an install can be obtained any time after the SDK has been started by calling this method. The Kochava Install ID is used to identify a specific app install and is scoped to that particular install. Different apps or installs on the same device will have different Install IDs.
Example (Retrieving the Kochava Install ID)
' Callback handler
sub onInstallIdRetrieved(installId as String)
    ' do something with the Kochava Install ID
end sub

' Retrieve the Install ID
kochava.measurement.retrieveInstallId(onInstallIdRetrieved)
Example (Retrieving the Kochava Install ID)
installId = kochava.tracker.getDeviceId()
// Do something with the Kochava Install ID
Retrieving Attribution
Access the attribution results within the app:
Estimated Time to Complete
15 Minutes
Install attribution results can be retrieved from Kochava servers if you wish to use these results within your app. Be aware that attribution results are always determined by Kochava servers; this feature simply provides the app with a copy of whatever the results were.
For example, you may wish to present a user with a different experience if you have determined they installed the app from a certain advertising network or source.
Attribution results are fetched by the SDK when requested and returned to the app asynchronously via a callback. This process usually takes about 3-4 seconds but can take longer depending on network latency and other factors. Typically once attribution results have been retrieved for the first time, it is persisted and not retrieved again. From that point on they can continue to be queried but will always provide the persisted attribution results from the original retrieval. In some scenarios, such as when using Seasonal Apps, attribution can change and be retrieved again. For such cases discuss it with your Client Success Manager for more details.
Estimated Time to Complete
15 Minutes
Install attribution results can be retrieved from Kochava servers if you wish to use these results within your app. Be aware that attribution results are always determined by Kochava servers; this feature simply provides the app with a copy of whatever the results were.
For example, you may wish to present a user with a different experience if you have determined they installed the app from a certain advertising network or source.
Attribution results are fetched by the SDK when requested and returned to the app asynchronously via a callback. This process usually takes about 3-4 seconds but can take longer depending on network latency and other factors. Typically once attribution results have been retrieved for the first time, it is persisted and not retrieved again. From that point on they can continue to be queried but will always provide the persisted attribution results from the original retrieval. In some scenarios, such as when using Seasonal Apps, attribution can change and be retrieved again. For such cases discuss it with your Client Success Manager for more details.
Example (Requesting Attribution Results)
sub onAttributionRetrieved(attribution as Object)
    retrieved = attribution.retrieved
    attributed = attribution.attributed
    firstInstall = attribution.firstInstall
    rawResult = attribution.raw
    ' do something with the attribution result
end sub

' This callback handler will fire once for every request.
kochava.measurement.retrieveInstallAttribution(onAttributionRetrieved)
Example (Requesting Attribution Results)
sub onAttributionRetrieved(attribution as Object)
    retrieved = attribution.getRetrieved()
    attributed = attribution.getAttributed()
    firstInstall = attribution.getFirstInstall()
    rawResult = attribution.getRaw()
    ' do something with the attribution result
end sub

' This callback handler will fire once for every request.
kochava.tracker.attribution.retrieve(onAttributionRetrieved)
Once you have the attribution results, you will need to parse and handle them in some meaningful way. A variety of data exists within this JSON object and you will need to determine which data is meaningful for your purposes. For an overview of the attribution dictionary contents, see: Attribution Response Examples.
Once you have the attribution results, you will need to parse and handle them in some meaningful way. A variety of data exists within this JSON object and you will need to determine which data is meaningful for your purposes. For an overview of the attribution dictionary contents, see: Attribution Response Examples.
Shutting Down the SDK
Shutting down the SDK after starting:
Estimated Time to Complete
5 Minutes
The SDK can be shut down after starting, which will completely disable the SDK and stop all measurement from continuing.
Shutting down the SDK is not recommended in typical scenarios. However, it may be necessary in consent-applicable instances such as when consent has been revoked after starting the SDK. After shutting down, all network communication with Kochava will cease and the SDK must be configured and started again if you wish for measurement to resume.
Estimated Time to Complete
5 Minutes
The SDK can be shut down after starting, which will completely disable the SDK and stop all measurement from continuing.
Shutting down the SDK is not recommended in typical scenarios. However, it may be necessary in consent-applicable instances such as when consent has been revoked after starting the SDK. After shutting down, all network communication with Kochava will cease and the SDK must be configured and started again if you wish for measurement to resume.
Example (Shut Down the SDK)
kochava.measurement.shutdown(false)Example (Shut Down the SDK)
kochava.tracker.shutdown(false)Clearing SDK Data
The shutdown method accepts a boolean indicating whether all persisted SDK data from disk should be cleared during shutdown. This parameter should only be set to true if the implications of clearing the data are fully understood.
Clearing SDK Data
The shutdown method accepts a boolean indicating whether all persisted SDK data from disk should be cleared during shutdown. This parameter should only be set to true if the implications of clearing the data are fully understood.
Example (Shut Down the SDK and Clear Data)
// WARNING: This is a destructive action, ensure you understand the ramifications of deleting data before using.
kochava.measurement.shutdown(true)
Example (Shut Down the SDK and Clear Data)
// WARNING: This is a destructive action, ensure you understand the ramifications of deleting data before using.
kochava.tracker.shutdown(true)
Enabling App Limit Ad Tracking
Limit the ad tracking at the application level:
Estimated Time to Complete
1 Minute
If you wish to limit ad tracking at the application level, with respect to Kochava conversions, you can set this value at any time but generally it should be done before starting the SDK. By default the limit ad tracking value is set to false indicating no limitation.
For example, you might provide an option for a user to indicate whether or not they wish to allow this app to use their advertising identifier for tracking purposes. If they do not wish to be tracked, this value would be set to true.
Estimated Time to Complete
1 Minute
If you wish to limit ad tracking at the application level, with respect to Kochava conversions, you can set this value at any time but generally it should be done before starting the SDK. By default the limit ad tracking value is set to false indicating no limitation.
For example, you might provide an option for a user to indicate whether or not they wish to allow this app to use their advertising identifier for tracking purposes. If they do not wish to be tracked, this value would be set to true.
Example (Enable App Limit Ad Tracking)
kochava.measurement.setAppLimitAdTracking(true)Example (Enable App Limit Ad Tracking)
kochava.tracker.setAppLimitAdTracking(true)Handling Consent
Kochava’s Intelligent Consent Manager and self-managed consent solutions:
Estimated Time to Complete
30 Minutes
The Kochava SDK deals with potentially sensitive data such as device identifiers, care should be taken to ensure that your use of the Kochava SDK remains compliant with any applicable laws and regulations.
Estimated Time to Complete
30 Minutes
The Kochava SDK deals with potentially sensitive data such as device identifiers, care should be taken to ensure that your use of the Kochava SDK remains compliant with any applicable laws and regulations.
Self-Managed
If you are handling consent on your own or using a 3rd party tool, startup and all usage of the SDK should be gated by your consent check. Also if consent is revoked after the SDK has been started you should shutdown the SDK and optionally delete local data.
If you are handling consent on your own or using a 3rd party tool, startup and all usage of the SDK should be gated by your consent check. Also if consent is revoked after the SDK has been started you should shutdown the SDK and optionally delete local data.
Example (Starting the SDK Only When Consent Allows)
if(!consentRequired || consentGranted) {
    kochava = GetKochavaInstance()
    kochava.measurement.startWithAppGuid("_YOUR_APP_GUID_")
}
Example (Starting the SDK Only When Consent Allows)
if(!consentRequired || consentGranted) {
    kochava = GetKochavaInstance()
    kochava.tracker.startWithAppGuid("_YOUR_APP_GUID_")
}
Example (Calling SDK Methods Only When Consent Allows)
if(!consentRequired || consentGranted) {
    event = kochava.events.buildWithEventName("My Event")
    event.send()
}
Example (Calling SDK Methods Only When Consent Allows)
if(!consentRequired || consentGranted) {
    event = kochava.events.buildWithEventName("My Event")
    event.send()
}
Example (Shutdown the SDK if Consent Is Revoked)
void onConsentRevoked() {
    // Shutdown and delete data
    kochava.measurement.shutdown(true)
}
Example (Shutdown the SDK if Consent Is Revoked)
void onConsentRevoked() {
    // Shutdown and delete data
    kochava.tracker.shutdown(true)
}
Integrating with Adobe Analytics
Integrate Kochava with Adobe Analytics to send data to an Adobe Analytics account:
Estimated Time to Complete
10 Minutes
Integrate Kochava with Adobe Analytics to send data to an Adobe Analytics account. The benefit of this integration is that developers utilizing Adobe Analytics can tie unique Adobe IDs to attribution meta-data creating a seamless way to properly track all campaign data with the Adobe Analytics platform.
Before proceeding ensure you have the Adobe Analytics SDK fully integrated in your app. Then register the Adobe identity values as an IdentityLink with the Kochava SDK and then finally set up a postback configuration on the dashboard.
Estimated Time to Complete
10 Minutes
Integrate Kochava with Adobe Analytics to send data to an Adobe Analytics account. The benefit of this integration is that developers utilizing Adobe Analytics can tie unique Adobe IDs to attribution meta-data creating a seamless way to properly track all campaign data with the Adobe Analytics platform.
Before proceeding ensure you have the Adobe Analytics SDK fully integrated in your app. Then register the Adobe identity values as an IdentityLink with the Kochava SDK and then finally set up a postback configuration on the dashboard.
Prerequisites
- Integrate the Adobe Analytics SDK in your app
Prerequisites
- Integrate the Adobe Analytics SDK in your app
Register IdentityLink
Retrieve Adobe specific identity values and register them as an IdentityLink with the Kochava SDK.
Register IdentityLink
Retrieve Adobe specific identity values and register them as an IdentityLink with the Kochava SDK.
Example (Register Identity Values)
' Start Adobe SDK
' ...

' Retrieve Adobe identity values and register them with the Kochava SDK
' http://github.com/adobe/aepsdk-roku/blob/main/Documentation/api-reference.md#getexperiencecloudid

' Current Key: Use for new integrations
kochava.measurement.registerIdentityLink("experiencecloudid", id)
' Legacy Key: Use if custom postbacks are already expecting this
kochava.measurement.registerIdentityLink("marketingcloudvisitorid", id)
Example (Register Identity Values)
' Start Adobe SDK
' ...

' Retrieve Adobe identity values and register them with the Kochava SDK
' http://github.com/adobe/aepsdk-roku/blob/main/Documentation/api-reference.md#getexperiencecloudid

' Current Key: Use for new integrations
kochava.tracker.registerIdentityLink("experiencecloudid", id)
' Legacy Key: Use if custom postbacks are already expecting this
kochava.tracker.registerIdentityLink("marketingcloudvisitorid", id)
Add A Postback Configuration
- Log in to Kochava.
- Select the desired Account and App.
- Select App Configurations > Partner Configuration.
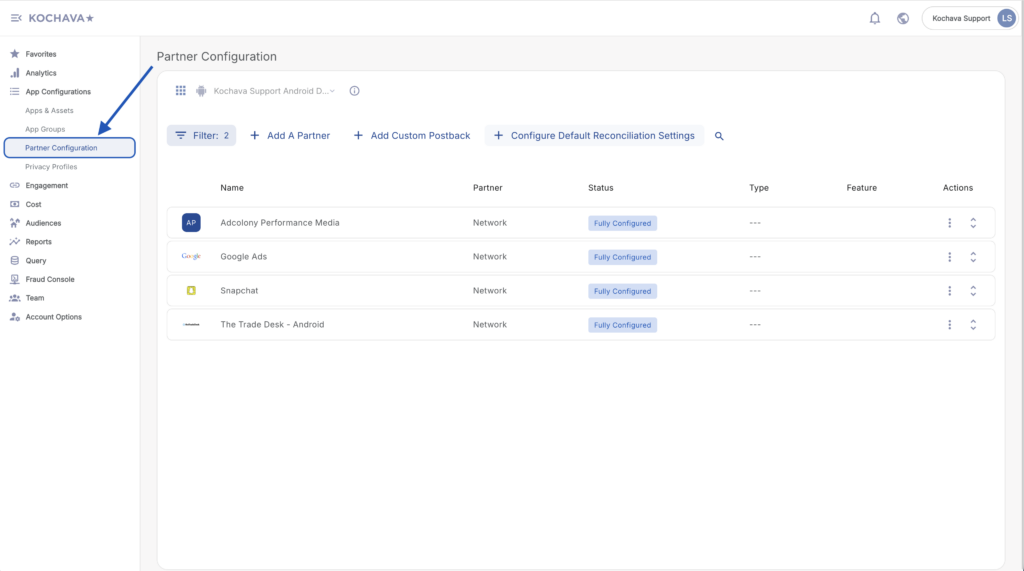
- Click + Add a Configuration.
- Select Adobe Analytics.
- Click Save.
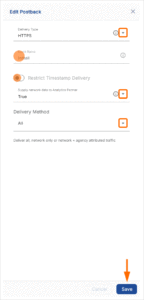
- Locate the desired event and Click + for a new configuration or 🖉 (Edit) for an existing configuration.
- Select the Delivery Type:
- HTTP
- HTTPS
- Enter the Event Name.
- Check Restrict Timestamp Delivery. (optional)
- Select whether to Supply Network Data to Analytics Partner:
- True
- False
- Select the Delivery Method:
- All
- Network Only
- Click Save.
Add A Postback Configuration
- Log in to Kochava.
- Select the desired Account and App.
- Select App Configurations > Partner Configuration.
- Click + Add a Configuration.
- Select Adobe Analytics.
- Click Save.
- Locate the desired event and Click + for a new configuration or 🖉 (Edit) for an existing configuration.
- Select the Delivery Type:
- HTTP
- HTTPS
- Enter the Event Name.
- Check Restrict Timestamp Delivery. (optional)
- Select whether to Supply Network Data to Analytics Partner:
- True
- False
- Select the Delivery Method:
- All
- Network Only
- Click Save.
Example (Sample Integration)
<?xml version="1.0" encoding="UTF-8"?>
<request>
<scXmlVer>1.0</scXmlVer>
<reportSuiteID>RRMmobileintegrationtest</reportSuiteID>
<visitorID>1234567890123456-6543210987654321</visitorID>
<channel></channel>
<timestamp>2015-04-03T09:47:44-07</timestamp>
<ContextData>
  <KochavaCampaignID>12345</KochavaCampaignID>
  <KochavaCampaignName>Summer Collection</KochavaCampaignName>
  <KochavaInstallEvent>1</KovhavaInstallEvent>
  <KochavaNetworkName>Facebook</KochavaNetworkName>
  <KochavaTrackingPartner>??</KochavaTrackingPartner>
</ContextData>
</request>
Example (Sample Integration)
<?xml version="1.0" encoding="UTF-8"?>
<request>
<scXmlVer>1.0</scXmlVer>
<reportSuiteID>RRMmobileintegrationtest</reportSuiteID>
<visitorID>1234567890123456-6543210987654321</visitorID>
<channel></channel>
<timestamp>2015-04-03T09:47:44-07</timestamp>
<ContextData>
  <KochavaCampaignID>12345</KochavaCampaignID>
  <KochavaCampaignName>Summer Collection</KochavaCampaignName>
  <KochavaInstallEvent>1</KovhavaInstallEvent>
  <KochavaNetworkName>Facebook</KochavaNetworkName>
  <KochavaTrackingPartner>??</KochavaTrackingPartner>
</ContextData>
</request>