This feature is available only with paid Kochava accounts. Contact us to learn more.
Kochava Cost provides access to daily spend reports across all of your (Kochava Cost-integrated) network partners in one place. Once a configuration has been established with an API-connected (or manual upload) partner and Kochava, Cost will pull and display the daily spend in easy-to-consume graphical representations, or in reports that you can share with your team.
- Easily collect all network partners’ cost data in one location.
- Daily cost is collected up to 7 days later to ensure the most accurate, up-to-date value is being used for calculations.
- Upload cost data manually for non-API-integrated partners .
- Check the integration status and next pull time for all partners quickly in one location.
- Set up email alerts for timely notification of changing configuration status.
- Export all of your cost configurations for a quick review of the settings across partners.
Requirement Measurement Key / Value Pair
We highly recommend checking your Kochava tracking links to ensure that the below keys are included exactly as below. This is necessary for us to join your Cost data to Measurement data.
- partner_campaign_id = the network partner’s campaign ID.
- partner_campaign_name = not required, but is human-readable and useful to have on measurement data.
- creative_Id = required for joining cost to measurement data at the creative level – EITHER the creative_id or creative_name can be passed here, so long as it is available from the network in cost data to join – AND doesn’t change mid-campaign.
Example: partner_campaign_id={partner macro here}
Example: Your links could contain both —
control.kochava.com/v1/cpi/click?campaign_id=12345&cp_2={partner_campaign_id}&partner_campaign_id={partner_campaign_id}
Cost Configuration User Interface
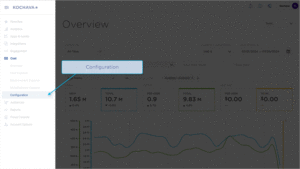
- Log in to Kochava.
- Select the desired Account.
- Select Cost > Configuration.
Creating a New Cost Configuration
- Click + Add a Media Partner.
- Select the desired Media Partner.
- Enter a unique Configuration Name.
- Enter any Media Partner specific parameters.
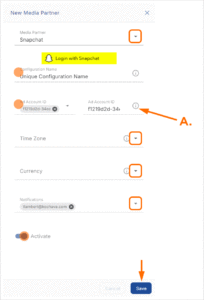
A. Media Partner specific fields.
- Select the desired Time Zone.
- Select the desired Currency.
- Add any additional email addresses for Notification.
- Activate will be set to On by default.
- Click Save.
Cost Configuration Location and Organization Tools
Cost Configurations can be easily located by utilizing the search and organization tools.
Live Search Tool:
Cost Configurations can be located using the live search tool by typing part or all of the name of a configuration.
Cost Configuration Organization:
Cost Configurations can be organized by using one of the following:
Media Partner Filter —
If multiple media partners have been activated, you can organize your Cost Configurations to display only the configurations associated with the desired partner.
Status Filter —
- Any
- Active
- Failed
- Needs Action
- Partner API Retry
- Paused
Sort —
- Configuration Name (A-Z)
- Configuration Name (Z)-A
- Last Pull Time (Newest)
- Last Pull Time (Oldest)
Cost Configuration List
The Cost Configuration List displays all of the active and configurations that still require attention. The list can be organized and sorted to easily locate any desired configuration.
Media Partner Name:
Displays the logo and name of the Media Partner configuration created.
Configuration Name
Displays the saved Configuration Name.
Status:
- Active — The previous day’s job was successful and cost data was pulled for D1, D2, D3, & D7.
- Failed — The job failed due to:
- Unforeseen issue (dev escalation needed) or
- Partner API Retry job failed.
- Needs Action — The previous day’s job failed. There will be a Job ID associated with this status, which can be viewed by clicking the configuration row. Please contact your Client Success Manager and provide that Job ID for troubleshooting. If values need to be adjusted, edit the configuration and save. Upon saving again, Kochava will run the job again at the next interval.
- Partner API Retry — The job failed due to partner API timeout issue (heavier than normal congestion), and our system is retrying the job at a later time. (1 retry only)
- Paused — The configuration’s Activate Toggle is set to OFF. No jobs will attempt to run until the configuration is activated.
Last Pull Time:
Date of last attempted API call made to the Media Partner (e.g., May 13, 2022 05:23:38 PM).
– – – : The previous day’s job has not run due to:
- Status is Active — the configuration was recently established and will run shortly.
- Status is Paused — the configuration was in a paused status when yesterday’s job would have run.
Next Pull Time:
Date of the next attempted API call that will be made to the Media Partner (e.g., May 14, 2022 04:05:00 PM).
Editing Cost Configurations
Once a Cost Configuration has been created, it may be updated or edited.
- Locate the desired Cost Configuration and click Cost Configuration Tools (⋮) > Edit.
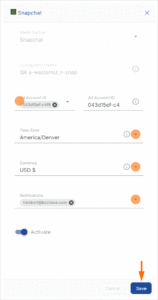
- Update any media partner specific fields.
- Update the Time Zone.
- Update the Currency.
- Add/Remove any email addresses for Notifications.
- Click Save.
Pausing/Reactivating a Cost Configuration
Cost Configurations may be easily paused and restarted.
Pausing a Cost Configuration:
Locate the desired Cost Configuration and click Cost Configuration Tools (⋮) > Pause.
Activating a Cost Configuration:
Locate the desired Cost Configuration and click Cost Configuration Tools (⋮) > Activate.
Deleting a Cost Configuration
- Locate the desired Cost Configuration and click Cost Configuration Tools (⋮) > Delete.
- Click Proceed.
Exporting Cost Configurations
Kochava provides a 1-Click method for exporting your Cost Configurations into a spreadsheet for easy examination.
Click Export Cost Configurations. The spreadsheet consists of the following data:
| Field | Description |
|---|---|
| If Cost Campaign is active (True), or if the campaign is paused (False). | |
| The Kochava account ID. | |
| The user defined configuration name. | |
| The network partner ID within Kochava. | |
| The network partner name within Kochava. | |
| The user selected timeframe. | |
| The user selected currency. | |
| The frequency that the Cost Configuration will be pulled. | |
| The media partner specific fields for the Cost Configuration. | |
| The next date and time the configuration will be pulled in UTC. | |
| The email addresses that the user defined for notification. | |
| Days that the Cost Configuration will be pulled. | |
| The date and time that the configuration was created. | |
| The date and time that the configuration was last updated. |