This feature is available only with paid Kochava accounts. Contact us to learn more.
Completing the following steps will allow you to create custom branded SmartLinks™ with Kochava-hosted Universal Link and App Link support.
Required Steps
- Confirm the implementation of the following minimum Kochava SDK versions or higher:
- iOS native SDK version — 3.12
- Android native SDK version — 3.7.0
- Unity — 4.1.0
- Xamarin — 3.0.0
- ReactNative — 1.3.0
- AIR — 2.5.0
- Cordova — 2.5.0
- Confirm the implementation of the Enhanced Deep Linking Kochava SDK requirements.
iOS Enhanced Deep Linking
Android Enhanced Deep Linking
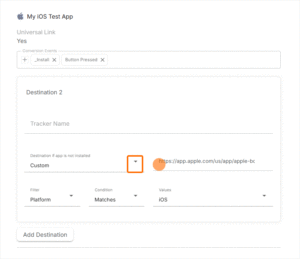
In this step, you will configure your app to pass incoming Deep Links to the Kochava SDK. Kochava will look up and respond with the final intended in-app destination of the user. The app should use this information to route the user to the appropriate destination in the app. This value is originally provided to Kochava when the SmartLink™ is created, within the Universal Link/App Link destination if app is installed field (see screenshot below).
- Choose a custom subdomain name.
SmartLinks created will take the following format: your-brand-name.smart.link/smartlinkID - Associate the domain to the app.
iOS:
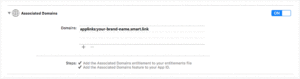
Add applinks: your-brand-name.smart.link in your com.apple.developer.associated-domains entitlement, and update your app delegate to respond appropriately when it receives the NSUserActivity object.
For more information on how to complete this step, refer to Apple’s Preparing your App to Handle Universal Links.
Android:
Add an intent filter for your-brand-name.smart.link to the activity you want to open when the link is clicked.
For information on how to complete this step using Android’s App Link Assistant, refer to Androids Create Intent Filters in your Manifest documentation.
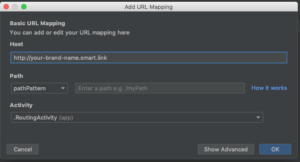
If not using Android’s App Link Assistant, add the following (after replacing your-brand-name.smart.link) within the activity definition of your AndroidManifest.xml.
<activity
   android:name=".RoutingActivity"
   android:label="@string/title_activity_routing">
   <intent-filter android:autoVerify="true">
       <action android:name="android.intent.action.VIEW" />
       <category android:name="android.intent.category.DEFAULT" />
       <category android:name="android.intent.category.BROWSABLE" />
       <data
           android:scheme="https"
           android:host="your-brand-name.smart.link" />
   </intent-filter>
</activity>- Create an Apple App Site Association File/Android Digital Asset Links File.
iOS:
Create an Apple App Site Association File.
For more information on creating an Apple App Site Association file, refer to Apple’s Creating and Uploading the Association File support documentation.
appID: The appID in the apple-app-site-association file is the same value that is associated with the “application-identifier” key in your app’s entitlements after being built.
paths: SmartLinks have a path that is dynamic, due to the alphanumeric link ID unique to each SmartLink (your-brand-name.smart.link/{smartlinkID}. For compatibility with SmartLinks, each app included in the file should allow for all paths (“*”), as shown in the example below. There are no issues with having two or more versions of the file; one that’s used by Kochava for SmartLinks exclusively, allowing all paths, and others for non-Kochava purposes with different path settings.
If multiple apps are included, the operating system will check the apps listed top to bottom and deep link the user into the first app it detects to be present on the device.
Example of AASA File Content —
{
   "applinks": {
       "apps": [],
       "details": [
           {
               "appID": "ABCD1234.com.example.example",
               "paths": [ "*" ]
           }
       ]
   }
}
Android:
Create a Digital Asset Link File.
For more information on creating a Digital Asset Link file, refer to Android’s Associate Your App with Your Website support documentation.
handle_all_urls: SmartLinks have a path that is dynamic, due to the alphanumeric link ID unique to each SmartLink (your-brand-name.smart.link/{smartlinkID}. For compatibility with SmartLinks, each app included in the file should allow for all paths (“handle_all_urls”), as shown in the example below. There are no issues with having two or more versions of the file; one that is used by Kochava for SmartLinks exclusively, allowing all paths, and others for non-Kochava purposes with different path settings.
Example of Digital Asset Links File Content —
[
{
  "relation": ["delegate_permission/common.handle_all_urls"],
  "target": {
    "namespace": "android_app",
    "package_name": "com.xyzapp.example",
    "sha256_cert_fingerprints":
    ["XX:XX:XX:XX:XX:XX:XX:XX:XX:XX:XX:XX:XX:XX:XX:XX:XX"]
  }
}
]- Provide the following information to your Client Success Manager:
- Your chosen custom subdomain name: your-brand-name.smart.link.
- For iOS: Your Apple App Site Association file.
- For Android: Your Digital Asset Links file.
- The iOS and Android Kochava App IDs.
- The iOS and Android Kochava Test App IDs.
Kochava will associate your custom domain to the test apps first, allowing you to confirm the above steps were implemented correctly. Associating it to your test apps first helps avoid your team potentially creating and trafficking SmartLinks that use your custom domain before testing can be completed. If you do not have test apps, simply create new ones and supply their app IDs. Add test to the app name to help distinguish them from the prod apps. - Product Name and Product Icon:
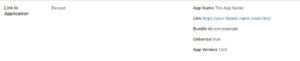
Product Name: Typically the same as the app name on the app store and should not be platform specific.
Product Icon: Typically the same image as the app store icon. Should be a 1:1 aspect ratio (e.g., 512×512), something that works for both iOS and Android.
When a user who does not have the app installed clicks on your_brand_name.smart.link, they will be briefly auto-redirected through a web page where your product name and icon will be displayed. When using SmartLinks™, this happens on the way to the if app is not installed destination defined during SmartLink™ creation. - Fallback destinations:
- iOS: Typically the app store. The iOS if app is not installed destination defined during SmartLink™ creation will override this fallback destination.
- Android: Typically the app store. The Android if app is not installed destination defined during SmartLink™ creation will override this fallback destination.
- Other: Typically your website. The if app is not installed destinations defined for other platforms or the catch-all destination defined during SmartLink™ creation will override this fallback destination.
- Wait for your Client Success Manager to confirm that your custom domain has been created.
Your Client Success Manager can also assist you with the rest of the steps. - Once your custom domain has been created, test successful implementation of Step 4 (Associate the domain to the App)
iOS:
You can verify that the your-brand-name.smart.link has been properly associated to your app by entering your-brand-name.smart.link in Apple’s App Search API Validation Tool.
Successful
Not Successful
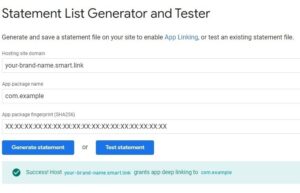
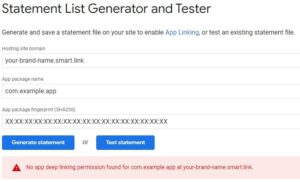
Android:
You can verify that there is an intent filter in place for your-brand-name.smart.link by entering your-brand-name.smart.link as the Hosting site domain, as well as the App package name and App package fingerprint (SHA256) and clicking Test statement in Google’s Statement List Generator and Tester.
Successful:
Not Successful:
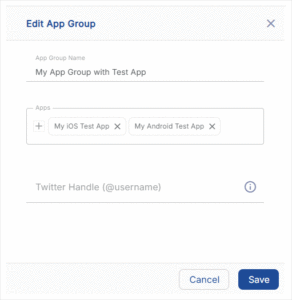
- Create a test App Group that includes the test apps provided in Step 6 (Provide information to CSM).
For more information, refer to our Creating App Groups support documentation.
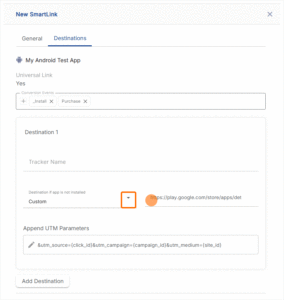
- Create a test SmartLink™ in the App Group.
For more information, refer to our Create a SmartLink™ support documentation.- Enter an in-app destination in the Universal Link/App Link destination if app is installed field.
- Enter if app is not installed destinations for iOS and Android (typically the app store).
- Test the SmartLink™.
iOS:
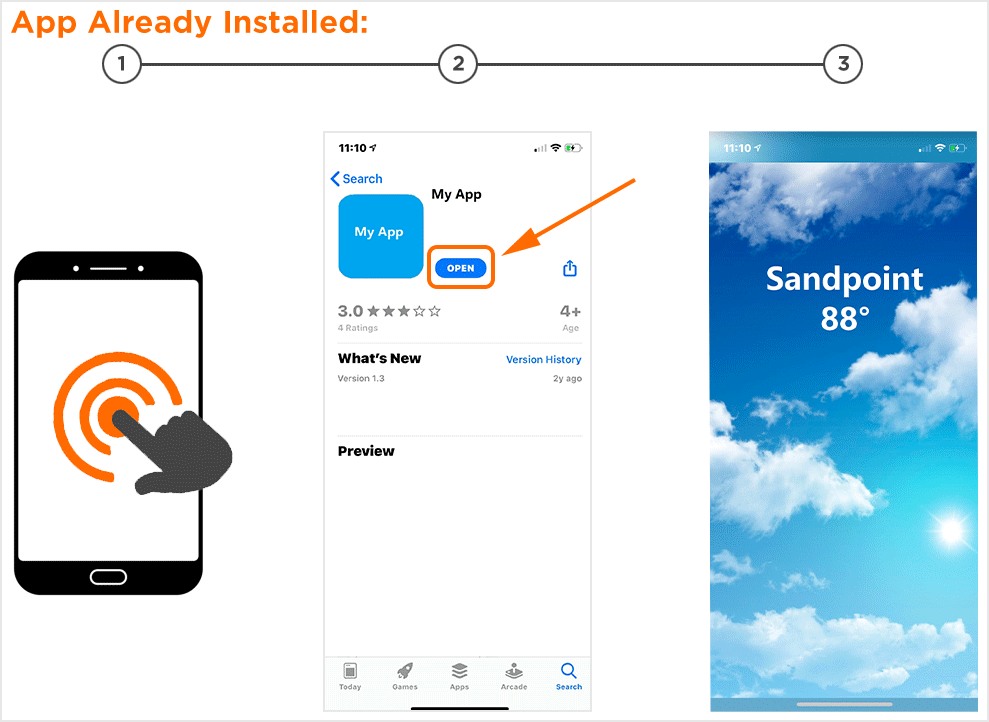
Test the SmartLink™ just created by clicking it from your email app (slack works as well if it is configured to open links in safari) and confirm the following:
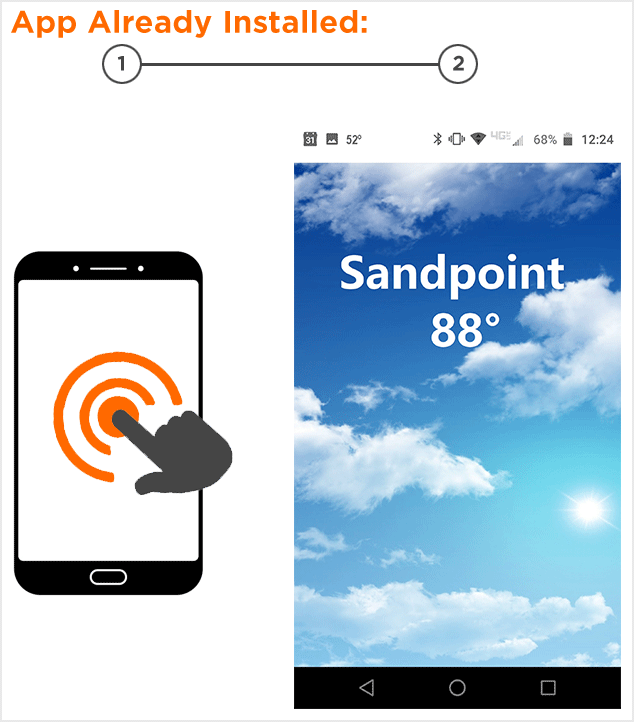
App is Already Installed on the Device:
Expected Behavior:
The link should take you directly to the specific in-app destination (myApp://take-the-user-here in the example above).

What is happening in the Background:
- The OS checks whether the domain has permissions to take the user into the app by reading the AASA file (Step 5 Create Apple App Site Association file / Android Digital Asset Links file).
- The app is opened by the OS if the SmartLink domain was successfully added to com.apple.developer.associated-domains entitlement as a domain that your app wants to handle as Universal Link (Step 4 Associate the Domain to the App).
- The app passes the SmartLink URL to the Kochava SDK (Step 2 Confirm Implementation).
- Kochava records a click, which is made eligible for attribution to the chosen conversion events (“Level Complete” in the example above). Attribution for Kochava-hosted Universal Links is always deterministic when the app is already installed on the device.
- Kochava checks to see if there are any macros in the deep link (myApp://take-the-user-here) that could be replaced with values provided on the SmartLink URL.
- The Kochava SDK returns myApp://take-the-user-here (Step 2 Confirm Implementation).
- Alternative example: If the value included a macro, such as myApp://weather/{city}, and the SmartLink URL that drove the user into the app contained city=sandpoint, the value returned by the SDK would be myApp://weather/sandpoint.
- The app uses the information returned by the SDK (myApp://take-the-user-here) to take the user to the specific in-app destination (Step 2 Confirm Implementation).
Not Expected Behavior:
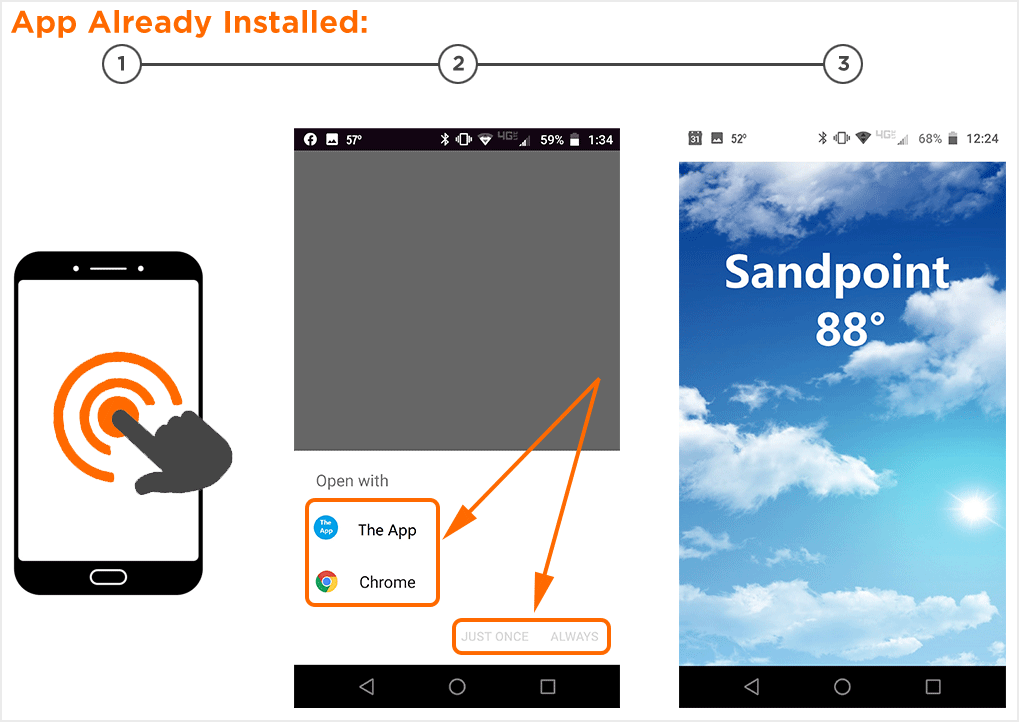
You should not be taken to the app store where the “OPEN” button is displayed next to the app icon.
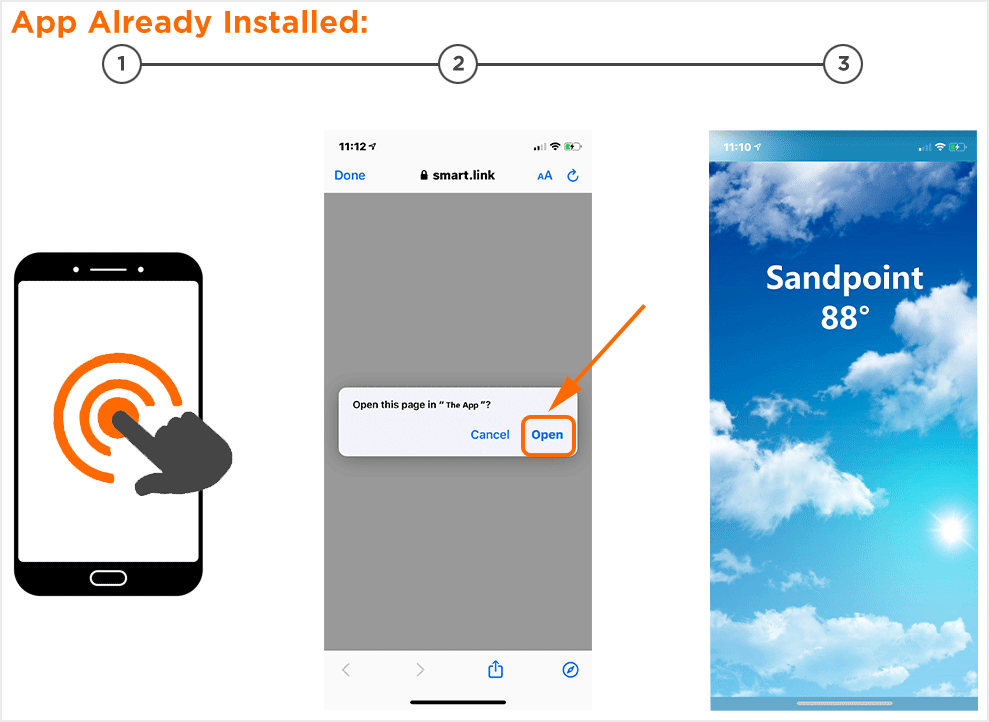
You should not encounter a dialogue box prompting you to choose whether you want to open in the app.
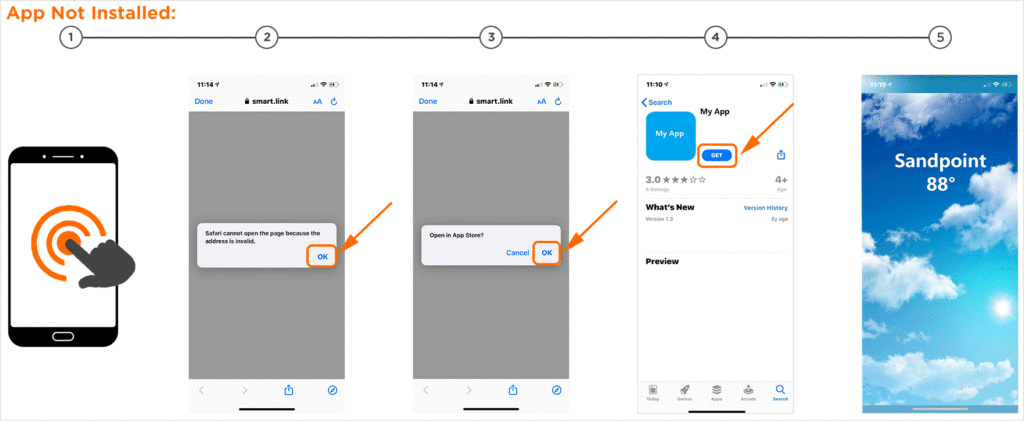
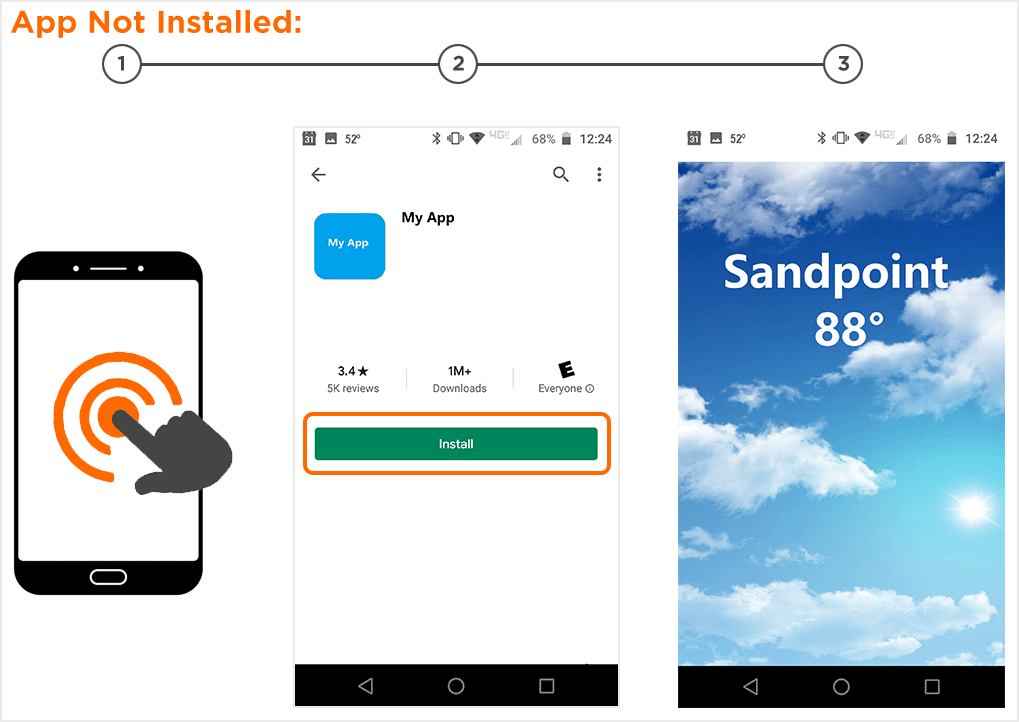
App is Not Installed on the Device:
Expected Behavior:
The link should take you directly to the if app is not installed destination defined during SmartLink™ creation (typically the app store)

Not Expected Behavior:
- You should not encounter an error dialogue box or a dialogue box prompting you to choose whether you open in the app or browser.
- This is expected behavior when not using a Universal Link (For example, links without a custom subdomain, such as https://smart.link/). The OS prompts the user to decide where they should be taken.
Android:
Test the SmartLink™ created by clicking it from your email app (slack works as well) and confirm the following scenarios
App is Already Installed on the Device:
Expected Behavior:
The link should take you to the specific in-app destination (myApp://take-the-user-here in the example above).
What is happening in the Background:
- The OS checks whether the domain has permissions to take the user into the app by reading the Digital Asset Links file (Step 5 Create Apple App Site Association file / Android Digital Asset Links file).
- The app is opened by the OS if the intent filter for your-brand-name.smart.link was added to AndroidManifest.xml (Step 4 Associate the Domain to the App).
- The app passes the SmartLink URL to the Kochava SDK (Step 2 Confirm Implementation).
- Kochava records a click, which is made eligible for attribution to the chosen conversion events (“Level Complete” in the example above). Attribution for Kochava-hosted App Links is always deterministic when the app is already installed on the device.
- Kochava checks to see if there are any macros in the deep link (myApp://take-the-user-here) that could be replaced with values provided on the SmartLink URL.
- The Kochava SDK returns myApp://take-the-user-here (Step 2 Confirm Implementation).
- Alternative example: If the value included a macro, such as myApp://weather/{city}, and the SmartLink URL that drove the user into the app contained city=sandpoint, the value returned by the SDK would be myApp://weather/sandpoint.
- The app uses the information returned by the SDK (myApp://take-the-user-here) to take the user to the specific in-app destination (Step 2 Confirm Implementation).
Not Expected Behavior:
You should not encounter a dialogue box prompting you to choose whether you open in the app or in the browser.
App is Not Installed on the Device:
Expected Behavior:
The link should take you directly to the app store.
- If the expected behavior is achieved in Step 11 (Test the SmartLink™).
Kochava recommends archiving the SmartLink™ created for the test app group in order to avoid it accidentally getting used for live traffic. - Request that your Client Success Manager have your-brand-name.smart.link disassociated from the test apps and associated to your prod apps.
Once you receive confirmation from your Client Success Manager, your setup is complete! - Create an App Group for the production apps, if not already completed.
Refer to our Creating and Editing App Groups support documentation for more information. - Create the SmartLink™ with Universal Link/App Link Support.
Refer to our Creating and Editing SmartLinks™ support documentation for more information.