The Kochava Consent SDK supports CCPA through the use of IAB’s U.S. Privacy String. An understanding of how the U.S. Privacy String represents consent status is recommended to use this SDK properly.
Take time to review IAB’s U.S. Privacy String spec if necessary.
Before integrating the SDK, ensure you have set your desired CCPA app settings within the Kochava dashboard. The SDK will not function properly until the following settings have been provided under the CCPA tab:
- Whether CCPA applies to only California or all of the United States.
- Your app’s correct Package ID, which is the Android package name or iOS bundle ID.
SDK Integration
iOS:
Requirements:
- Xcode 12.4 or higher
- Add the Module into your Project.
The v5 KochavaConsent module is distributed as either an XCFramework or static library which you must add to your project. A typical integration includes modules KochavaCore and KochavaConsent. If upgrading from v4 to v5 of the SDK, note that the integration process is unchanged. Swift Packages is the preferred distribution method, but other options are available.
| Module | Swift Package |
|---|---|
| KochavaCore Core SDK functionality. | https://github.com/Kochava/Apple-SwiftPackage-KochavaCore

|
| KochavaConsent Consent management. | https://github.com/Kochava/Apple-SwiftPackage-KochavaConsent

|
How to Add a Swift Package:
If this is your first time adding a Swift Package, follow these steps for each of the modules above you wish to add:
- Copy the URL of the swift package to your pasteboard.
- In Xcode 12.2 or higher, go to File > Swift Packages > Add Package Dependency.
- Paste in the URL of the swift package into the prompt.
- Configure the version to the desired major version. Currently you should use
Cocoapods wrapping XCFrameworks:
| Module | Cocoapod |
|---|---|
| KochavaConsent Management of user consent. | Apple-Cocoapod-KochavaConsent

|
Cocoapods Wrapping Static Libraries:
| Module | Cocoapod |
|---|---|
| KochavaConsent Management of user consent. | KochavaConsentiOS

|
How to Add a Cocoapod:
If this is your first time adding a Cocoapod, follow these steps for each of the modules above you wish to add:
- Open your Podfile in an editor. If you do not have a Podfile yet, see Using Cocoapods.
- Add the module, and configure the version to the desired major version. Currently
you should use 5. Example:
target 'MyApp' do
  pod 'Apple-Cocoapod-KochavaConsent', '~> 5.0'
end- Import the module where you are going to use it. For Swift, if you are using static libraries, you should add this import to your Objective-C Bridging Header.
XCFramework(s) (Swift) —
import KochavaConsentXCFramework(s) (Objective-C) —
#import <KochavaConsent/KochavaConsent.h>Static Library(s) (Objective-C) —
#import "KochavaConsent.h"At this point the Consent SDK integration is complete!
| Module | XCFramework |
|---|---|
| KochavaCore Core SDK functionality. |  |
| KochavaConsent Consent management. |  |
How to Add an XFramework:
Follow these steps for each of the modules above you wish to add:
- Download the XCFramework from the link above and add it to your project.
XCFramework Addition Details: Expand for Details
- Download the release archive containing the XCFramework.
- Open the archive and copy the XCFramework into your Xcode project folder using Finder. You will typically want to add this file to the Frameworks folder of your project.
- Right click on your project in Xcode, select “Add Files to (project name)”, and add the included file to your project.
- If you are working with multiple targets, you will want to ensure that you have included the XCFramework in each of the desired targets by selecting the file and reviewing its target membership in the inspector, which appears on the right side in Xcode.
- Ensure that the XCFramework is included in Frameworks, Libraries, and Embedded Content in your project target (located under the General tab). It will normally have been added at the moment you added the file to your target.
- Import the XCFramework.
Sample Code:
XCFramework(s), Swift —
import KochavaConsentXCFramework(s), Objective-C —
#import <KochavaConsent/KochavaConsent.h>| Module | iOS Static Library | tvOS Static Library |
|---|---|---|
| KochavaCore Core SDK functionality. |  |
 |
| KochavaConsent Consent management. |  |
 |
How to add a Static Library:
Follow these steps for each of the modules above you wish to add:
- Download the static library from the link above and add it to your project. We recommend integrating XCFrameworks rather than static libraries.
Static Library Addition Details: Expand for Details
- Download the release archive containing the static library.
- Open the archive and copy the static library (including the folder wrapping it with the headers) into your Xcode project folder using Finder. You will typically want to add this to the root folder of your project, and we recommend placing it under a sub-folder named Kochava.
- Right click on your project in Xcode, select “Add Files to (project name)”, and the included files to your project.
- If you are working with multiple targets, you will want to ensure that you have included the static library in each of the desired targets by selecting associated files and reviewing their target membership in the inspector, which appears on the right side in Xcode.
- Ensure that the included static library is included in Frameworks, Libraries, and Embedded Content in your project target (located under the General tab). It will normally have been added at the moment you added the file to your target.
- Import the static library’s main header file.
The Kochava Apple SDK is natively written in Objective-C. You must import the main header file in order to access its symbols. If you’re using static libraries and you’re working in a project which contains Swift code, you must import this file in your Objective-C Bridging Header. For more information, see the Apple page Migrating your Objective-C Code to Swift.:
Sample Code:
Static Library(s), Objective-C —
#import "KochavaConsent.h"Android:
Requirements:
- Android API 16
- Internet Permissions
Latest Version:

 (Release Notes)
Add the SDK:
Add the Maven Central repository to your project level build.gradle file.
allprojects {
    repositories {
        // ...
        mavenCentral()
    }
}
Add the Kochava Consent SDK and all dependencies to your module level build.gradle file. If you have a multiple module project this should be added to your base module. Replace x.y.z with the version obtained from the Download Badge above.
dependencies {
    // Kochava Consent SDK.
    implementation 'com.kochava.consent:consent:x.y.z'

    // SDK Dependencies.
    implementation "com.google.android.material:material:1.1.0"
    implementation "androidx.constraintlayout:constraintlayout:1.1.3"
}
SDK Usage Overview
The typical use of the Kochava Consent SDK is as follows:
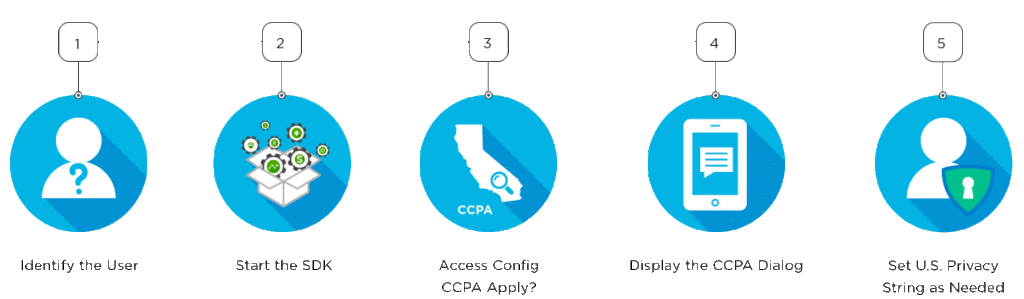
Identify the User
Before consent can be meaningful, one or more identities must be registered to associate with consent-related activities. An identity can be as granular as an authenticated user or as broad as a device id; it is up to you and how broadly your consent charter applies. If you’re not sure what to use as an identity, we suggest using the Kochava Device ID, which is an identifier unique to the app installation and easily retrieved via the Kochava Tracker’s Get Device ID API call. You might also generate your own unique device identifier on the first launch.
Once you have registered at least one identity, all consent-related audit trails will be associated with the identities you have registered for the duration of the app launch, or until the identity is unregistered. As a best practice, identities should always be registered before any consent-related activities occur. Only identities which were registered at the time will be associated with a consent-related activity.
Identities are not persisted between app launches; you must always register identities before starting the SDK. This is necessary because, for example, the SDK could often be wrong in assuming the same user was logged in after the app was terminated and launched later. For this reason it is up to the developer to ensure the proper identities are registered before starting the SDK.
Register an Identity:
Once an identity is known, provide the Register Identity API call with a name and value of the identity. This call can be made anytime and must be made at least once before starting the SDK. Additional identities can continue to be registered after starting the SDK. A unique name and value is required to register an identity. The name should accurately represent the type of identity being provided.
Example (Register the Kochava Device ID as an Identity) —
// start the Kochava Tracker before querying the Kochava Device ID
Tracker.configure(new Tracker.Configuration(appContext)
        .setAppGuid("YOUR_APP_GUID")
);

// register the Kochava Device ID as an identity
Consent.getInstance().registerIdentity("kochava_device_id", Tracker.getDeviceId());

// now that we have registered at least one identity we can start the SDK
Consent.getInstance().start(appContext);// KochavaTracker
// ⓘ Configure.
KochavaTracker.shared.configure(
withParametersDictionary: [kKVAParamAppGUIDStringKey: "_YOUR_APP_GUID_"],
delegate: nil
)
// KVAConsentClient
// 1. Register the Kochava deviceIdString as an identity.
// 2. Start, now that we’ve registered at least one identity.
KVAConsentClient.shared.registerIdentity(
withNameString: "kochava_device_id",
valueString: KochavaTracker.shared.deviceIdString
)
KVAConsentClient.shared.start()Example (Register a Known User ID as an Identity) —
// register the known user identity
Consent.getInstance().registerIdentity("user_id", "1567345");

// now that we have registered at least one identity we can start the SDK
Consent.getInstance().start(appContext);// KVAConsentClient
// 1. Register the known user identity.
// 2. Start, now that we’ve registered at least one identity.
KVAConsentClient.shared.registerIdentity(
withNameString: "user_id",
valueString: "1567345"
)
KVAConsentClient.shared.start()Example (Register Multiple User Identities):
// register multiple known user identities
Consent.getInstance().registerIdentity("user_id", "1567345");
Consent.getInstance().registerIdentity("user_hash", "A3FBC149AEC");
// now that we have registered at least one identity we can start the SDK
Consent.getInstance().start(appContext);
// later, we might know of another identity, which we can add
Consent.getInstance().registerIdentity("user_alias", "user12345");// KVAConsentClient
// 1. Register multiple known user identities.
// 2. Start, now that we’ve registered at least one identity.
// 3. Later, if we know of another identity we can add it.
KVAConsentClient.shared.registerIdentity(
withNameString: "user_id",
valueString: "1567345"
)
KVAConsentClient.shared.registerIdentity(
withNameString: "user_hash",
valueString: "A3FBC149AEC"
)
KVAConsentClient.shared.start()
KVAConsentClient.shared.registerIdentity(
withNameString: "user_alias",
valueString: "user12345"
)Example (Register a Kochava Identity Link as an Identity) —
// register the known identity link as an identity
Consent.getInstance().registerIdentity("user_hash", "AAAA-BBBB");
// now that we have registered at least one identity we can start the SDK
Consent.getInstance().start(appContext);
// start the Kochava Tracker and set the same identity link
Tracker.configure(new Tracker.Configuration(appContext)
.setAppGuid("YOUR_APP_GUID")
);
Tracker.setIdentityLink(new Tracker.IdentityLink()
.add("user_hash", "AAAA-BBBB")
);// KochavaTracker
// 1. Configure.
// 2. Set an identity link.
KochavaTracker.shared.configure(
withParametersDictionary: [kKVAParamAppGUIDStringKey: "_YOUR_APP_GUID_"],
delegate: nil
)
KochavaTracker.shared.sendIdentityLink(with: [
"user_hash": "AAAA-BBBB"
])
// KVAConsentClient
// 1. Register the same identity for consent purposes.
// 2. Start, now that we’ve registered at least one identity.
KVAConsentClient.shared.registerIdentity(
withNameString: "user_hash",
valueString: "AAAA-BBBB"
)
KVAConsentClient.shared.start()Unregister an Identity:
At times, you may wish to unregister an identity. This might be necessary if a known user logs out, and can be accomplished any time by calling the Unregister Identity API. Only identities which previously been registered can be unregistered.
Example (Unregister an Existing User Identity) —
// register the known user identity
Consent.getInstance().registerIdentity("user_id", "1567345");
// now that we have registered at least one identity we can start the SDK
Consent.getInstance().start(appContext);
// this user logged out, so we will unregister their identity
Consent.getInstance().unregisterIdentity("user_id");// KVAConsentClient
// 1. Register the known user identity.
// 2. Start, now that we’ve registered at least one identity.
KVAConsentClient.shared.registerIdentity(
withNameString: "user_id",
valueString: "1567345"
)
KVAConsentClient.shared.start()
// KVAConsentClient
// ⓘ This user logged out, so we will unregister their identity.
KVAConsentClient.shared.unregisterIdentity(
withNameString: "user_id"
)Update an Identity:
When an existing identity value changes but the name of the value is still the same, you can update the identity value directly by calling the Register Identity API again for that identity (you do not need to Unregister the name first).
Example (Update an Existing User Identity) —
// register the known user identity
Consent.getInstance().registerIdentity("user_id", "1567345");
// now that we have registered at least one identity we can start the SDK
Consent.getInstance().start(appContext);
// later, the user has switched logins, so we will update the existing identity to another value
Consent.getInstance().registerIdentity("user_id", "745368");// KVAConsentClient
// 1. Register the known user identity.
// 2. Start, now that we’ve registered at least one identity.
KVAConsentClient.shared.registerIdentity(
withNameString: "user_id",
valueString: "1567345"
)
KVAConsentClient.shared.start()
// KVAConsentClient
// ⓘ Later, the user has switched logins, so we will update the existing identity to another value.
KVAConsentClient.shared.registerIdentity(
withNameString: "user_id",
valueString: "745368"
)Start the SDK
Before starting the Kochava Consent SDK or module, at least one identity must be registered. Once one or more identities have been registered, the Start API call can be made. See Identifying the User below for more information on registering an identity. No additional configuration is needed.
Example (Start the SDK) —
// register the known user identity
Consent.getInstance().registerIdentity("user_id", "1567345");
// now that we have registered at least one identity we can start the SDK
Consent.getInstance().start(appContext);// KVAConsentClient
// 1. Register the known user identity.
// 2. Start, now that we’ve registered at least one identity.
KVAConsentClient.shared.registerIdentity(
withNameString: "user_id",
valueString: "1567345"
)
KVAConsentClient.shared.start()Access the Configuration
The Kochava Consent SDK provides you with the following consent-related configuration properties, which you can leverage to provide the best user experience while ensuring CCPA compliance:
- Whether or not CCPA applies to this user
- Custom host configuration values
Wait for the Configuration Callback:
A handshake is made asynchronously by SDK to determine configuration values. This means that you must wait for this handshake to complete before accessing the configuration. This handshake takes place immediately, but is subject to the device’s network connection.
The SDK will provide you with a callback when configuration is ready to use. If you do not wish to rely on the callback, you can optionally check the Configuration’s IsReady property any time. However, you must wait for the configuration to be ready at least once on the first launch before accessing its properties.
Example (Wire Up the Callback) —
// start the SDK
Consent.getInstance().start(appContext);
// subscribe to configuration event
Consent.getInstance().setConfigListener(new ConfigReceivedListener() {
@Override
public void onConfigReceived(@NonNull ConfigApi config) {
// await callback...
}
});// KVAConsentClient
// 1. Start.
// 2. Set didReceiveConfigurationBlock to be called whenever a new configuration is received.
KVAConsentClient.shared.start()
KVAConsentClient.shared.didReceiveConfigurationBlock =
{
(configuration) in
// await callback...
}Example (Handle the Callback) —
// called when configuration is ready to use
@Override
public void onConfigReceived(@NonNull ConfigApi config) {
// the configuration is ready to use, we can now access its properties..
if(config.isModePresent("ccpa"))
{
// CCPA applies to this user, do something
}
}// called when configuration is ready to use
KVAConsentClient.shared.didReceiveConfigurationBlock =
{
(configuration) in
// the configuration is ready to use, we can now access its properties..
if KVAConsentClient.configuration.modePresent(withNameString: "ccpa")
{
// CCPA applies to this user, do something
}
}Example (Check the IsReady Flag) —
// check the IsReady flag before using configuration values
ConfigApi config = Consent.getInstance().getConfig();
if(config.isReady()) {
// the configuration is ready to use, we can now access its properties..
if(config.isModePresent("ccpa")) {
// CCPA applies to this user, do something
}
} else {
// not yet ready, keep waiting..
}// check the IsReady flag before using configuration values
let configuration = KVAConsentClient.shared.configuration
if (configuration.readyBool) {
// the configuration is ready to use, we can now access its properties..
if (configuration.modePresent(withNameString: "ccpa")) {
// CCPA applies to this user, do something
}
} else {
// not yet ready, keep waiting..
}Determining if CCPA Applies:
The SDK will inform you when CCPA applies to the current user. Specifically, you do not need to ask whether the user is in California, you simply need to ask the SDK whether CCPA applies to this user, because this is determined using a combination of the user’s IP-based location and your desired CCPA settings within your app’s dashboard. If you have selected that CCPA applies only to users in California, then the SDK will indicate CCPA mode is present only for users in California. If you have selected the entire United States, then the SDK will indicate CCPA is present for users within the United States.
If CCPA applies to the current user, the SDK will indicate this via the IsModePresent API call within the Configuration object. Simply pass in the desired mode to check, which is “ccpa”.
Example (Determine if CCPA Applies to this User) —
// determine if CCPA applies to this user
ConfigApi config = Consent.getInstance().getConfig();
if(config.isModePresent("ccpa"))
{
// CCPA applies to this user, show a notice
}// determine if CCPA applies to this user
let configuration = KVAConsentClient.shared.configuration
if (configuration.modePresent(withNameString: "ccpa")) {
// CCPA applies to this user, do something
}Custom Host Configuration:
Custom host configuration, when available, can be accessed via the Host API call within the Configuration object or namespace. Custom key/value pairs that you may have provisioned through our dashboard can be accessed here. It is not necessary to access this object unless you have a specific use case.
Example (Getting a Custom Value form the Host Configuration Object) —
// retrieving a custom key/value pair from the host configuration object
ConfigApi config = Consent.getInstance().getConfig();
String myCustomDialogue = config.getHost().optString("myCustomDialogue", "");// retrieving a custom key/value pair from the host configuration object
let configuration = KVAConsentClient.shared.configuration
let myCustomDialogue = configuration.hostDictionary["myCustomDialogue"]Display the Consent Dialog
If CCPA applies to the user, the consent dialog, which the SDK creates for you, must be made available to the user at some point and can be obtained by calling the RequestDialog() API. It is up to you to decide precisely when a user should be presented with the consent dialog, but typically the consent dialog would be triggered by providing a Privacy button within a user profile or other options menu. Additionally, if CCPA does not apply to this user, we suggest you disable the Privacy button or show an optional message if it is clicked, but you may wish to simply always show the consent dialog even if CCPA does not apply.
Our example will assume the consent dialog will be displayed when the user clicks a Privacy button.
About the RequestDialog API call:
This API call will provide you with a consent dialog which can be displayed to the user. You may display this dialog at any size, but we strongly recommend it be displayed at or near full-screen, as it contains quite a bit of information. The dialog should be requested only at the moment you wish to display it and should not be requested before then. Before requesting the dialog, always ensure that the Configuration is ready by calling the IsReady() API. It is possible if the user is offline that the Configuration may not be ready, in which case you should prepare to show a temporary, alternate dialog or message.
The SDK will handle updating the U.S. Privacy String automatically as the user interacts with it; however, you will need to close the consent dialog when the user indicates they are done. This is accomplished by subscribing to the Completed callback, which will fire when the dialog should be closed.
The requestDialog(Context) API call returns a UsPrivacyDialog object from which a View can be obtained to present to the user. The SDK will throw an exception if the dialog creation fails or the Configuration is not yet ready.
void privacyButtonClicked() throws DialogNotReadyException {
if(Consent.getInstance().getConfig().isReady() && Consent.getInstance().getConfig().isModePresent("ccpa")) {
// CCPA applies to this user, request a new Consent Dialog from the SDK.
// This will throw a DialogNotReadyException if the config is not ready or otherwise is missing required fields.
final UsPrivacyDialogApi dialog = Consent.getInstance().usPrivacy().requestDialog(activityContext);
// Build the dialog's view.
final View dialogView = dialog.buildView(new UsPrivacyDialogListener() {
@Override
public void onUsPrivacyDialogComplete() {
// Close the dialog/page
}
});
// Load the view into the dialog or full screen view group page.
// ...
} else {
// CCPA does not apply to this user, display an alternate message or dialog of some kind
}
}The constructor for class KVAConsentDialogNavigationController returns an instance which may be presented to the user using the show or present methods of a parent view controller. The constructor will return nil if the construction fails or if the configuration is not yet ready. The constructor takes parameters to facilitate requests to open a url and to dismiss the dialog when complete.
// The following code sample is written from the context of a UIViewController, and presents the dialog using the show method with the default presentation style. You could also use other approaches such as a popover.
// when the "Privacy" button is tapped, the consent dialog will be constructed from the SDK and displayed
@IBAction func privacyButton_didTouchUpInside(_ sender: Any)
{
if KVAConsentClient.shared.configuration.readyBool && KVAConsentClient.shared.configuration.modePresent(withNameString: "ccpa")
{
let didRequestToOpenURLBlock: KVAConsentDialogNavigationControllerDidRequestToOpenURLBlock =
{
(consentDialogNavigationController, url) in
application.openURL(url)
}
let didCompleteBlock: KVAConsentDialogNavigationControllerDidCompleteBlock =
{
(consentDialogNavigationController) in
consentDialogNavigationController.dismiss(animated: true)
}
if let consentDialogNavigationController = KVAConsentDialogNavigationController(didRequestToOpenURLBlock: didRequestToOpenURLBlock, didCompleteBlock: didCompleteBlock)
{
self.show(consentDialogNavigationController, sender: self)
}
}
else
{
// CCPA does not apply to this user or the configuration is not yet ready
// … display an alternate message or dialog
}
}Set the United States Privacy String
CCPA consent support is based on version 1 of IAB’s U.S. Privacy String (USP). This is a 4-character string designed to easily convey all consent-related status information by setting individual characters of this string. As per the IAB spec, this string is stored in the app’s local storage on disk and is available to all entities within the app. The SDK will listen for and report changes to the USP and automatically create the audit trail necessary for CCPA compliance.
See IAB’s spec: US Privacy String
SDK-Managed U.S. Privacy String:
The SDK will automatically set the 1st, 2nd, and 3rd digit of the USP on your behalf when the SDK-provided consent dialog is displayed and the user interacts with it. Use the CoveredByLSPA() API call to set the 4th digit as you see fit. If the CoveredByLSPA() API is never used, the SDK will always set the 4th digit to “-“.
Stop here if you prefer the SDK handle the setting of the USP automatically. If you wish to set it yourself, read on.
Self-Managed U.S. Privacy String:
If you do not wish for the SDK to set the USP on your behalf, or you wish to set certain values separately, use the SetUSPrivacyString() API call or one of the individual setters shown in the examples below.
When setting the USP yourself, the USP should be set anytime a consent-related action occurs in the app, so that the last-set USP value accurately represents the current state of consent. These actions include, but are not limited to:
- The user has left a CCPA region and CCPA no longer applies
- The user has entered a CCPA region and CCPA now applies
- The user has been presented with a consent dialogue
- The user accepts or declines the consent dialogue
- The Limited Service Provider Agreement status has changed
To set a new USP value, a call to SetUSPrivacyString API is made. Be aware that the value passed in the setter is precisely what the value will be set to; our SDK will not sanitize or format it. To clear or reset the USP value, pass an empty string (“”) as the value.
Example (Start the SDK and Set a the U.S. Privacy String Value) —
// register the known user identity
Consent.getInstance().registerIdentity("user_id", "1567345");
// now that we've registered at least one identity we can start the SDK
Consent.getInstance().start(appContext);
// you must determine whether the LSPA applies to this user, and can indicate this using the individual setter
Consent.getInstance().usPrivacy().setCoveredByLspa(UsPrivacyStringValue.YES);
// later on, the user is prompted with consent, so we use the individual setter to indicate this
Consent.getInstance().usPrivacy().setExplicitNoticeGiven(UsPrivacyStringValue.YES);
// later on, the user indicates they wish to opt-out of the sale of their data, so we use the individual setter to indicate this
Consent.getInstance().usPrivacy().setOptOutSale(UsPrivacyStringValue.YES);
// later on, the user leaves California and CCPA no longer applies, so we set the entire U.S. Privacy String
Consent.getInstance().usPrivacy().setString("1---");// KVAConsentClient
// 1. Register the known user identity.
// 2. Start, now that we’ve registered at least one identity.
KVAConsentClient.shared.registerIdentity(
withNameString: "user_id",
valueString: "1567345"
)
KVAConsentClient.shared.start()
// ...
// you must determine whether the LSPA applies to this user, and can indicate this using the individual setter
KVAConsentClient.shared.usPrivacy.coveredByLSPA = .yes
// …
// later on, the user is prompted with consent, so we use the individual setter to indicate this
KVAConsentClient.shared.usPrivacy.explicitNoticeGiven = .yes
// …
// later on, the user indicates they wish to opt-out of the sale of their data, so we use the individual setter to indicate this
KVAConsentClient.shared.usPrivacy.userOptedOutOfSale = .yes
// …
// later on, the user leaves California and CCPA no longer applies, so we set the appropriate U.S. Privacy String
KVAConsentClient.shared.usPrivacy.string = "1---"Reading the U.S. Privacy String:
The U.S. Privacy String can also be read from disk using a similar call.
Example (Start the SDK and Read the Current Value of the U.S. Privacy String) —
// register the known user identity
Consent.getInstance().registerIdentity("user_id", "1567345");
// now that we've registered at least one identity we can start the SDK
Consent.getInstance().start(appContext);
// get the current U.S. Privacy String
String currentUSP = Consent.getInstance().usPrivacy().getString();// KVAConsentClient
// 1. Register the known user identity.
// 2. Start, now that we’ve registered at least one identity.
KVAConsentClient.shared.registerIdentity(
withNameString: "user_id",
valueString: "1567345"
)
KVAConsentClient.shared.start()
// get the current U.S. Privacy String
let usPrivacyString = KVAConsentClient.shared.usPrivacy.stringFor more information on setting proper U.S. Privacy String values, as well as IAB’s CCPA Framework, see:
IAB’s CCPA Framework
Creating a Custom Audit Entry
Audit entries are automatically created for you by the SDK when the US Privacy String is updated and when the current consent mode changes.
It is NOT necessary to create your own audit entries under normal circumstances. Rather, you should focus only on updating the US Privacy String as needed and allow the SDK to create a complete audit trail for you. However, should you wish to create your own audit entry, you may call this API. Please consult with your CSM to determine if a new audit entry is needed before doing so.
Example (Create a Custom Audit Entry) —
// register the known user identity
Consent.getInstance().registerIdentity("user_id", "1567345");
// now that we've registered at least one identity we can start the SDK
Consent.getInstance().start(appContext);
// ...
// create a custom audit entry
Consent.getInstance().usPrivacy().addAuditEntry("Updated Account Settings");// KVAConsentClient
// 1. Register the known user identity.
// 2. Start, now that we’ve registered at least one identity.
KVAConsentClient.shared.registerIdentity(
withNameString: "user_id",
valueString: "1567345"
)
KVAConsentClient.shared.start()
// KVAConsentAuditEntry
// ⓘ Create a custom audit entry.
KVAConsentAuditEntry.add(withTextString: "Updated Account Settings")
Debugging
The SDK can provide logging output for purposes of debugging and error reporting.
Example (Enabling Logging) —
if(BuildConfig.DEBUG) {
// Set a desired log level
Consent.getInstance().setLogLevel(LogLevel.TRACE);
}
// register the known user identity
Consent.getInstance().registerIdentity("user_id", "1567345");
// now that we've registered at least one identity we can start the SDK
Consent.getInstance().start(appContext);// KVALog
// ⓘ Set a desired log level.
KVALog.shared.level = .trace
// KVAConsentClient
// 1. Register the known user identity.
// 2. Start, now that we’ve registered at least one identity.
KVAConsentClient.shared.registerIdentity(
    withNameString: "user_id",
    valueString: "1567345"
)

KVAConsentClient.shared.start()