Support Home > Cost > Cost Manual Upload Process

Cost Manual Upload Process

Kochava provides a cost manual upload process for Media Partners that do not have an API.


WARNING: Any data uploaded via this process is permanent and cannot be edited or deleted. Please keep accurate records of uploads, so that duplicate data is not created by overlapping dates. Recommend uploading on a specific cadence like daily or Mon-Sun to ensure no duplicate data is created.


Cost Configuration Interface

  1. Log in to Kochava.
  2. Select the desired Account
  3. Select Cost > Cost Configuration.
  4.  


Creating a Manual Upload Configuration

NOTE: Only Media Partners with the upload icon are eligible for this process.

  1. Click Add a Media Partner.
  2. Select the desired Media Partner.
  3. NOTE: If you see the partner in the provided list, or in the Cost Configuration → Add a Media Partner list, Kochava has already performed the mapping required and data can be uploaded at any time. If you do not see the Media Partner on the list, Kochava will need to integrate the partner first. Contact your Client Success Manager to learn more.

  4. The Configuration Name is automatically generated based on the selected Media Partner (i.e., Mooko Upload).
  5. Enter Upload URL. (This is the public URL to the CSV file)
  6. Select the Time Zone.
  7. Select the desired Currency.
  8. Enter the desired email address for Notifications.
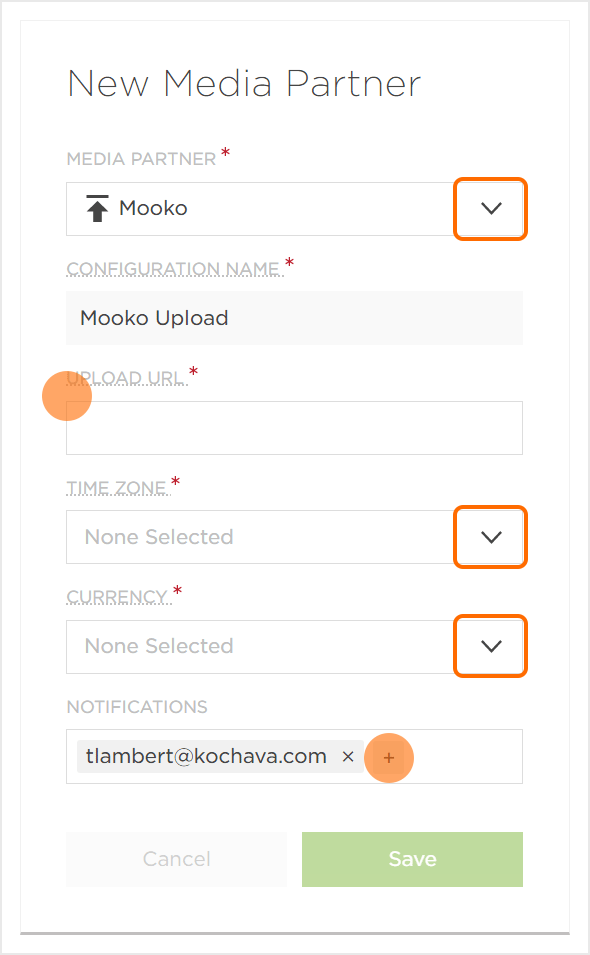
  9. NOTE: By default, the current user’s email address who is setting up the configuration will automatically entered into the Notifications field.

  10. Click Save.
  11.  

    New Configuration


    NOTE: Manual Upload files will need to be requested from the Media Partner’s UI or representative – and be in the CSV format with a single tab. If the file does not match Kochava’s column mapping the file needs to be edited or the upload will fail.


    Best Practice: When working to integrate each Media Partner, Kochava requests the base report file, so that any subsequent reports used for upload will hopefully be the same and not require editing. However, the best practice is to verify the file to make sure the column headers match – in the event that the report was changed or is a different type.


Google Sheet Upload:

The manual upload process may also be completed utilizing Google Sheets.

NOTE: Files may contain multiple days, but only a single tab. Any additional tabs in the spreadsheet will be ignored. Date format must be mm-dd-yyyy. For example: 2-26-2022 must be formatted as 02-26-2022.


Caution: Any data uploaded via this process is permanent and cannot be edited or deleted. Please keep accurate records of uploads, so that duplicate data is not created by overlapping dates. Recommend uploading on a specific cadence like Mon-Sun to ensure no duplicate data.

  1. Open the desired Google Sheet.
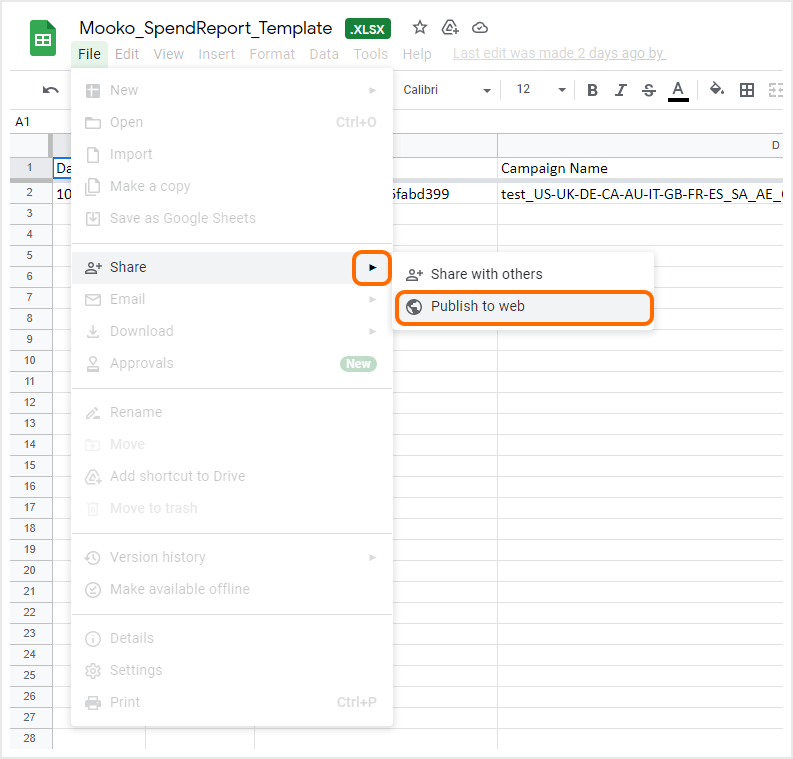
  2. Click File > Share > Publish to web.
  3.  

    Google Sheet Menu


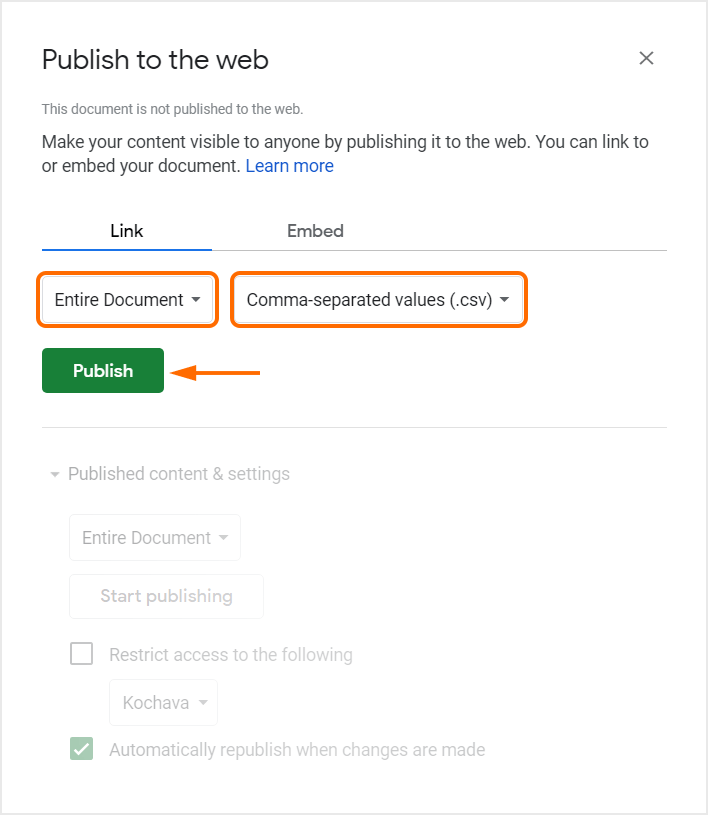
  4. Select to share the Entire Document.
  5. Select Comma-separated values (.csv) as the format.
  6. Click Publish.
  7.  

    Google Sheet Settings


  8. A pop-up message will be displayed stating “Are you sure you want to publish this selection?” Click OK.
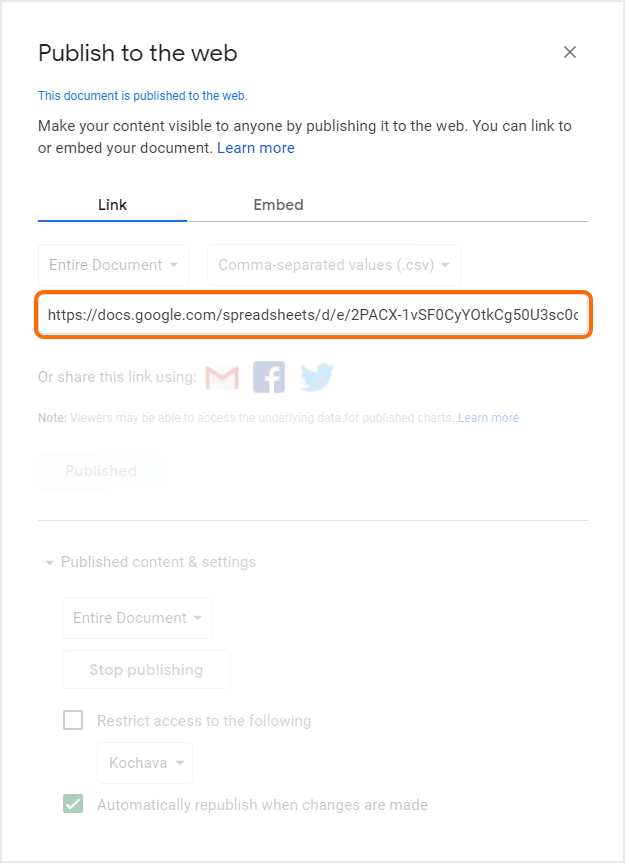
  9. Copy the provided link and paste into the Kochava UI as shown above.
  10.  

    Google Link Location


NOTE: After saving a new manual upload configuration or new file upload, please wait a few minutes for Kochava’s system to upload the file and display the new status.


Uploading Additional Files:

To add additional files after the initial upload:

  1. Click on the Configuration Edit () button.
  2. Click Upload New File.
  3. Follow the procedures from the upload process above.
  4. NOTE: Some configuration values will persist from the original upload, but others may need to be entered again before clicking Save.


Last Modified: Jan 16, 2025 at 3:00 pm