
Data Needed Before Beginning Process:
- Venatus Product ID
- Venatus Event Name
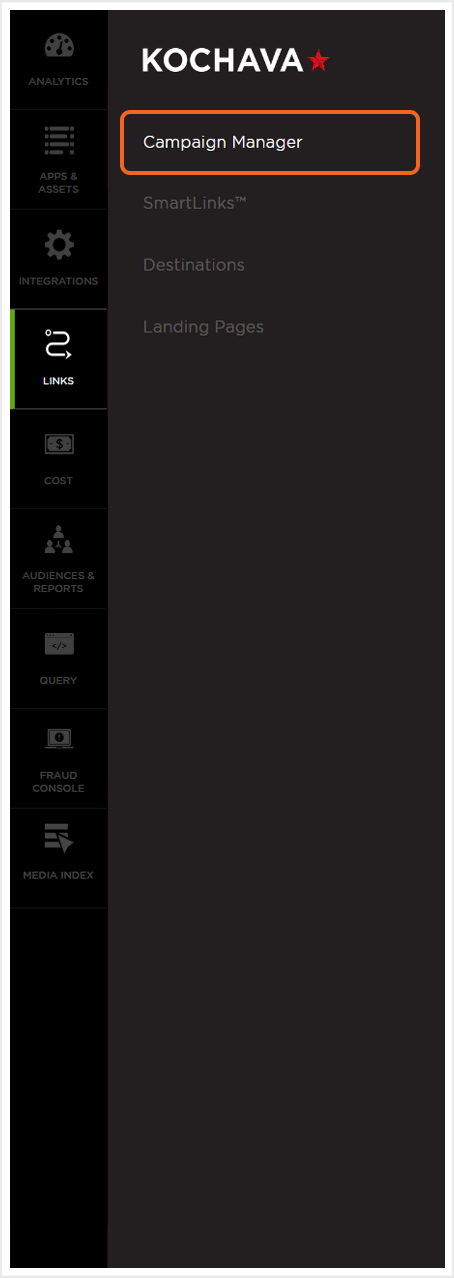
Create a Link for a Venatus SAN Install Campaign
NOTE: For open network integration no trackers or install postbacks need to be created. There are specific settings needed for open network integration post-install postbacks. Refer to the Post-Install Event Postback Configuration section below.
- Log in to Kochava.
- Select the desired Account and App.
- Select Links > Campaign Manager.
- Click Add a Tracker or Select Segment Tools (⋮) > Add a Tracker.
- Select the Campaign.
- Select the Segment.
- Enter the Tracker Name.
- Select Tracker Type > Acquisition. (default setting)
- Select Media Partner > Venatus SAN.
- Select Agency Partner. (optional)
- Enter the Destination URL.
- Enter a Deep Link. (optional)
- Enter any Custom Parameter(s). (optional)
- Click Save. (If no further trackers need to be created)
- Click Save & Add Another Tracker. (If additional trackers need to be created)
- Click Save & Create Postback (to navigate directly to the Partner Configuration page).
NOTE: In order to streamline the Campaign/Segment/Tracker creation process a feature has been added to allow the creation of campaigns and segments while creating a new tracker. For more information about creating a campaign or segment while adding a new tracker, refer to our Create an Install Campaign support document.
![]()
![]()
NOTE: When a Tracker is created, Kochava automatically generates a name for the Tracker. We recommend that you replace the Tracker name at this point with a clear name of your choosing.
NOTE: The Destination URL is not relevant and should simply be your website.
![]()
![]()
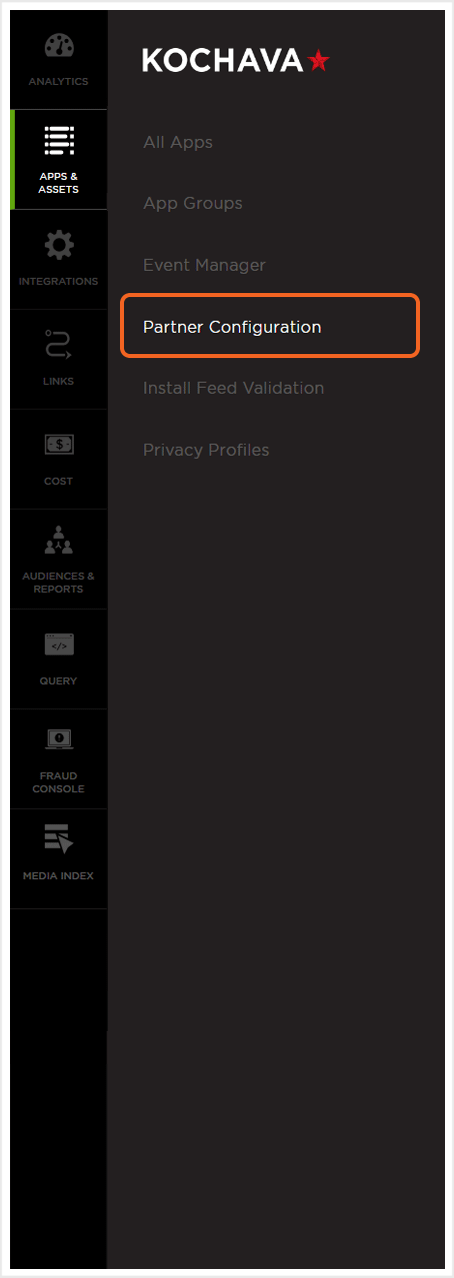
Install Postback Configuration
- Select Apps & Assets > Partner Configuration.
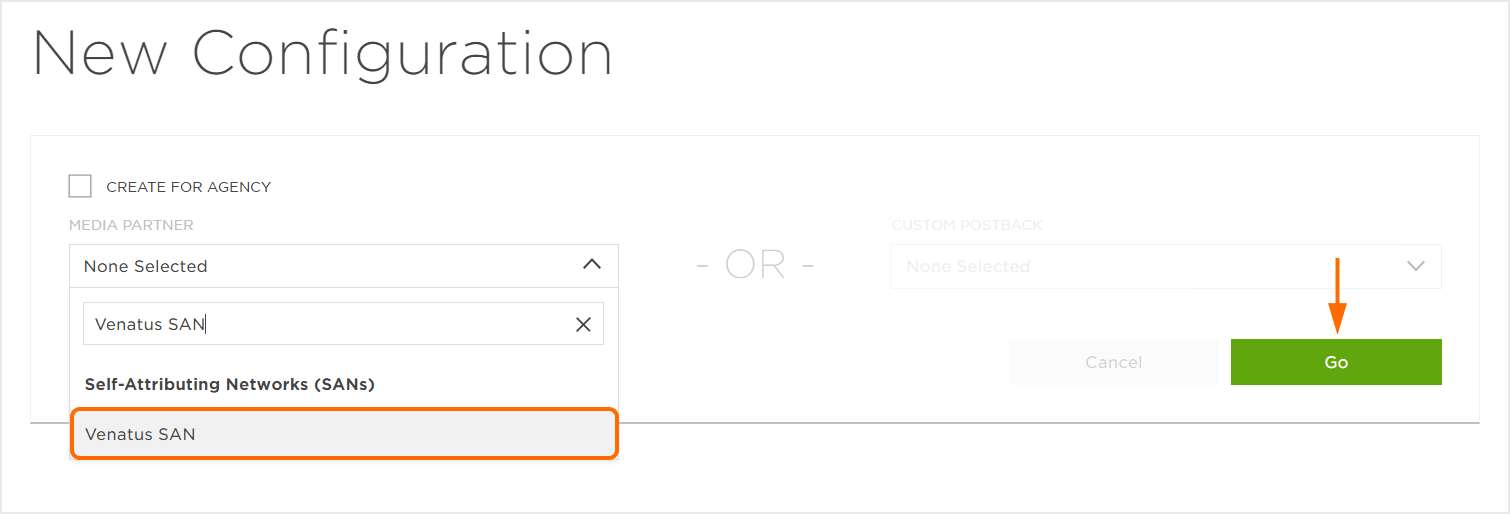
- Click Add a Configuration.
- Select Media Partner > Venatus SAN.
- Click Go.
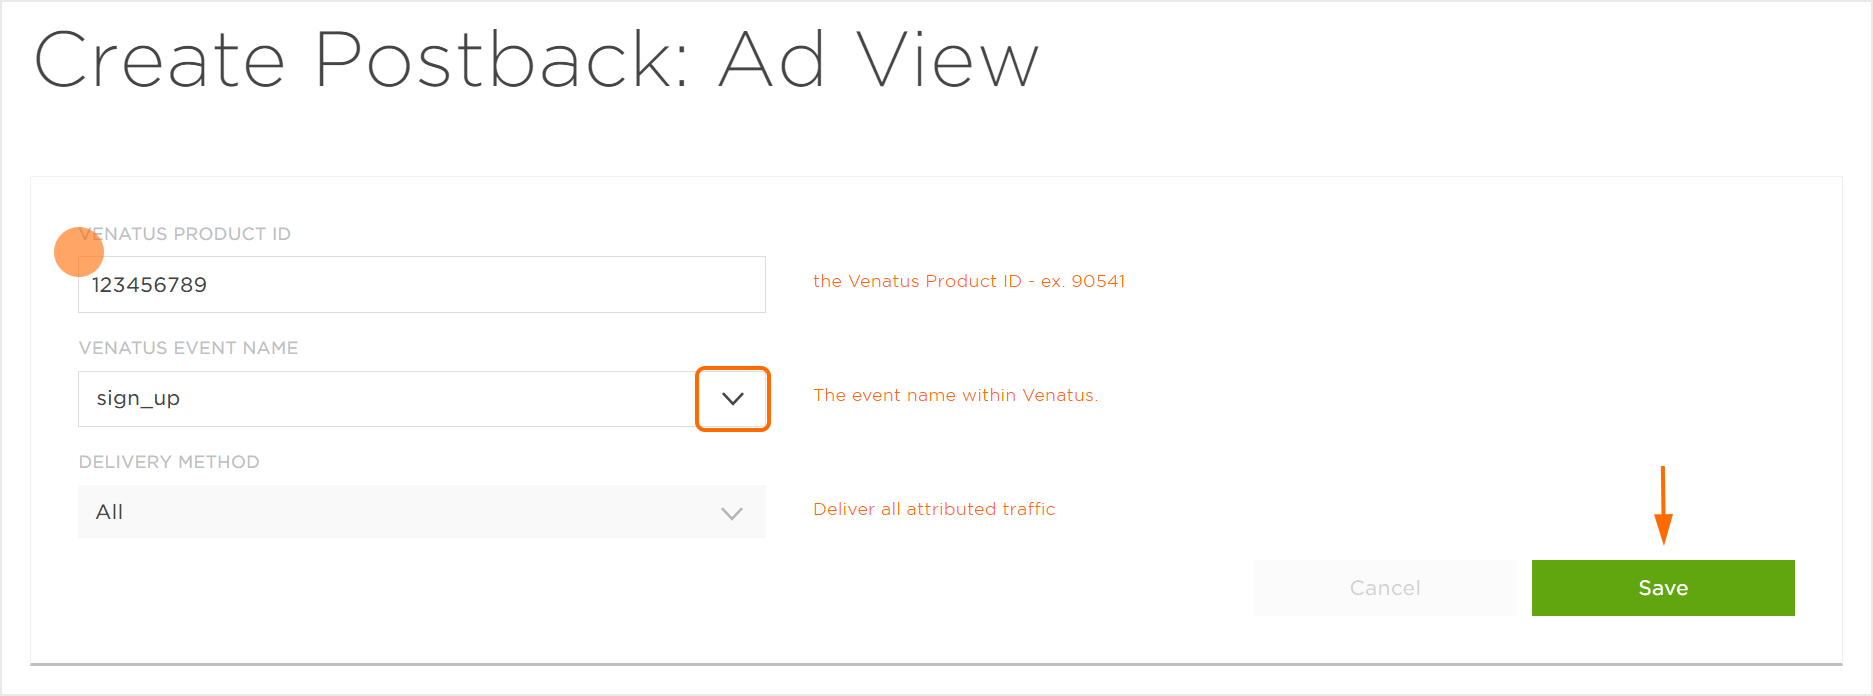
- Select Install > Postback Tools (⋮) > Edit.
- Enter the Venatus Product ID.
- Select the Venatus Event Name > first_open.
- Click Save.

Reengagement Configuration
The information within this section provides the steps necessary to establish a reengagment campaign. If a reengagment campaign does not need to be created, the information in this section may be disregarded.
NOTE: If a reengagement campaign does not need to be set up, but the data associated with post-install events needs to be sent to Venatus SAN follow the steps within the Create a Postback Section below.
Create a Reengagement Segment:
- Locate the desired Campaign.
- Select Campaign Tools (⋮) > Add a Segment.
- Enter a Segment Name.
- Enter a Segment Description. (optional)
- Click Submit.
Create a Reengagement Tracker:
- Click Add a Tracker or Select Segment Tools (⋮) > Add a Tracker.
- Select the Campaign.
- Select the Segment.
- Enter a Tracker Name.
- Select Tracker Type > Reengagement.
- Select Media Partner > Venatus SAN.
- Select an Agency Partner. (optional)
- Select the Venatus Event that will map to the selected Kochava event.
- Add Reengagement Event.
- Click Save (If no further trackers need to be created).
- Click Save & Add Another Tracker (If additional events need to be created).
- Click Save & Create Postback (to navigate directly to the Partner Configuration page).
NOTE: A Reengagement event can be added by clicking on the “+” and removed by clicking “X“.
![]()
![]()
Post-Install Event Postback Configuration:
- Select Apps & Assets > Partner Configuration.
- Click Add Configuration or search for Venatus SAN.
- Locate the desired event and Click Create for a new configuration or Edit for an existing configuration.
- Enter the Venatus Product ID.
- Select the Venatus Event Name.
- Click Save.
Standard Post-Install Event List:
| Key | Description |
|---|---|
| first_open | When a user launches your app for the first time. |
| trial | When a user successfully signs up for a given trial product. |
| subscription | When a user pays for a subscription. |
| sign_up | hen a user completes an app sign up. |
| share_with_friend | Link shared with contact. |
| purchase | Item has been purchased. |
Click and Impression Attribution Macros:
Click-through attribution, also known as click tracking, is the term used when a click leads to a user action within a certain attribution window. View-through attribution, also known as impression tracking, is the term used when an impression leads to a user action within a certain attribution window. The attribution window is supported for 7 day click lookback and 14 day impression lookback to meet your business needs.
| URL Parameters | Description | Type |
|---|---|---|
| campaign_name | Name of the campaign. | string |
| campaign_id | ID of the campaign. | string |
| creative_name | Name of the creative. | string |
| creative_id | ID of the creative. | string |
| country | 2 Digit country code where ad was served. | string |
| platform | The platform of the device where the ad was served. | string |
| device_model | Device Model of device where the ad was served. | string |
| os_name | Name of the operating system of the device where the ad was served. | string |
| os_version | Operating system version of the device where the ad was served. | string |
| user_agent | User agent of the device where the ad was served. | string |
| ad_type | The type of ad served. | string |
Example Attribution Response
Match:
{
"success": true,
            “attributionMode”: “BMA”,
	"type": "impression",
	"metadata": {
		"creative_id": "Sample Creative",
		"site_id": "7774bc1af39681954243777812cb7009",
		"unix_date": "1476137388"
	},
	"match": {
		"idfa": "777583CD-A667-48BC-B806-444CB2B48606"
	}
}
No Match:
{
    "success": false,
    "attribution_mode": "BMA",
    "type": null,
    "matched_by": null,
    "matched_by_keys": null,
    "metadata": null,
    "match": null
}