
Data Needed Before Beginning Process:
- Amazon Product ID
Create a Link for an Amazon Install Campaign:
- Once a tracker has been created, navigate to Campaign Manager.
- Locate and click on the desired Campaign.
- Located the desired Segment, and click on the expand arrow.
- Locate the desired Tracker, and click on the expand arrow.
- Locate and copy the Tracker ID.
![]()
![]()
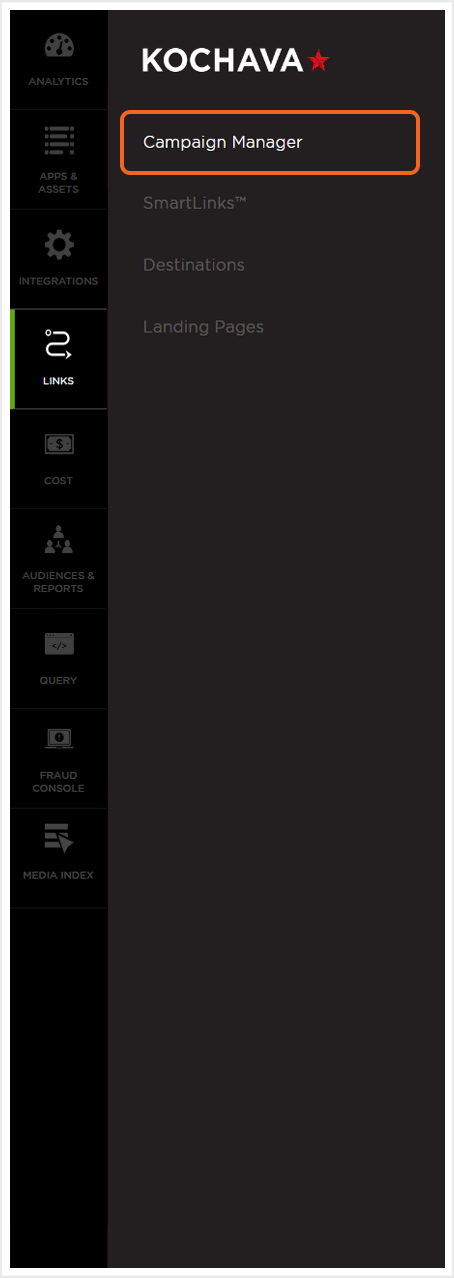
- Log in to Kochava.
- Select the desired Account and App.
- Select Links > Campaign Manager.
- Click Add a Tracker or Select Segment Tools (⋮) > Add a Tracker.
- Select the Campaign.
- Select the Segment.
- Select Tracker Type > Acquisition. (default setting)
- Select Media Partner > Amazon – SAN.
- Select Agency Partner. (optional)
- Select Default Tracker:
- On
- Off (default)
- Enter the Destination URL.
- Enter a Deep Link. (optional)
- Enter any Custom Parameter(s). (optional)
- Click Save. (If no further trackers need to be created)
- Click Save & Add Another Tracker. (If additional trackers need to be created)
- Click Save & Create Postback (to navigate directly to the Partner Configuration page).
NOTE: In order to streamline the Campaign/Segment/Tracker creation process a feature has been added to allow the creation of campaigns and segments while creating a new tracker. For more information about creating a campaign or segment while adding a new tracker, refer to our Create an Install Campaign support document.
![]()
![]()
NOTE: When a Tracker is created, Kochava automatically generates a name for the Tracker. We recommend that you replace the Tracker name at this point with a clear name of your choosing.
NOTE: Selecting On will allow SAN network traffic to funnel to the default tracker when no tracker ID is present. If a default tracker is not set up and the tracker ID is not appended to the partner campaign name, that data will be bucketed in the most recently set up tracker for that network.
NOTE: The Destination URL is not relevant and should simply be your website.
![]()
![]()
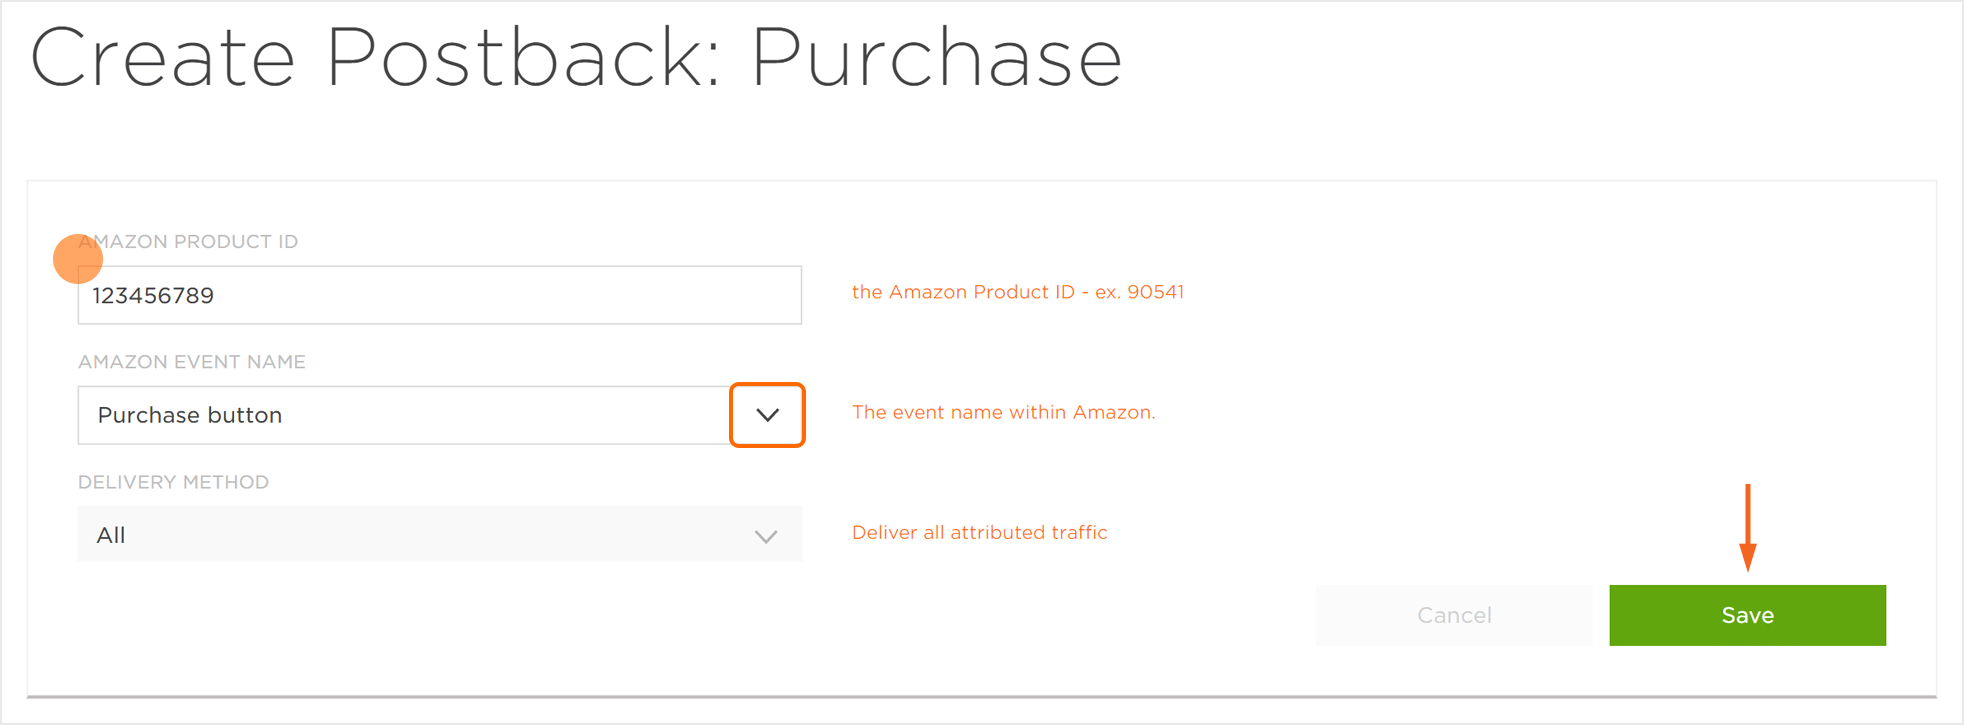
Install Postback Configuration:
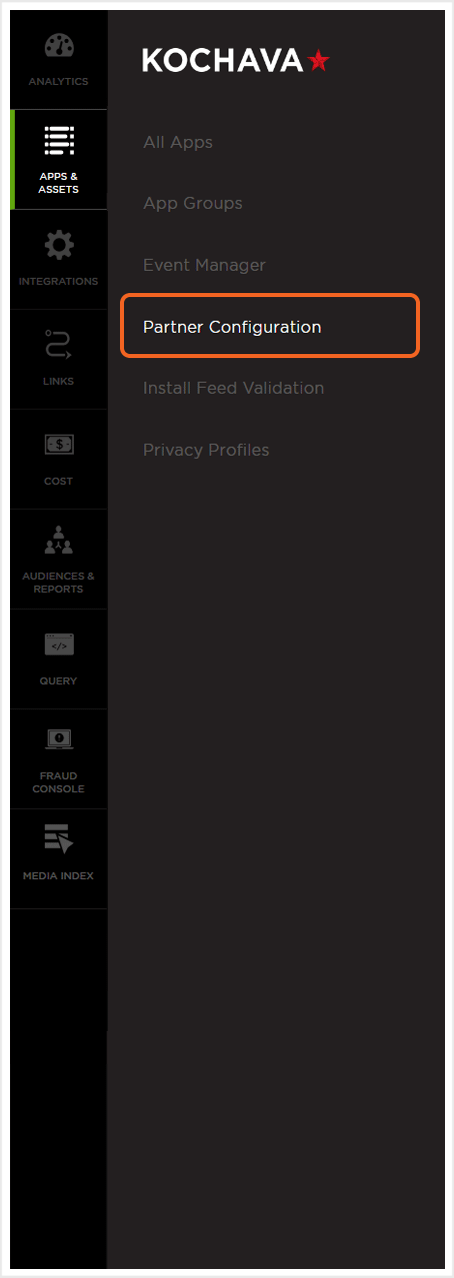
- Select Apps & Assets > Partner Configuration.
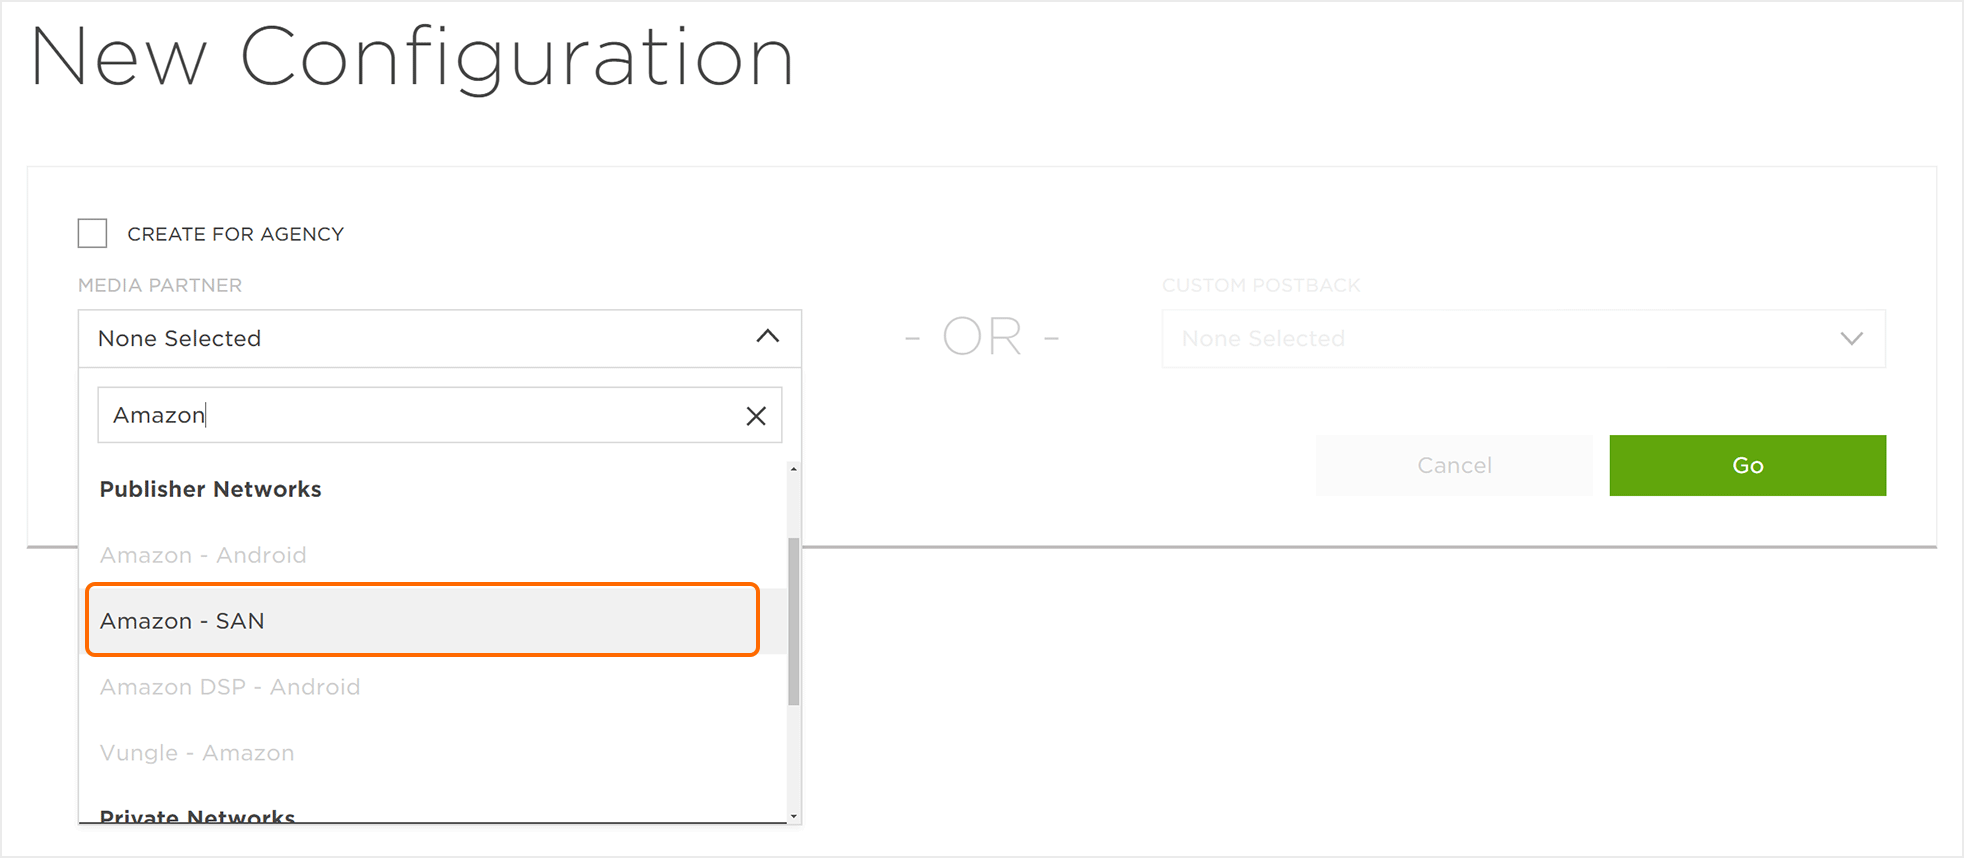
- Click Add a Configuration.
- Select Media Partner > Amazon – SAN.
- Click Go.
- Select Install > Postback Tools (⋮) > Edit.
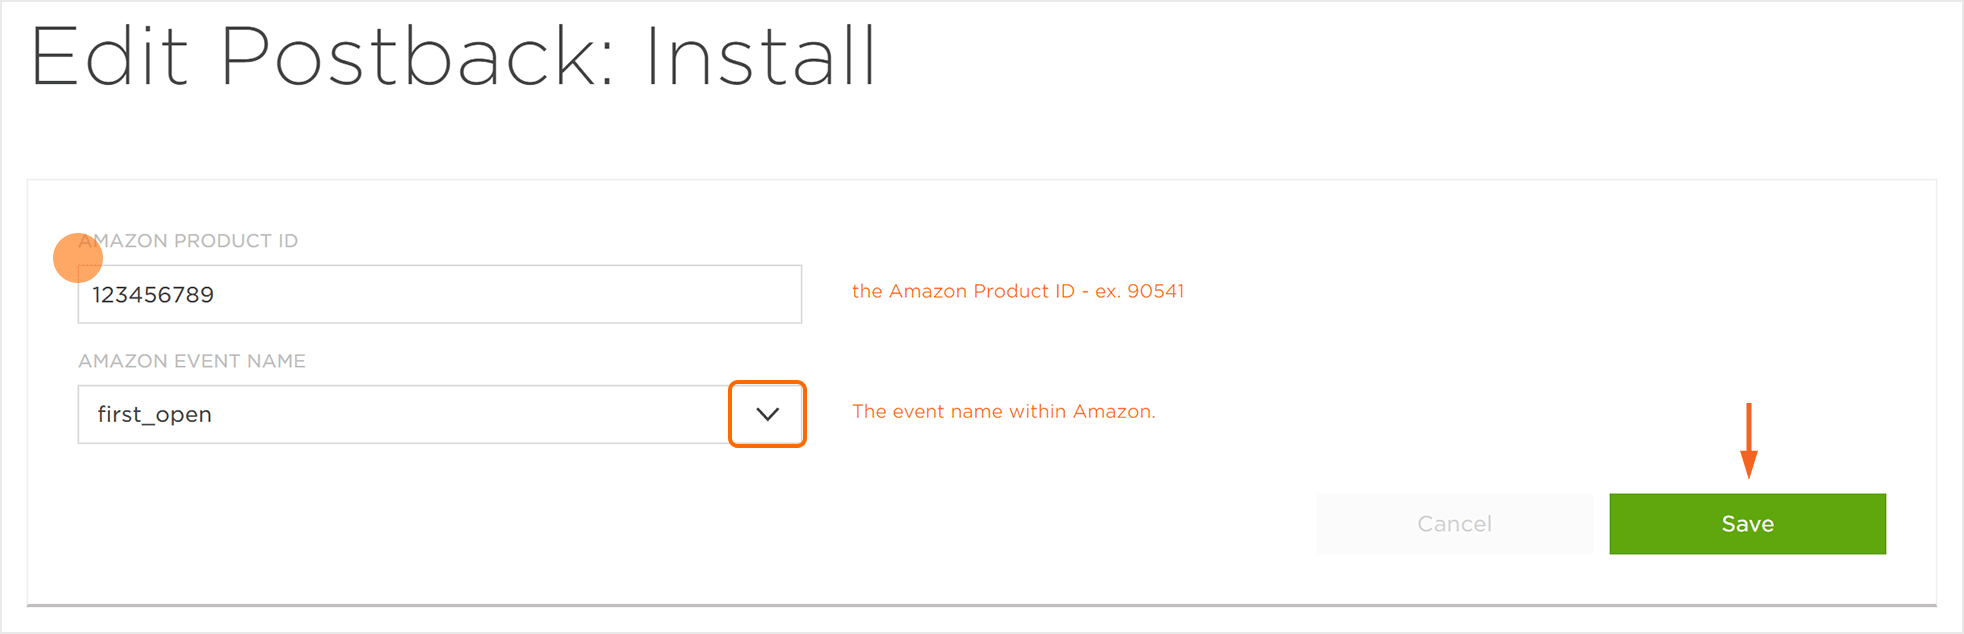
- Enter the Amazon Product ID.
- Select the Amazon Event Name.
- Click Save.
Create a Reengagement Tracker:
- Click Add a Tracker or Select Segment Tools (⋮) > Add a Tracker.
- Select the Campaign.
- Select the Segment.
- Enter a Tracker Name.
- Select Tracker Type > Reengagement.
- Select Media Partner > Amazon – SAN.
- Select an Agency Partner. (optional)
- Select the Amazon Event that will map to the selected Kochava event.
- Add Reengagement Event.
- Click Save (If no further trackers need to be created).
- Click Save & Add Another Tracker (If additional events need to be created).
- Click Save & Create Postback (to navigate directly to the Partner Configuration page).
NOTE: A Reengagement event can be added by clicking on the “+” and removed by clicking “X“.
![]()
![]()
Reengagement Postback Configuration:
- Select Apps & Assets > Partner Configuration.
- Select Amazon – SAN > Network Tools (⋮) > Postbacks.
- Locate the desired event and Click Create for a new configuration or Edit for an existing configuration.
- Enter the Amazon Product ID.
- Select the desired Amazon Event Name.
- Click Save.
Standard Post-Install Event List:
- Marketing landing page
- Subscription page
- Sign up page
- Application
- Game load
- Widget load
- Survey start
- Survey finish
- Banner interaction
- Widget interaction
- Game interaction
- Email load
- Email interaction
- Submit button
- Purchase button
- Click on redirect
- Drop down selection
- Sign up button
- Subscription button
- Success page
- Thank you page
- Registration form
- Registration confirm page
- Store locator page
- Brand store engagement 1 thru 7
- Product purchased
- Homepage visit
- Video started
- Video completed
- Message sent
- Referral
- Accept
- Decline
- Other
- PageView
- Search
- Contact
- Schedule
- Third Party
Example — Successful Attribution Response:
{
  "ad_name": "777835295469351497-AMZN US Fire TV Inline Home",
  "ad_size": "1200x102",
  "app_id": "ad777a07b44840eee7984e9994b8adad",
  "campaign_name": "777942549829950444-Sling FTV Rotational Q1 Campaign - AMZN US Fire TV Inline Home - News",
  "creative_id": "777579093742755999",
  "device_id": "---",
  "device_id_type": "adid",
  "event_id": "---",
  "fire_adid": "---",
  "site_id": "77799247d0c04edea1baaa73fbd52fff-FireTV Service",
  "site_name": "77799247d0c04edea1baaa73fbd52fff-FireTV Service",
  "source_name": "MOBILEAPP_AMAZON_FIRE_TV",
  "timestamp": "2022-05-01T03:58:45Z",
  "unix_date": 1651377525000,
}